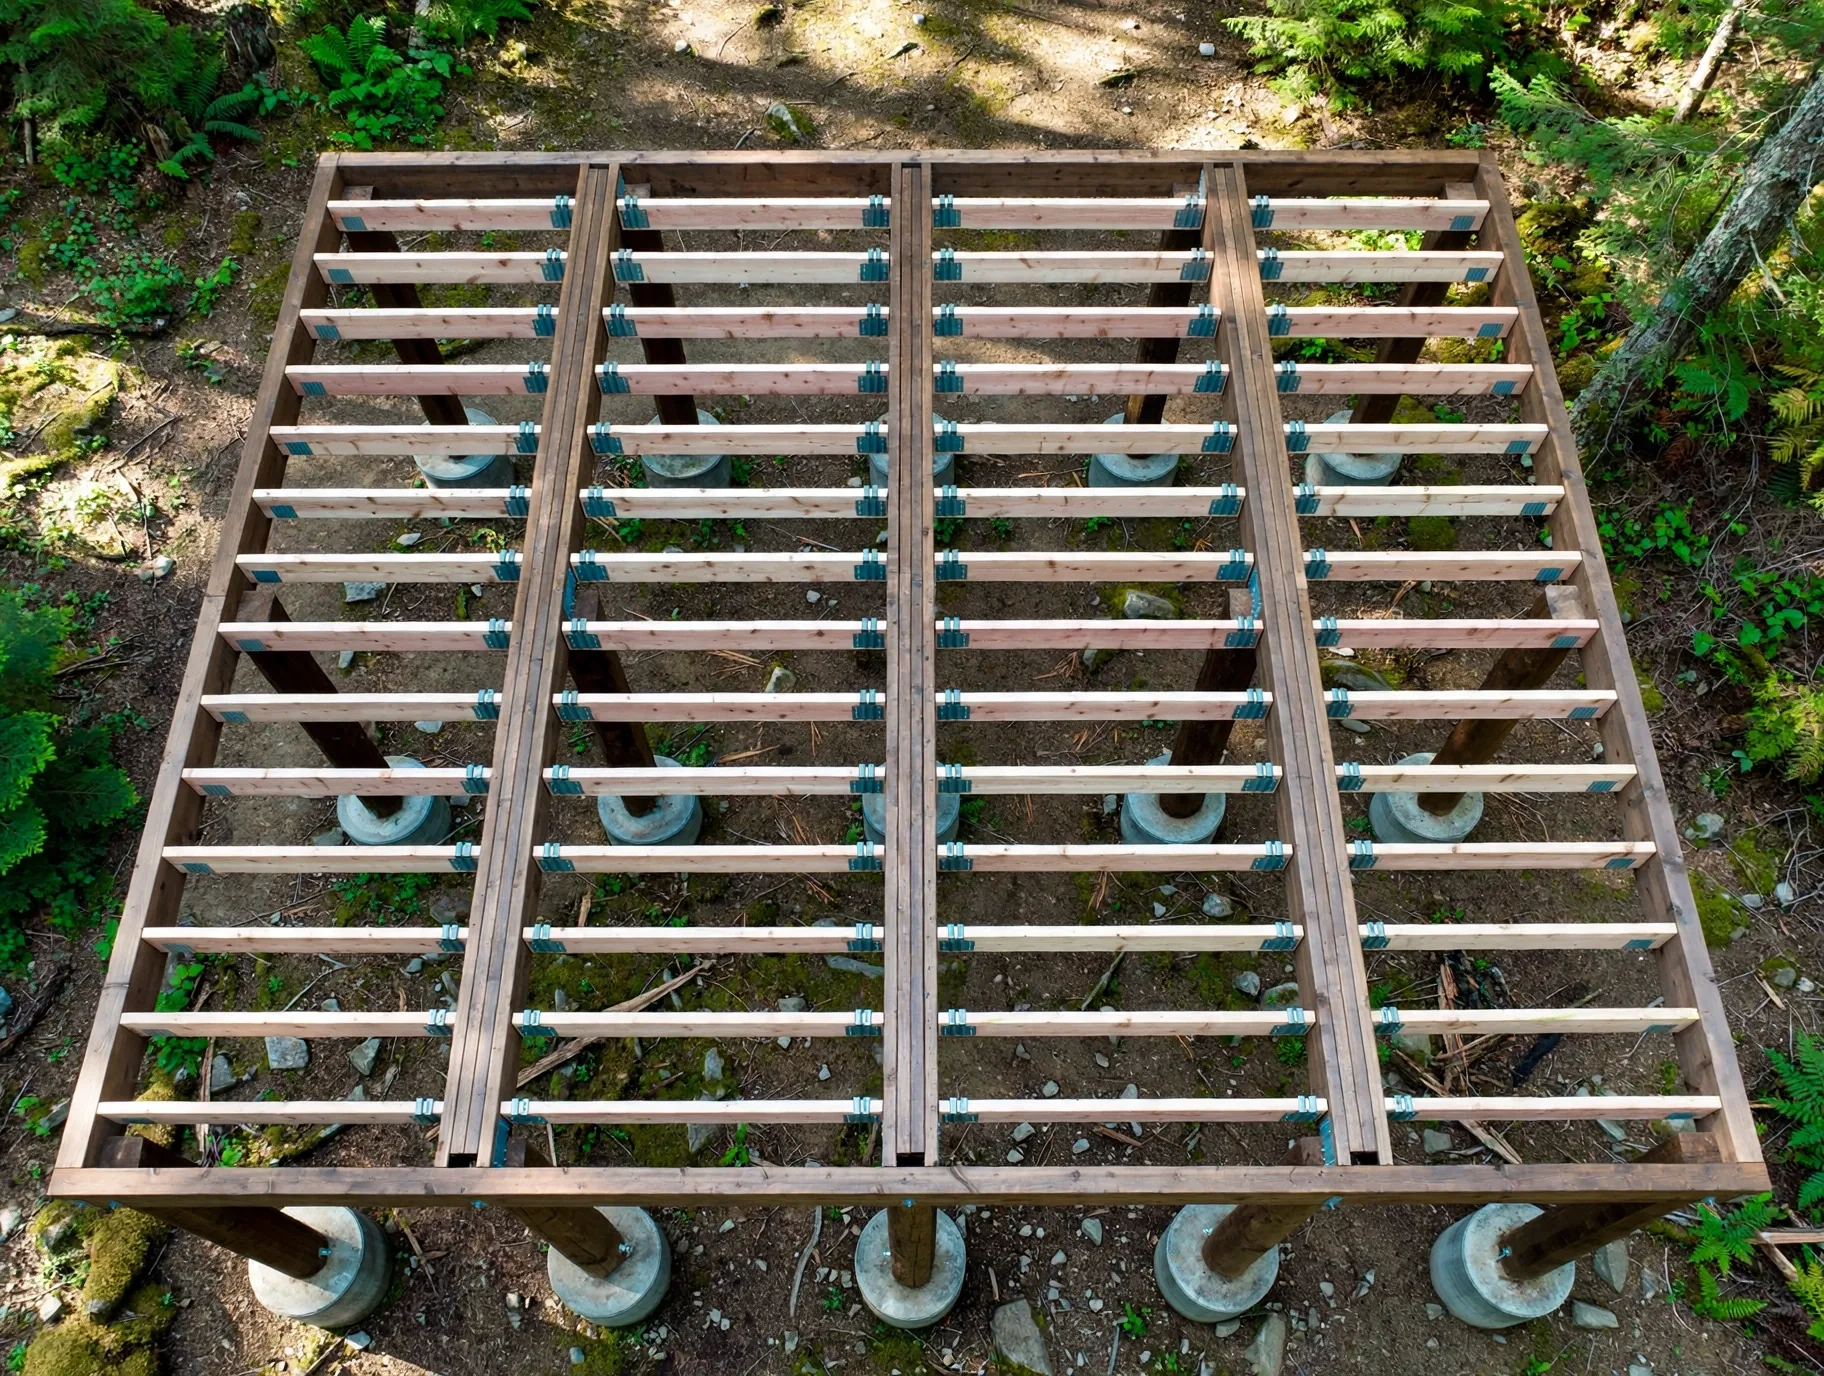
A tent platform turns a good site into a permanent camp. It gives a canvas or wall tent a level, dry floor, so the tent can pitch in the same place season after season.
Most guides to building one leave the hard part to you. They name no lumber size and count nothing. They let you discover at the yard that a platform is a structure, with footings, spans, and loads that somebody has to size. This guide sizes it.
It builds one platform end to end. The worked build is a 12 × 16 ft platform for a 10 × 12 ft wall tent.
Every dimension is stated, and every span is checked against the residential deck tables the building code points to. The worst loaded footing is checked too, as are the connectors and concrete against their manufacturers’ own documents. A materials list lets you shop for the build, and short conversion formulas then rescale the same build to your tent.
The guide shows its ground. Where a code or a manufacturer’s document governs a point, the guide follows the document and names it in the sources. Where the documents are silent and the field has settled a practice, the guide follows the practice and calls it field consensus where it matters.
Use the guide in order. Step 1 settles the design, the foundation, and the stove position, while Step 2 gives the materials list and the conversion formulas for resizing the build. Then follow Steps 3 to 10 in sequence, because each stage uses the layout, counts, or checks left by the stage before it.
Do you need a platform at all?
A platform gives a tent a level, dry, durable pitch surface. That is the whole of its promise.
It does not insulate: cold air under a raised deck reaches the tent floor much as cold ground does. A platform tent in winter wants the same floor insulation as a ground pitch.
It does not waterproof anything: a tent that leaks from above leaks onto a platform exactly as it leaks onto grass. The deck only keeps ground water and splash off the floor.
On a flat, drained site that you visit a few nights a year, a platform is an expense answering a question the site never asked.
Where it earns its cost is a sloped, wet, or rough site you return to. It also suits a heavy canvas or wall tent that wants a fixed home, with a door that opens onto a porch instead of a mud step.
Read the rest of this guide as the build for that case. Read the portable section near the end as the answer for land you do not hold permanently.
We independently evaluate everything we recommend. We may earn a commission when you buy through links on this page. Commissions do not change what this guide teaches, and brands cannot pay to be named in it.
Step 1 – Design the platform
Start with the site. Look for privacy and natural protection from wind and falling limbs, and choose ground that drains.
A spot that sheds water beats a spot that collects it. No platform fixes a site that floods. Stay clear of rockfall, landslide, and flash flood ground entirely.
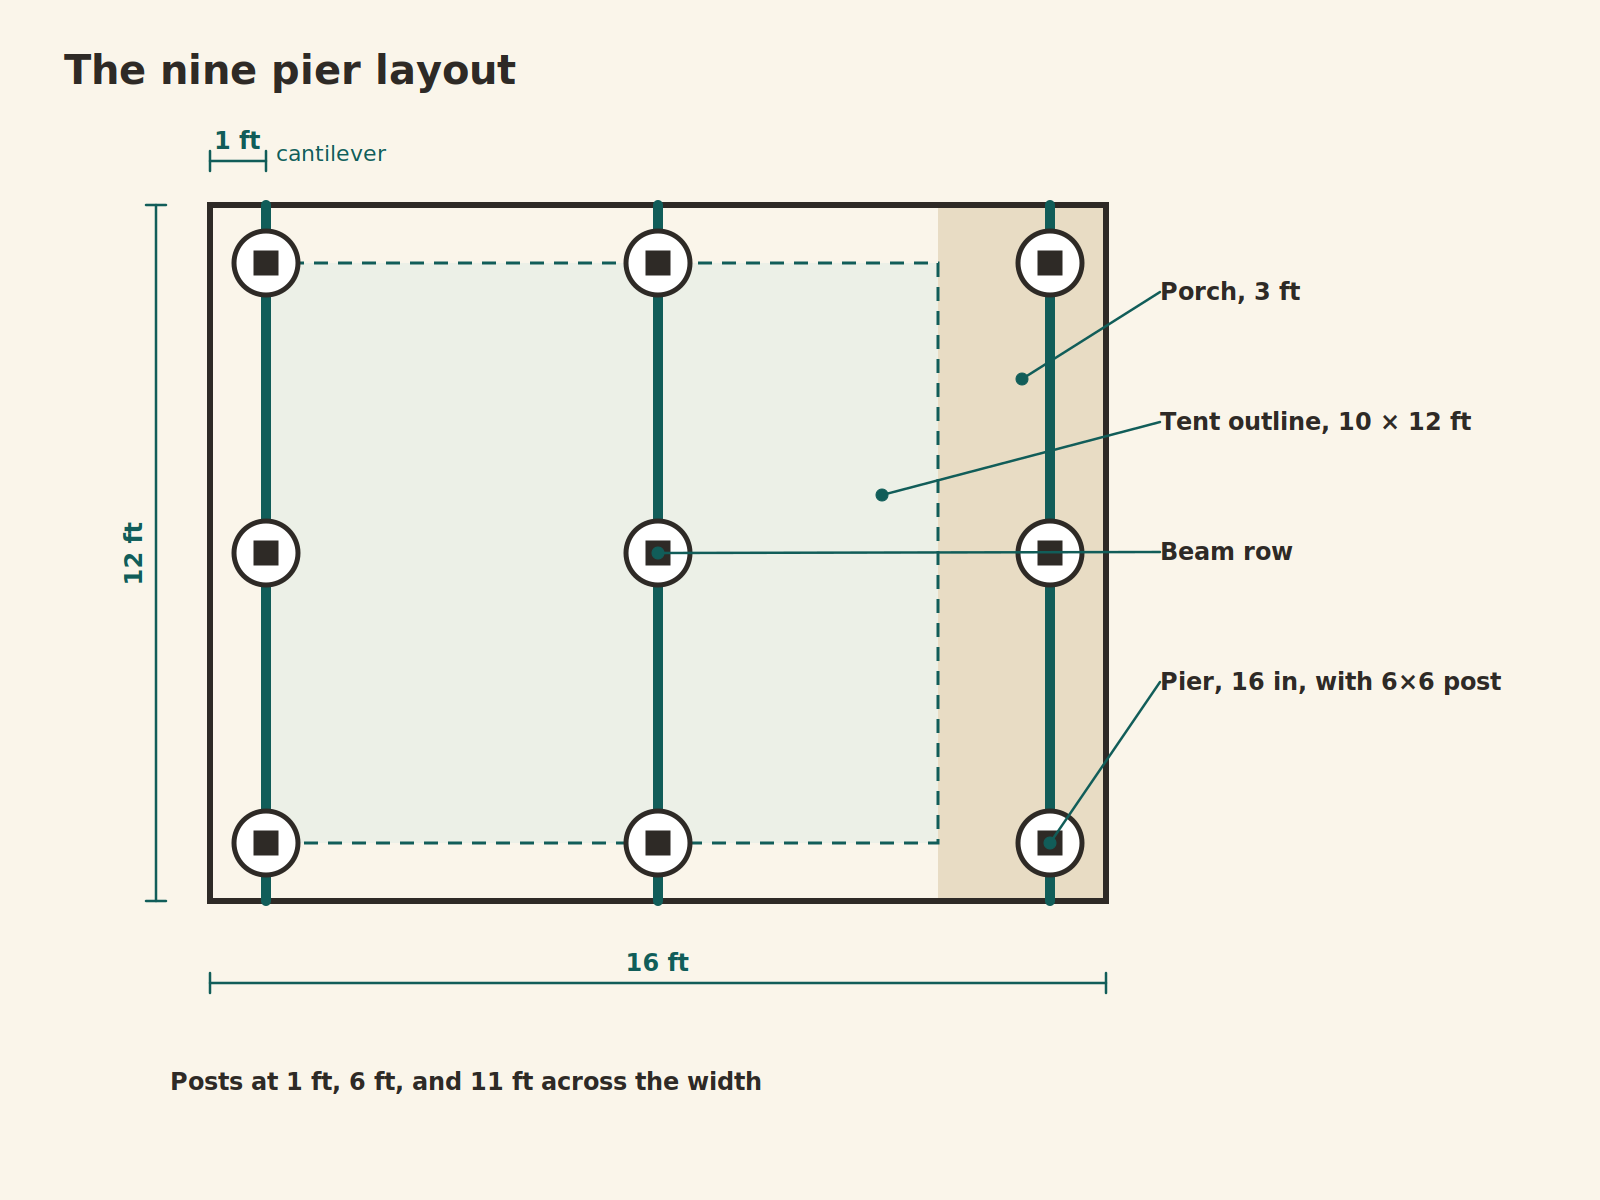
Size the platform from the tent, not from the lumber rack, using the field’s working doctrine. Allow 1 ft of deck beyond the tent on both sides and at the back. Allow 3 ft at the front, where the door opens and the stove work happens.
A 10 × 12 ft wall tent therefore takes a 12 × 16 ft platform. That gives 192 sq ft of deck, with a real porch at the door end.
Build it as a rectangle. The tents it serves pitch over rectangular footprints. Any other shape wastes deck at the corners and complicates every cut that follows.
Decide the height as a decision, not a default. Height buys drainage and airflow under the tent floor, but it costs steps up, creates a harder edge to fall from, and eventually raises a permit question.
The working rule is simple: use the lowest height that clears your site’s water and slope.
On this build, the posts run up to about 2.5 ft. Roughly 16 in of beams, joists, and decking sit above them. Do not infer a low finished height from the post figure alone. The next passage gives the permit test and this build’s position under it.
This guide teaches the build as specified, on ground where its posts stay short. Where falling ground leaves the posts standing tall, two things change together: the frame needs permanent lateral bracing this guide does not design, and the deck’s downhill edge can stand well over 30 in above the ground below. At that height, edge treatment and fall protection become questions for the site and local rules, outside the build this guide teaches. Treat that ground as a different structure problem, either engineered work or a question for the local building office and a professional before anything is built.
Codes, permits, frost, and load
Check your local building office before you dig anything; it is the authority that decides. This guide’s figures are the model code’s, stated so you can have the conversation with the test in hand.
A tent platform may legally count as a structure. Under the model code, a deck needs no permit only when all four conditions hold at once:
- 200 sq ft or less in area.
- Not more than 30 in above grade at any point.
- Not attached to a dwelling.
- Not serving a required exit door.
The worked build covers 192 sq ft. That size comes from the tent, its margins and porch, and from a frame large enough to carry the full structural lesson at a moderate lumber bill.
Its posts run up to about 2.5 ft. The doubled beams, joists, and decking add roughly 16 in above them. On ground that falls away, the finished deck can therefore stand well over 30 in above grade.
This build does not claim the exemption. The local office’s reading decides, which is why the check comes first.
Local amendments can tighten or remove the exemption. A permit exemption never exempts the work from the code’s other provisions. It also does not remove zoning, setback, or land use rules, or the terms of a lease.
If the platform will host paying guests, treat it as possible commercial work and ask the office directly, because that path runs under different rules.
Operators also ask two longer term questions. What do seasons of repeated pitching and striking do to a deck? What does a permanent platform do to the ground under it over years? Those are service life and site questions for the operator’s own maintenance and site planning. This guide flags them rather than answering them, and the build below is specified for a landowner’s tent.
For the permanent form this guide builds, your local frost depth is the design figure. The piers go down to it, and their bases rest on gravel at that depth. That depth is the bottom of the ground seasonal freezing can grip and lift.
One floor applies whatever the frost depth. A footing never sits shallower than 12 in below undisturbed ground.
Many code editions except free standing accessory structures and decks not supported by a dwelling from the frost requirement. Your local adoption decides whether that relief reaches your platform.
The warning underneath the paperwork stands either way. Frost heave needs no code violation to ruin a platform. Shallow supports in frost susceptible soil lift unevenly, do not settle back to level, and leave the deck out of level for good.
Build for the full load: the platform itself, the tent, its occupants, their gear, and snow where snow is part of your winters.
Where your ground snow load exceeds the ordinary live load figure, the greater of the two governs. Step 8 states what to do with that rather than trust a margin.
The footing decision
Three foundation forms serve this build, and choosing among them is a design decision with conditions, not a matter of taste.
Poured concrete piers are the form this guide builds. They are the permanent answer, with the most digging and the most concrete. Built to their own specification, they are the only foundation here that does not move with the seasons.
Packed posts are short posts set in holes. Dirt or gravel is packed around them rather than concrete. Makers use this form as their standard for semi-permanent tent sites.
Its logic is real: gravel drains at the post instead of ponding against it, no concrete collar gives frost a grip, and the structure repairs post by post.
The cost is also clear: the foundation rests on the soil’s own bearing and friction, with no manufactured connection at its base.
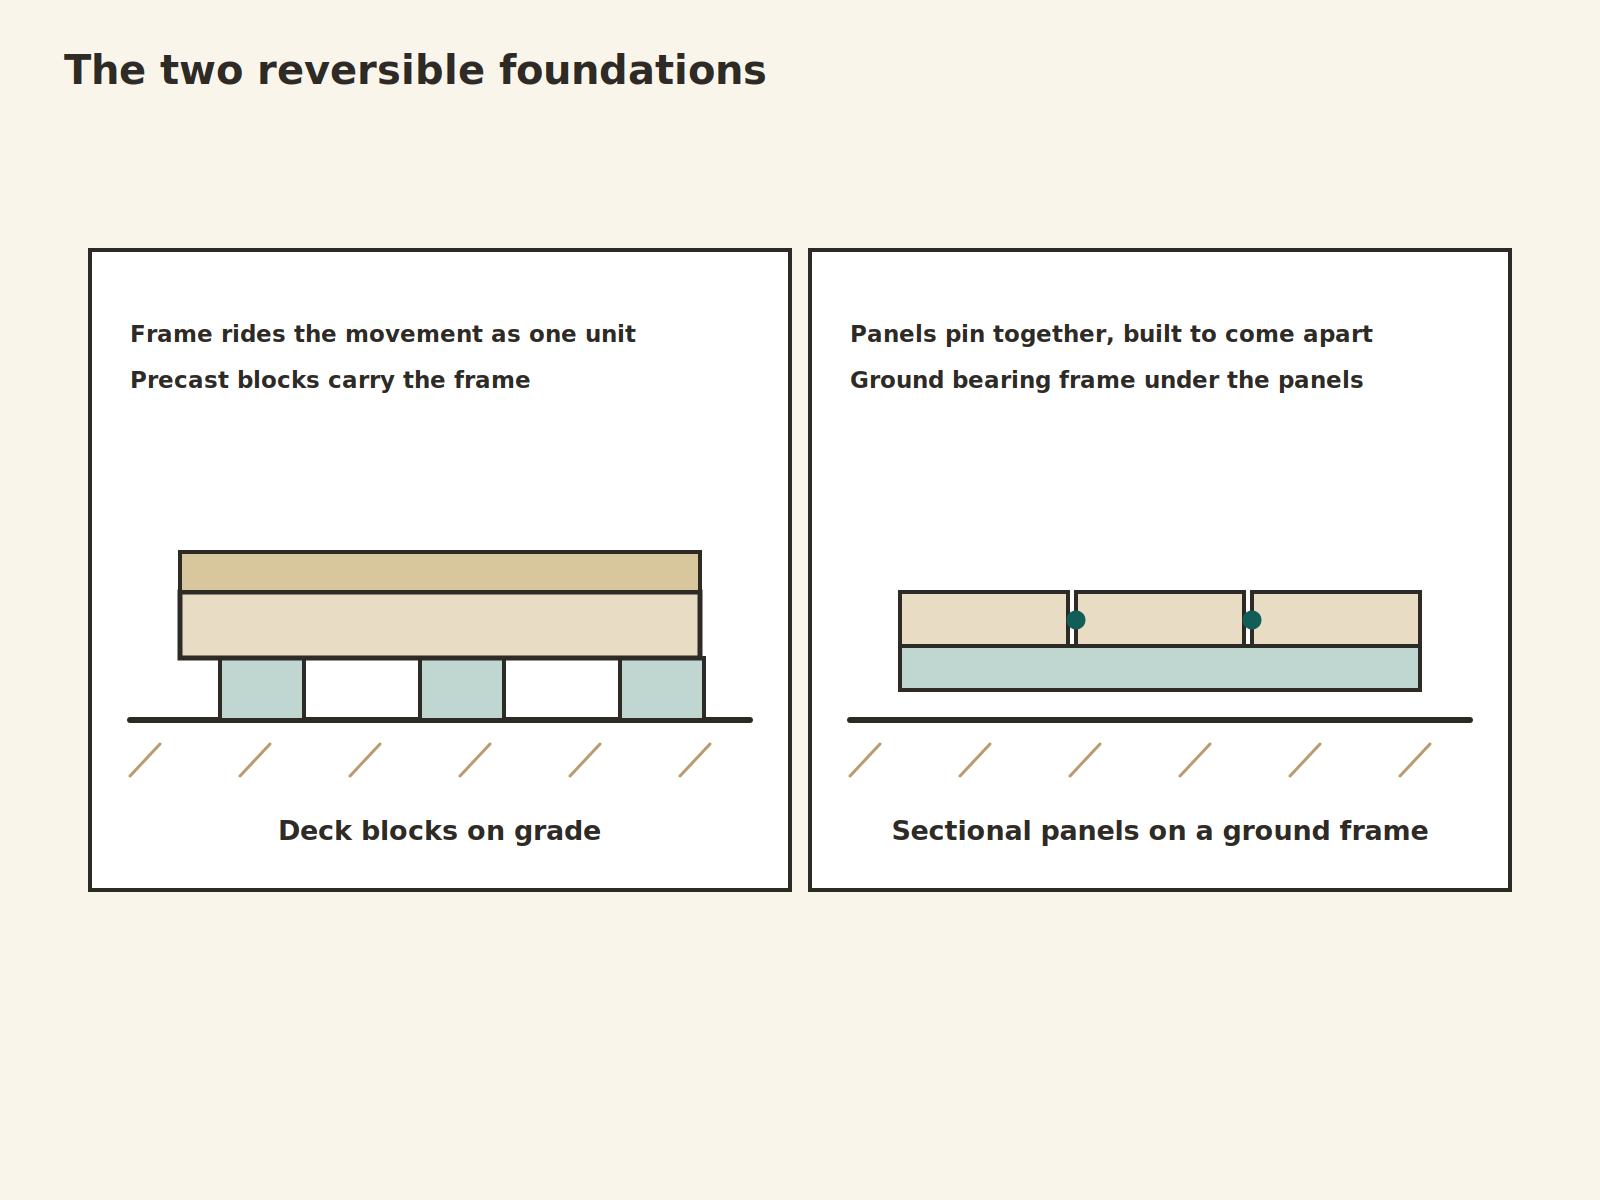
Deck blocks and floating forms use precast blocks on grade. They carry an unanchored frame. They are the fastest form and the only genuinely reversible one.
The deck rides seasonal movement as one unit and relevels with a jack and shims. Its failure mode is one block settling or washing out on soft ground and taking its corner out of level, which is maintenance rather than a failure.
Blocks offer no uplift resistance worth the name under an empty platform and a large tent in wind.
Choose using three inputs:
- How permanently you hold the land.
- How hard your winters work the ground.
- Whether your soil is firm and drained, or soft and wet.
The steps that follow build the pier form. The block form returns in the portable section.
| Form | How it carries the load | Where it fits |
|---|---|---|
| Poured concrete piers | The pier base rests on 6 in of compacted gravel at the frost depth, and the post stands on a wet set standoff base, clear of the concrete. | The permanent build. The only foundation here that does not move with the seasons. |
| Packed posts | Short posts set in holes with dirt or gravel packed around them rather than concrete, resting on the soil’s own bearing and friction. | Semi-permanent sites, the makers’ standard form. It repairs post by post. |
| Deck blocks | Precast blocks on grade carry an unanchored frame, with no uplift resistance worth the name. | Reversible builds on firm, drained ground. The deck rides seasonal movement as one unit and relevels with a jack and shims. |
| Sectional panels | Deck panels on ground bearing frames that pin or fold together. No structural teaching transfers; the maker’s instructions govern the panel whole. | Land held for a season or for days at a time, at a manufactured price and a manufactured weight. What the premium buys is reversibility. |
| Interlocking pallets | HDPE sections snap together without tools and stand 3.9 in tall, each section rated at up to 661.3 lb, the open grid draining and airing under the tent floor. | The lightest raised floor, laid in an afternoon. It asks for ground that is already nearly flat. |
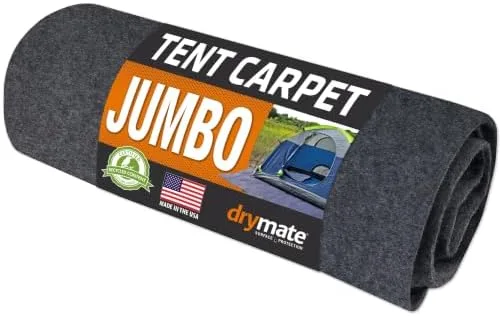
| Ground liner, not a platform | A carpet mat with a waterproof backing, laid at ground level inside the tent or under it. It adds no height and corrects no slope. | Flat, drained ground where the need is moisture, cold, and floor wear rather than level or height. |
A kit deserves one sentence here. Complete platform floors are sold matched to their makers’ tents. The CanvasCamp platform line for its bell tents is the visible example. It is sold direct from its own store.
A kit settles sizing and counting for its own tent, while settling nothing about your site, your foundation on your soil, or your permit.
If your tent runs a wood stove, its position is decided now, not at pitching.
The tent’s stove jack fixes the stove’s place inside the tent. That corner sets which way the tent sits on the deck. Settle the porch and the stove’s corner together at this step, wherever the tent’s own jack puts the stove.
Step 10 returns to the stove on the finished deck.
Step 2 – Gather tools and materials
Gather the tools before the first cut. The build uses an ordinary carpentry set:
- Circular saw – SKIL 15 Amp 7-1/4 Inch Circular Saw.
- Drill driver – DEWALT 20V Max XR Drill Driver.
- Claw hammer – IRWIN 20 oz Steel Claw Hammer.
- Post hole digger – VNIMTI Post Hole Digger.
- Electric post hole digger – XtremepowerUS 1500W Electric Post Hole Digger.
- Shovel – VNIMTI Heavy Duty Gardening Shovel.
- Tamper – BlumeTrec 8 × 8 Inch Steel Tamper.
- Mixing tub – GlobMarble 17 Gallon Heavy-Duty Mixing Tub.
- Wheelbarrow – True Temper Steel Wheelbarrow.
- Margin trowel – MARSHALLTOWN 5 × 2 Inch Margin Trowel.
- Tape measure – CRAFTSMAN 25-Ft Tape Measure.
- Torpedo level – CRAFTSMAN 9 Inch Magnetic Torpedo Level.
- Carpenter pencils – WYOMER Octagonal Red Carpenter Pencils.
- Twine – ACE Supply Bright White Twine String.
- Speed square – Swanson Tool S0101 7 Inch Speed Square.
Three of them carry most of the build, and each is named here once, in the form this guide uses.
The cuts run on a 15 amp circular saw with a 7-1/4 in blade and a laser guide.
The drilling and driving runs on a 20V cordless drill driver kit, its battery and charger in the box.
The nails go in by hand, with a 20 oz steel claw hammer.
Work safely from the first cut:
- Wear eye protection for cutting and for mixing concrete.
- Wear hearing protection for saw work.
- Support every piece on a stable stand before you cut it.
- Keep cords and batteries clear of the cut line.
These rules are stated once here. They govern every step below.
Buy the frame in the treatment class the position demands. Pressure treated is not one material.
Posts, beams, and joists in this build are ground contact rated lumber: in plain terms, the stronger treatment class for members in or near the ground. They are structural, and several cannot be replaced without dismantling the platform.
Decking may be above ground rated material. That is what most yards stock for the purpose.
A yard that hands you above ground boards for the posts has underbuilt this structure. It has underbuilt the one part you cannot later reach.
The span figures in this guide are figured on No. 2 Southern Pine. That is the species and grade the materials list specifies. A different species or grade carries its own span table, and the spans get checked against it before the lumber is bought.
Buy the materials at the lumber yard, not online. The lumber, the concrete, and the connectors are yard purchases, checked for size, grade, and straightness where you can see them. This guide links tools and bought products it can point to exactly; the materials carry no links, because the yard is where their counts and classes get settled.
Materials list
Required is the count the design consumes. It is exact where the design fixes it. It is stated as about where the count rides on the connectors and products you choose.
Buy is the purchase count, with ordinary waste and cull allowance. Cull allowance is extra stock for pieces that are damaged or unusable. The buy column is the list to shop from.
| Item | Specification | Required | Buy |
|---|---|---|---|
| Form tubes | 16 in diameter, 48 in long, cut to depth | 9 | 9 |
| Concrete, 80 lb bags | standard or fast-setting mix, see the note at Step 5 | 70 bags | 72 bags |
| Gravel, 0.5 cu ft bags | footing base, 6 in per hole | 6.3 cu ft | 13 bags |
| Post bases | standoff type, for 6×6, wet set | 9 | 9 |
| Posts | 6×6 ground contact treated, 8 ft | 9 posts, each cut to fit, none over about 2.5 ft on a site close to level | 3 pieces |
| Post caps | for doubled 2×8 beam on 6×6 post | 9 | 9 |
| Beams | 2×8 ground contact treated, No. 2 Southern Pine, 12 ft | 6 | 6 |
| Joists | 2×8 ground contact treated, No. 2 Southern Pine, 16 ft, cut to 15 ft 9 in | 8 | 9 |
| Side joists | 2×8 ground contact treated, No. 2 Southern Pine, 16 ft, full length | 2 | 2 |
| End rim joists | 2×8 ground contact treated, No. 2 Southern Pine, 12 ft, cut to 11 ft 9 in | 2 | 2 |
| Joist hangers | face mount, for 2×8, with specified fasteners | 16 | 16 |
| Hurricane ties | joist to beam, one per crossing | 30 | 30 |
| Connector nails | 10d, split between 1½ in hanger nails and full length shear nails | about 500 | 2 boxes of 5 lb |
| Beam assembly nails | 16d galvanized, for doubling beams | about 60 | 1 box of 1 lb |
| Decking | 2×6 treated, 12 ft | 34 boards | 36 boards |
| Deck screws | 3 in, two per board per joist crossing | 680 | about 700 count |
| Semi-transparent stain | coverage about 250 sq ft per gallon per coat on the worked area of about 230 sq ft (the deck top and the rim faces) | 1 gal per coat | 2 gal |
| Water sealer | if a separate product is used, per its label | 1 gal | 1 gal |
Figure your own platform
The worked build generalizes in the counts below. Together, they replace any figuring rule of thumb.
- Size. Platform size equals tent size plus 1 ft a side and at the back and 3 ft at the front.
- Joist lines. Joist lines equal the platform width in inches divided by 16, plus one. Round up to a whole line. Spread the spacing evenly when the width is not a multiple of 16. The 16 in figure is the center to center spacing. Buy joist stock at the platform’s length, 16 ft on this build, and cut it to fit.
- Deck boards. Deck boards equal the platform length in inches divided by 5.75, rounded up. That count is for 2×6 boards at a quarter inch planning gap. The planning allowance is wider than the setting gap at Step 9, so the count carries its own slack. The boards run across the platform, so buy them at the platform’s width in length, 12 ft on this build.
- Piers and posts. Piers and posts equal beam rows times posts per beam. Set beam rows so joist spans stay under the tabulated figure for the joist size you choose. For Southern Pine 2×8 joists, that figure is 11 ft 10 in. Counting an end cantilever, it is 10 ft 1 in. This build works at 7 ft. Set the posts on each beam by the same rule, against the beam’s own figure: a doubled 2×8 beam spans at most 7 ft 4 in between posts, counting the 1 ft cantilever at each end. This build works at 5 ft. When a length does not divide evenly, round up to the next row or the next post and spread the spans evenly. Beam stock is bought at the platform’s width, 12 ft on this build, two boards to each beam.
Concrete rescales by one conversion formula. Bags of 80 lb mix per 16 in pier equal 0.194 times the pour depth in inches.
A 30 in pour needs about 6 bags a pier, and a 48 in pour needs about 10. The count scales with the square of the pier’s diameter if you change sizes. A different diameter is a bearing decision. The Step 4 footing check sets it, never this count.
Work the conversion formula unrounded, multiply by your pier count, and round the total up.
Platform size calculator
Enter your tent size and your pour depth. The calculator runs the counts and the concrete conversion formula above, on your numbers.
Pour depth is your local frost depth plus the pier’s stand above grade. The worked build pours 40 in.
The calculator covers tents up to 11 ft wide and 13 ft long. A larger tent falls outside this guide’s worked design. It needs the Step 4 footing check run for its size and a frame designed for it.
Platform size: 12 × 16 ft
Joist lines: 10
Deck boards, 2×6: 34
Beam rows: 3
Posts per beam: 3
Piers and posts: 9
Concrete, 80 lb bags: 70 (7.8 bags per pier)
Run the counts on your own tent’s dimensions and you hold the frame, board, pier, and concrete counts for your own build, with their lengths as stated above. That list is the working core of what a plan sells.
The counts carry one condition. They keep this guide’s members and its 16 in piers. They hold while the footing check at Step 4 still passes at your size, with your worst post’s share of the deck under the about 2,094 lb one pier carries on the code’s weakest presumed soil. A larger platform puts more floor on each post, so run that check for your size before you buy. Where it fails, the build needs bigger or more piers and a frame designed for its size, not counts scaled up from this one.
Plans for other sizes and shapes are in fact sold by tent makers and on marketplace sites. This guide names that market without naming a seller. For the size built here, the worked example and its conversion formulas already do a purchased plan’s work.
Step 3 – Lay out and clear the site
Lay out the full rectangle before clearing.
- Stake the rectangle on the ground.
- Run string lines corner to corner.
- Square it by its diagonals. Measure both diagonals. Adjust the stakes until the two readings are equal. Only then trust the corners.
- Mark the nine pier positions on the strings. Beams run across the 12 ft width at 1 ft, 8 ft, and 15 ft along the length. Posts stand on each beam at 1 ft, 6 ft, and 11 ft across the width. That leaves 1 ft of cantilever at every edge.
- Mark each hole’s center with spray paint.
The layout kit is ordinary, and its tools are named once, in the Step 2 list. The diagonals read off a 25 ft tape with fraction markings. The lines themselves run on #18 nylon twine, 250 ft to the roll, and the marks go down with WYOMER Octagonal Red Carpenter Pencils, which survive a site better than a round pencil does.
Checkpoint: both diagonals read equal, and all nine pier centers are marked.
Clear inside the lines. Take out rocks, sticks, roots, and forest debris.
Expect larger roots and buried rock, which may need a bar or a saw rather than gloves.
Spread gravel under the platform area if your ground holds water, because a drained bed under the deck is cheaper than drainage fixed later.
Check as you clear for the roots and buried debris that would shift a form tube in Step 4. Deal with them now, rather than around a poured pier.
Step 4 – Dig the pier holes and set the forms
Call before you dig, wherever the land is.
Dial 811 a few days before you start. Do not leave it until the morning of. Dig once the lines stand marked.
The call is free, the system is national, and it covers rural land exactly as it covers a city lot.
Rural sites carry buried electric drops, water lines, septic lines, and propane lines. Those are the lines a landowner digging nine holes on his own ground is likeliest to meet and least likely to have mapped.
The lines 811 does not mark, the private runs past your own meter among them, are yours to arrange locating for.
The 811 program takes the call for your state.
Dig each hole wide enough to take its 16 in form tube. Leave room to level the tube.
The diameter comes from the ground, not from the post. Start with the worst loaded post, an interior one. It carries about 1,750 lb of deck, tent, people, and gear.
The deck design load is 40 lb per sq ft live and 10 dead. It applies over the post’s 35 sq ft share of the deck. Live load means the tent, its occupants, and their gear, while dead load means the structure itself.
A 16 in pier carries about 2,094 lb on the weakest soil the code presumes. That soil figure is 1,500 lb per sq ft.
The footing check, per pier
Then dig and prepare each hole:
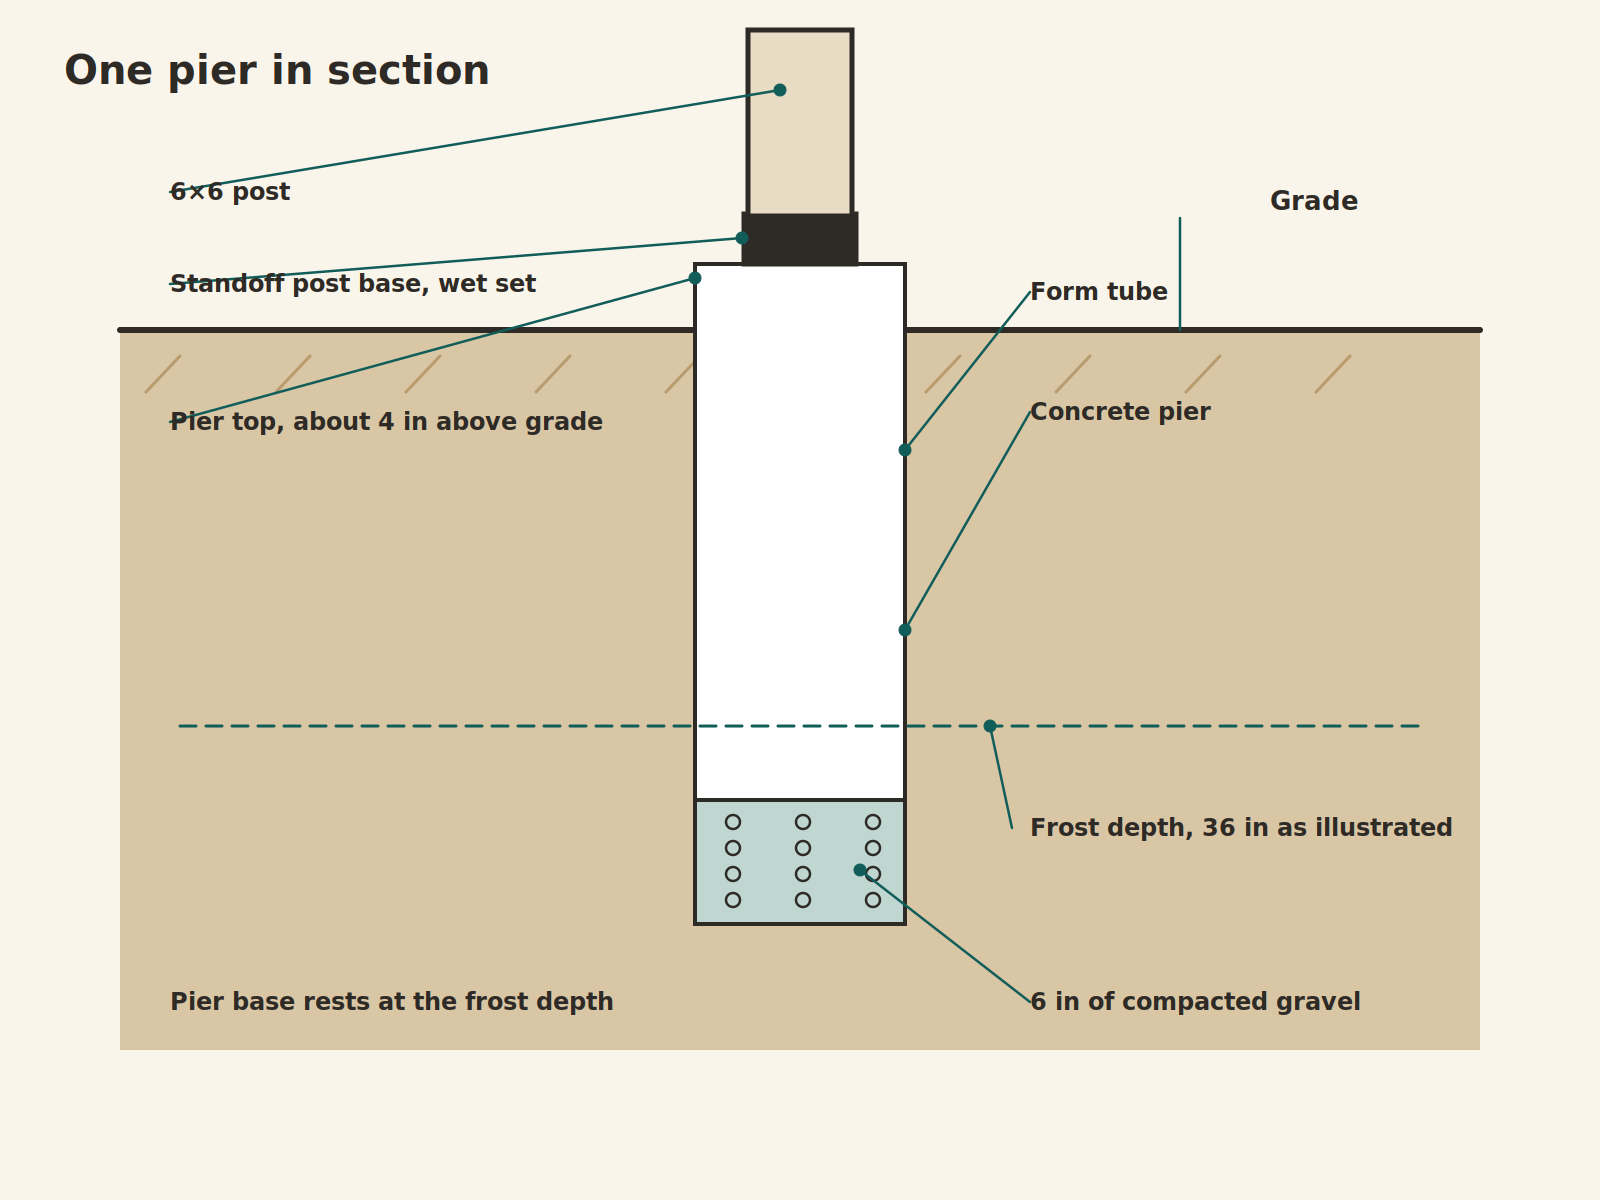
- Dig 6 in deeper than your local frost depth. This build illustrates that depth at 36 in, so the hole runs about 42 in deep.
- Set 6 in of compacted gravel in the bottom. Tamp it. The pier’s base then rests on the gravel at the frost depth itself. The pour runs 40 in from there to its top above grade.
- Keep the spoil back from the hole’s edge.
- Check each hole for roots and debris before its form goes in.
- If you dig with a powered auger, brace for its torque reaction. When the bit catches, that reaction is a recognized wrist and shoulder injury.
The digging tools are named once, in the Step 2 list. Spoil and loose soil move with a long handled shovel with a round blade and a fiberglass handle.
The holes themselves open two ways, and either form digs the same hole. The hand form is a clamshell digger, 58 in long with fiberglass handles, worked hole by hole.
The powered form is an electric auger with a 6 in bit. It loosens the ground fast across nine holes, and the hole still gets finished to its full width by hand. It also asks the torque respect item 5 above states.
The choice between the two forms is effort against cost, not quality. The pier never knows which one dug it.
The tamping in item 2 runs on a hand tamper, an 8 × 8 in steel plate on a 48 in handle.
Set a form tube in each hole. Cut it so the pier’s top will finish about 4 in above the ground.
A pier that finishes at or below grade leaves the post base sitting in the wet zone this design exists to avoid.
Level each tube. A short magnetic torpedo level, 9 in long, rides the tube tops and the form edges for this work. Backfill around the tubes. Tamp the soil so the pour cannot shift it.
Checkpoint: all nine tubes are level, and each pier top is set to finish about 4 in above grade.
Step 5 – Pour the piers and set the post bases
Choose the mix for its cure clock. The two kinds run on different clocks.
Bagged concrete comes in standard ready-mix and fast-setting forms, sold under the QUIKRETE and Sakrete names. The form tubes are the cardboard tubes the field calls by the Sonotube name.
Fast-setting mix buys the earlier start set out in the cure passage below.
One count deserves its warning before you shop. Seventy bags of 80 lb mix is about 1.55 cu yd of placed concrete. That unit is cubic yards.
Past roughly a cubic yard, a short load ready-mix delivery or a rented mixer trailer is the practical route, and it is also the ergonomic one.
The mixing and moving gear is named once, in the Step 2 list. Bagged batches mix in a heavy tub, 17 gallons, sized to take a bag at a time under a hand held mixer. Mixed concrete, spoil, and gravel move in a steel wheelbarrow, 6 cu ft, on a tire that cannot go flat.
Wet concrete is caustic and burns skin on sustained contact.
- Mix and place it in gloves and eye protection.
- Keep wash water at hand.
- Wash any skin the concrete touches straight away.
Repeatedly lifting 80 lb bags invites injury at this count, which is the second reason the delivered load earns its fee on a nine pier build.
Pour each pier, and wet set one standoff post base into each pier while the concrete is fresh, centered on its mark and aligned to the string line.
As each base goes in, work the fresh concrete around it with a margin trowel. The 5 × 2 in blade fits beside the standoff, so the pier top can be finished without pushing the base off its mark.
Wet set simply means setting the base into fresh concrete. The standoff holds the post’s end clear of the concrete and out of standing water.
That is the build’s answer to the commonest way these platforms die, a post rotting at its ground line.
Checkpoint: each pier has one standoff base, centered and aligned before the concrete sets.
Set is not cure
Concrete that has set feels finished. It is not.
Fast-setting mix reaches:
- About 1,000 psi at 24 hours.
- About 2,500 psi at 7 days.
- Its 4,000 psi design strength at 28 days.
Fast-setting mix, strength by age
Psi means pounds per square inch.
Standard mixes gain strength on a slower early curve, reaching roughly 70 percent of design strength at about 7 days when they are kept moist.
Curing is that keeping moist: wet the piers down or cover them through the first week, rather than letting them dry. The practice decides whether the footing reaches the strength its figures promise.
Frame on the clock, not on the feel.
- Fast-setting mix: give the piers a full day before posts go on and light framing begins. Leave heavy work until 7 days.
- Standard mix: give the piers three days before framing. Leave substantial load until 7 days.
Heavy work includes pushing a frame square. It also includes stacking decking loads on the frame.
Do not lever against green footings, which can crack or shift a pier that would have cured sound. No part of this build is in a hurry that justifies it.
The waits are planning figures built on the mixes’ own data. The data sheet for the mix in your tub governs where its numbers differ. Cold weather lengthens every clock in this passage.
Step 6 – Set the posts
Set every post plumb, then brace it.
- Set one 6×6 post into each standoff base.
- Fasten it with the base manufacturer’s specified fasteners.
- Plumb each post as you set it.
- Brace each post plumb.
Posts go into post bases; the beams that arrive in Step 7 bear on top of the posts, and no beam ever fastens into a base.
The frame is not stable until the beams and joists tie it together, and a post standing free can be knocked or blown out of line, or over. Brace each post with a diagonal brace run to a stake in the ground. Leave the braces in place until the beams and joists tie the frame together.
Cut the posts to a line. Build the deck’s drainage into that line.
Run a level string from the back beam row to the front. Mark each post so the finished frame falls gently toward the porch end, about 1 in over the 16 ft length.
Carry each mark around the post with a 7 in speed square. The line then meets itself on the last face, and the cut starts true instead of wandering around the post.
A dead level wood deck of 192 sq ft ponds water. A slight fall sheds it off the porch edge, in the same direction the makers’ crowned decks shed theirs.
On a sloped site the posts simply differ in length, cut one by one to the same string.
Checkpoint: every post is plumb and braced, and every post top follows the falling string.
Step 7 – Set the beams
Build each beam on the ground, then lift it.
- Double each beam before you lift it.
- Nail two 2×8 boards together face to face. Use the 16d galvanized nails in a staggered pattern along both edges. The pair should work as one beam.
Three doubled beams carry this platform. There is one over each row of posts.
Lift each beam with help enough for its weight and length. A doubled 2×8 beam is an awkward, heavy lift onto braced posts. Keep hands on it until the caps hold it. Do not lift a beam alone.
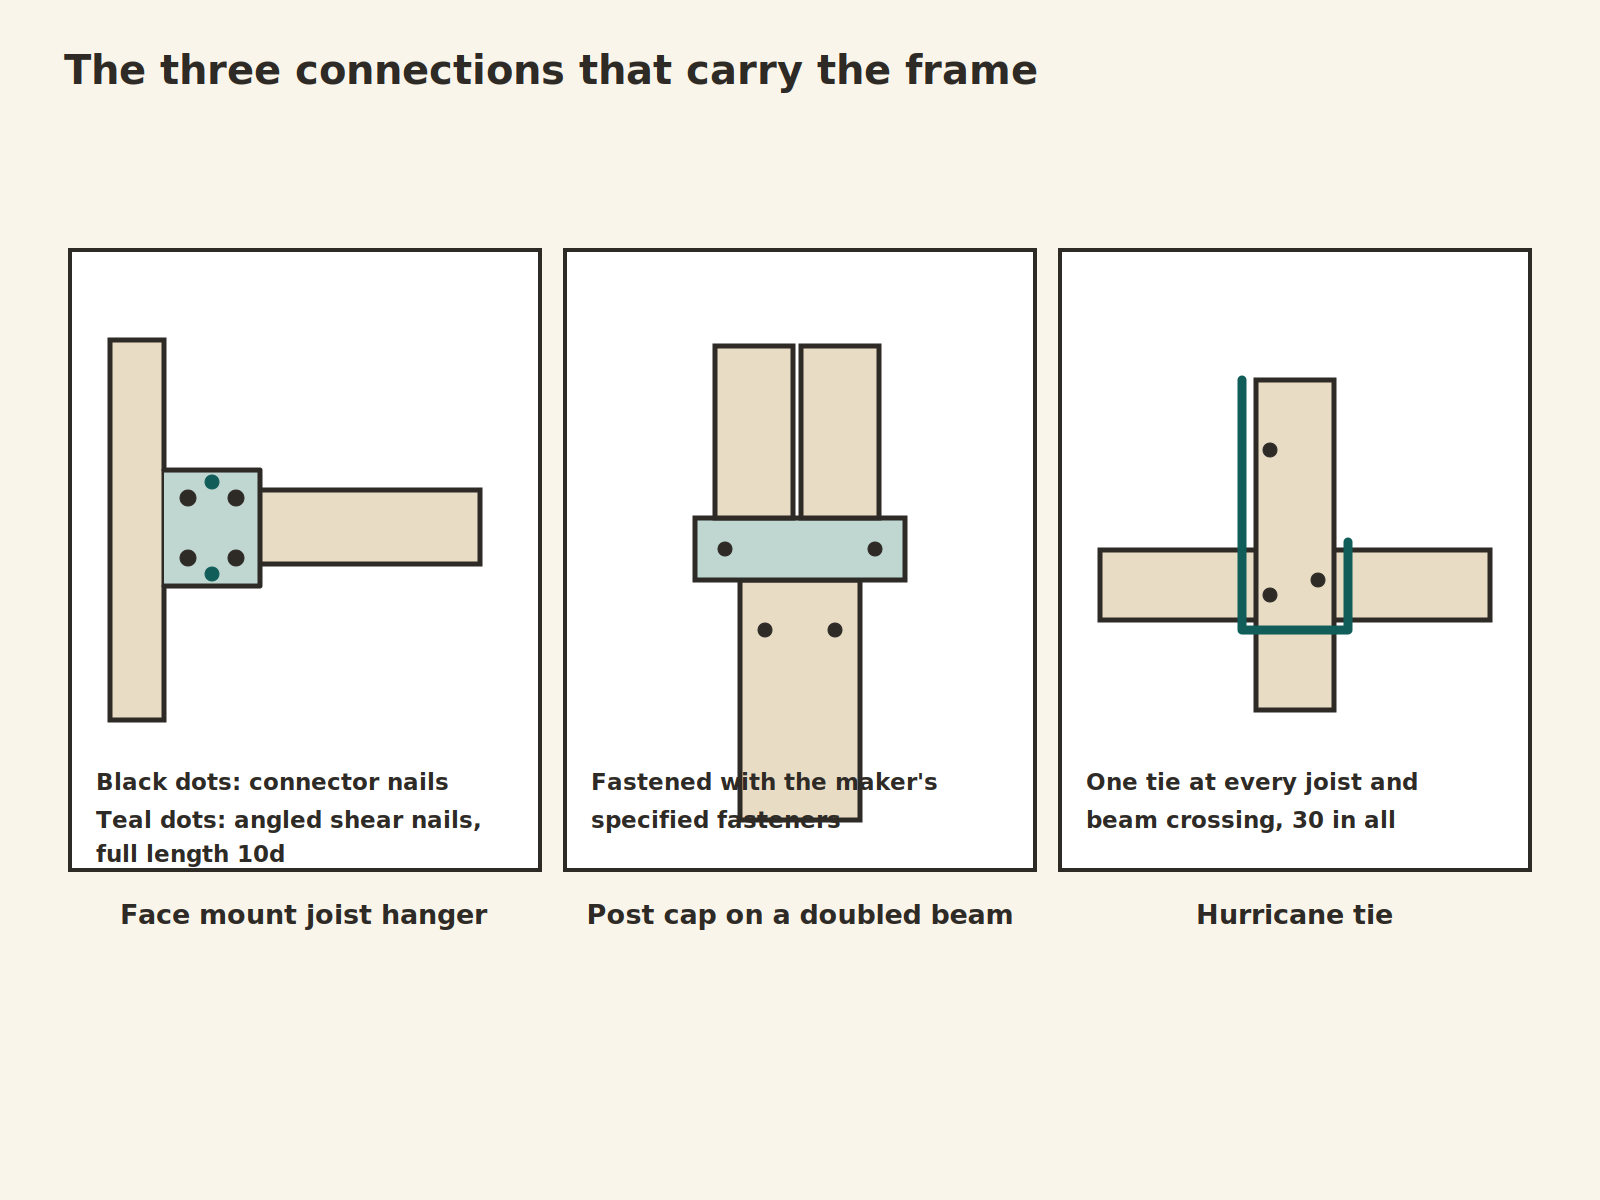
Seat each beam across its posts and fasten it with post caps. The cap is the connector made for a doubled beam bearing on a 6×6 post. Simpson Strong-Tie is the reference maker for the class.
Fasten the caps with the fasteners the cap’s maker specifies, and check the beam against the falling line from Step 6 before the last fasteners go in.
The spans you have just built are modest on purpose: 5 ft between posts against a published maximum of 7 ft 4 in for a doubled 2×8 beam carrying this joist span. That reserve is the build’s answer to snow and to bounce.
Checkpoint: all three beams are seated in their caps, and the fall has been checked before final fastening.
Step 8 – Frame the joists
Frame the outside first, then fill the field.
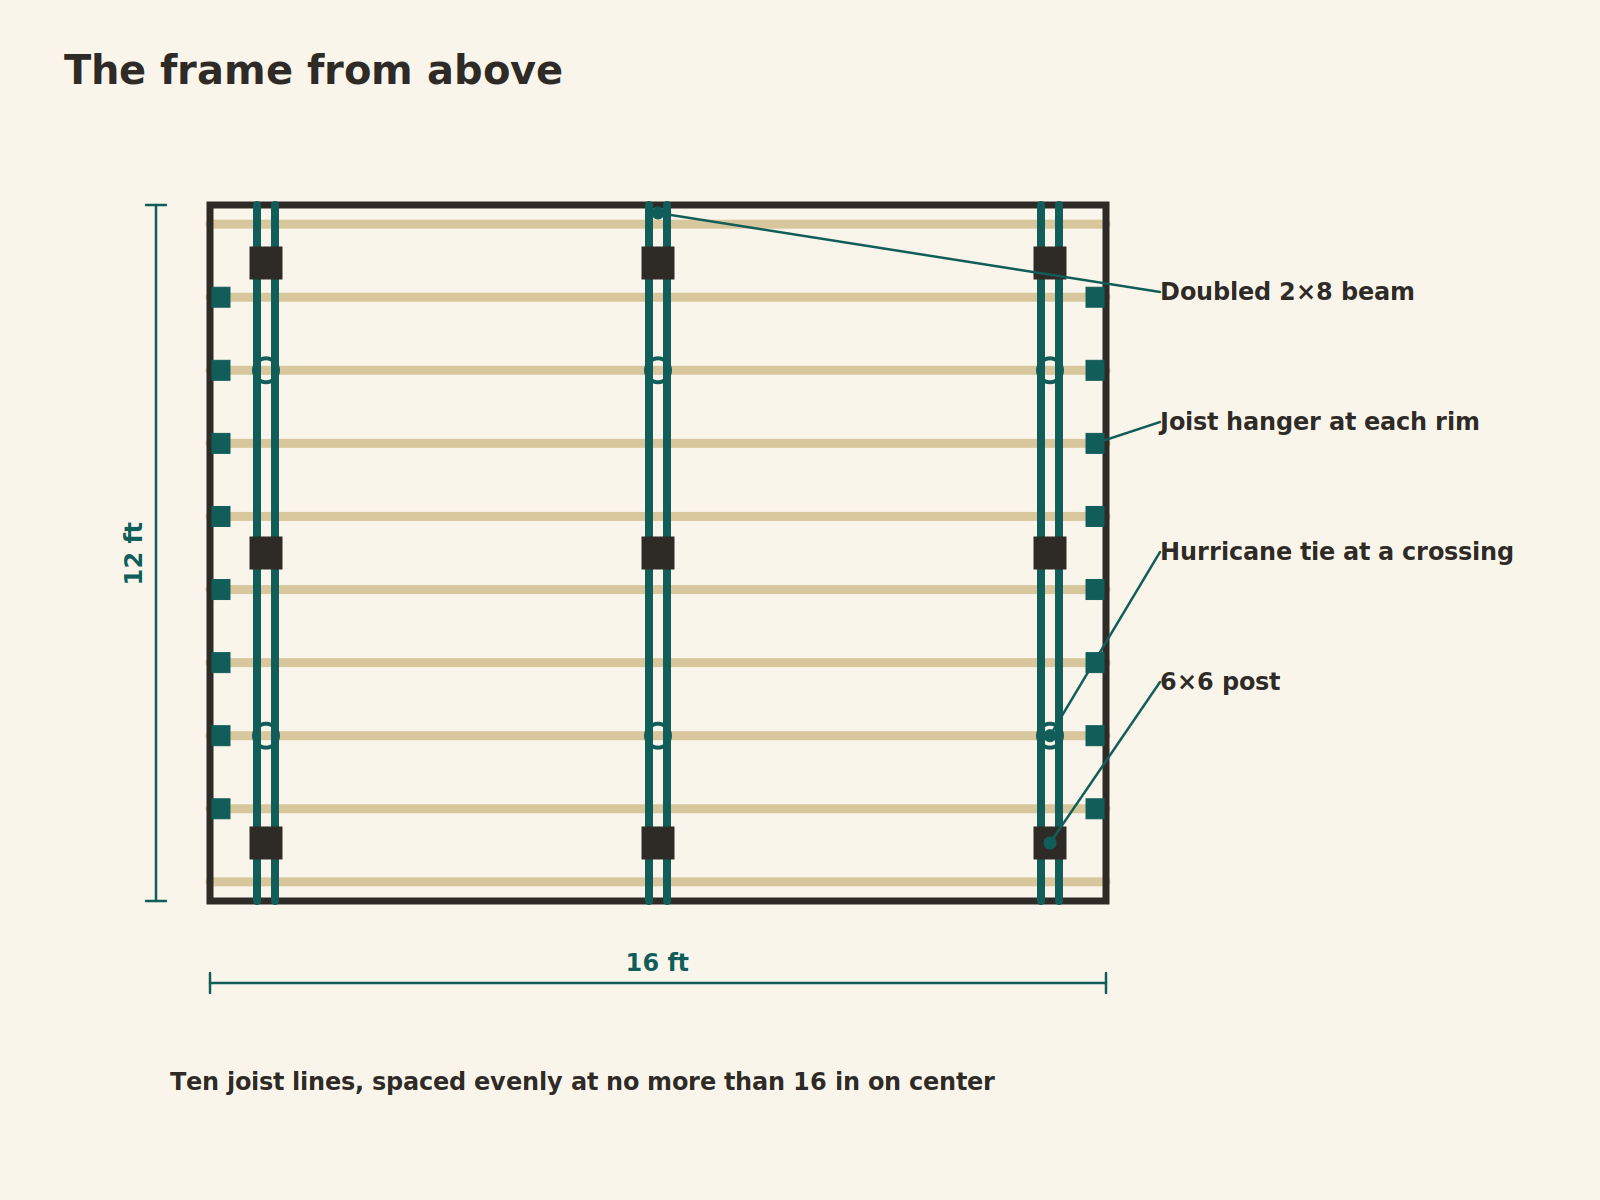
- Run the two side joists the full 16 ft length. Set them on the outside faces of the frame.
- Set the two end rim joists between them, across the width.
- Set the eight inner joists between the rims. They run the length, rest on the three beams, and frame into the end rims on face mount joist hangers. A face mount hanger fastens flat against the rim face. There are 16 hangers in all. The ten lines are spaced evenly, at no more than 16 in on center. On center means center to center.
- Fasten every joist to every beam it crosses. Use a hurricane tie at each crossing. There are 30 crossings in all.
Their span between beams is 7 ft against a tabulated maximum of 11 ft 10 in. Counting the end cantilevers, that maximum is 10 ft 1 in. The margin is deliberate, for the same reason as the beams’.
Span margins in this build
Where your ground snow load exceeds the design live load, take the greater figure seriously here. Widen the piers or add posts along the beams. Rerun the bearing check at Step 4 and the counts at Step 2. Do not trust the margin to absorb a load it was not sized for.
Checkpoint: the frame has ten joist lines, 16 hangers, and a hurricane tie at all 30 crossings.
The hangers carry one instruction this guide will not soften. It is the one fastener rule in the build that decides whether a connection holds its rating.
A joist hanger carries its published load only with the fasteners its manufacturer specifies:
- Connector nails, 10d × 1½ in, in the hanger’s faces.
- Full length 10d nails in its angled shear holes. Those are the diagonal nail holes.
- Or the manufacturer’s own structural connector screws. Simpson Strong-Tie’s Strong-Drive SD line is the common case.
Ordinary deck screws and wood screws never go in a hanger. Their shear behavior differs from a nail’s. The hanger’s rating does not survive the swap.
Inspectors name wrong fasteners and empty nail holes as the commonest hanger defects they find.
Fill every hole the hanger gives you. Use the specified fastener. Do that in every hanger on the frame.
Use the corrosion resistant finish the maker specifies for treated lumber on the frame’s connectors, because treated lumber corrodes unprotected steel.
Step 9 – Lay the decking
Work board by board from the rim line.
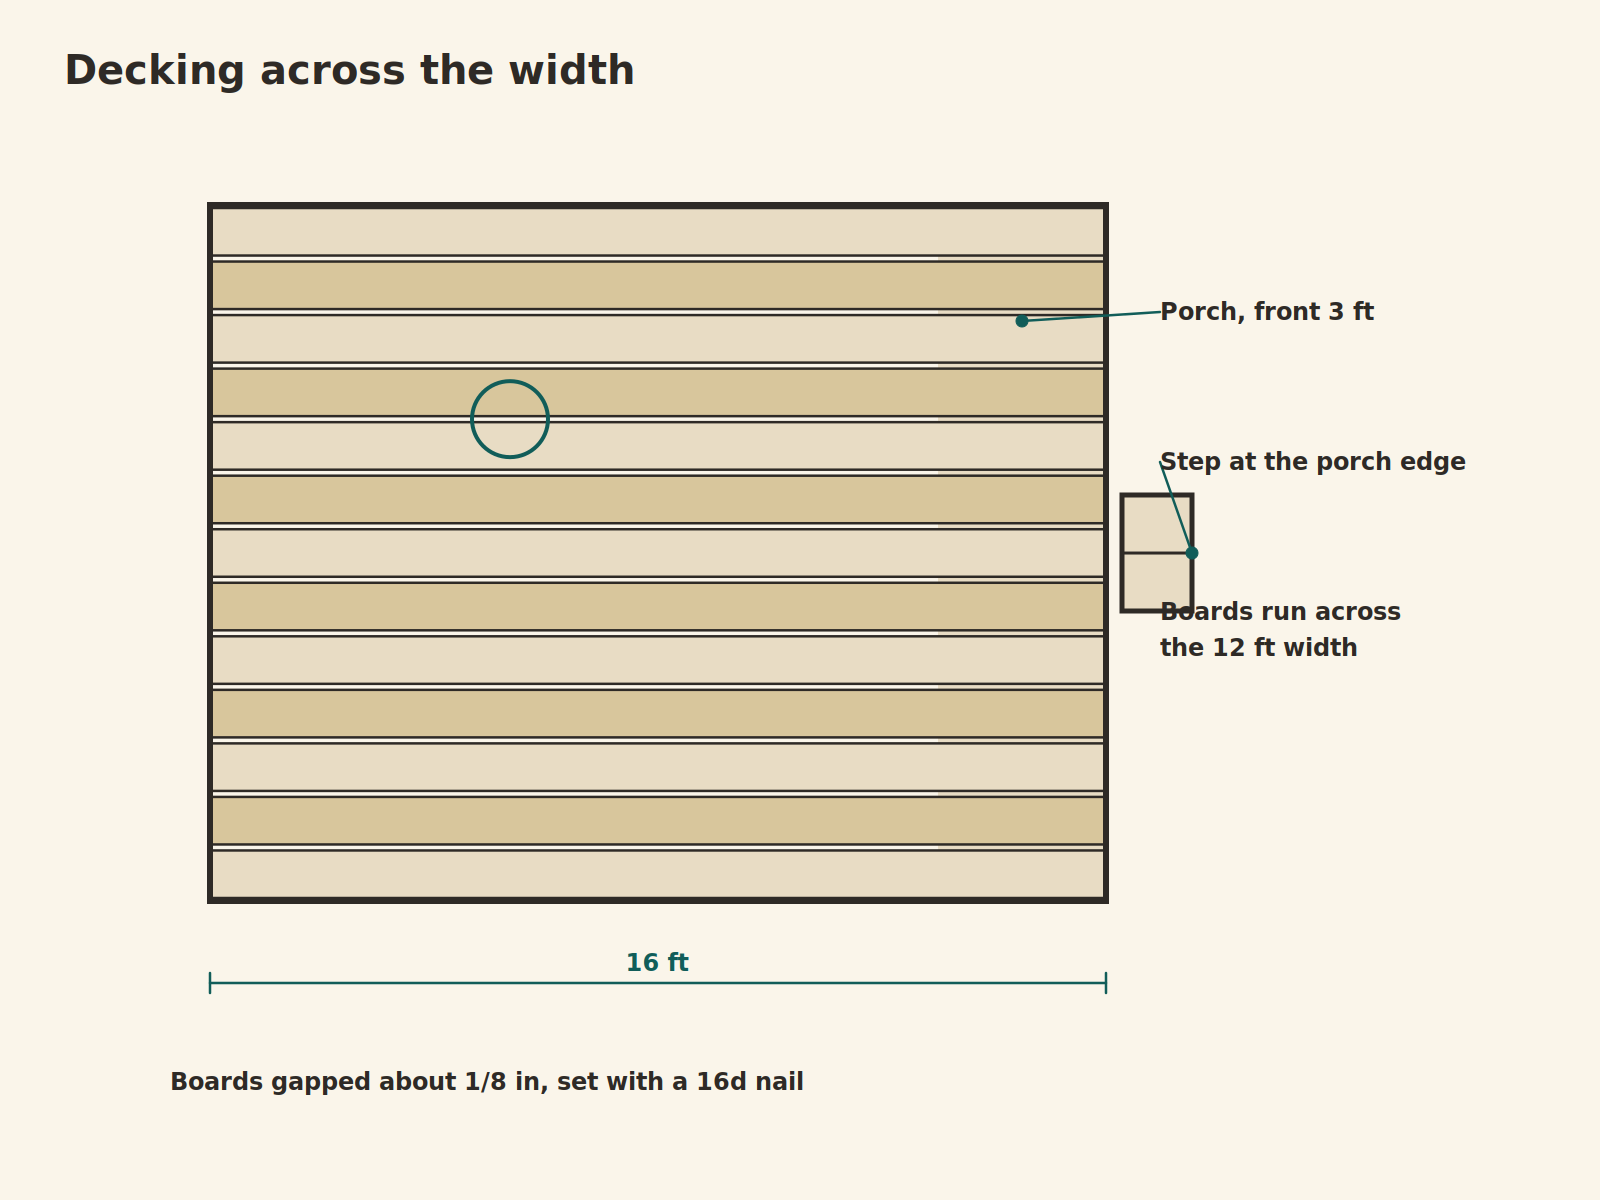
- Lay the 2×6 decking board by board. Each board runs across the 12 ft width. Work along the 16 ft length.
- Align the first board against the frame’s edge, not against any joist. The rim is the line the eye reads. The joists are what the boards fasten to.
- Drive two 3 in deck screws through each board at every joist crossing.
- Gap the boards about 1/8 in apart. Stand a 16d nail between them as the spacer. The gaps drain the deck and give the wood room to move.
The nail sets the working gap, a shade over 1/8 in. At that pitch, the 34 boards cover the 16 ft, with a little left to trim at the far end.
A run that comes up short takes a board from the buy column’s allowance.
Boards laid wet from the yard shrink as they dry, so a gap set at 1/8 in on fresh treated lumber opens further over the first season.
Laying fresh boards tight is the recognized alternative. Choose it if you would rather the gap arrive than depart.
Trim any overhang at the ends last, with the circular saw, the work supported and your stance stable, in eye and hearing protection.
Finish at the edge people use. The porch end is where occupants step off in the dark.
Where a sloped site has made the deck edge high, add a step or a graded landing there. Do not leave a drop at the tent door.
Checkpoint: the 34 boards cover the run, the gaps sit a shade over 1/8 in, and any high porch edge has a step or a graded landing.
Step 10 – Pitch the tent on the platform
Anchor the tent to the deck, and keep its ground angles.
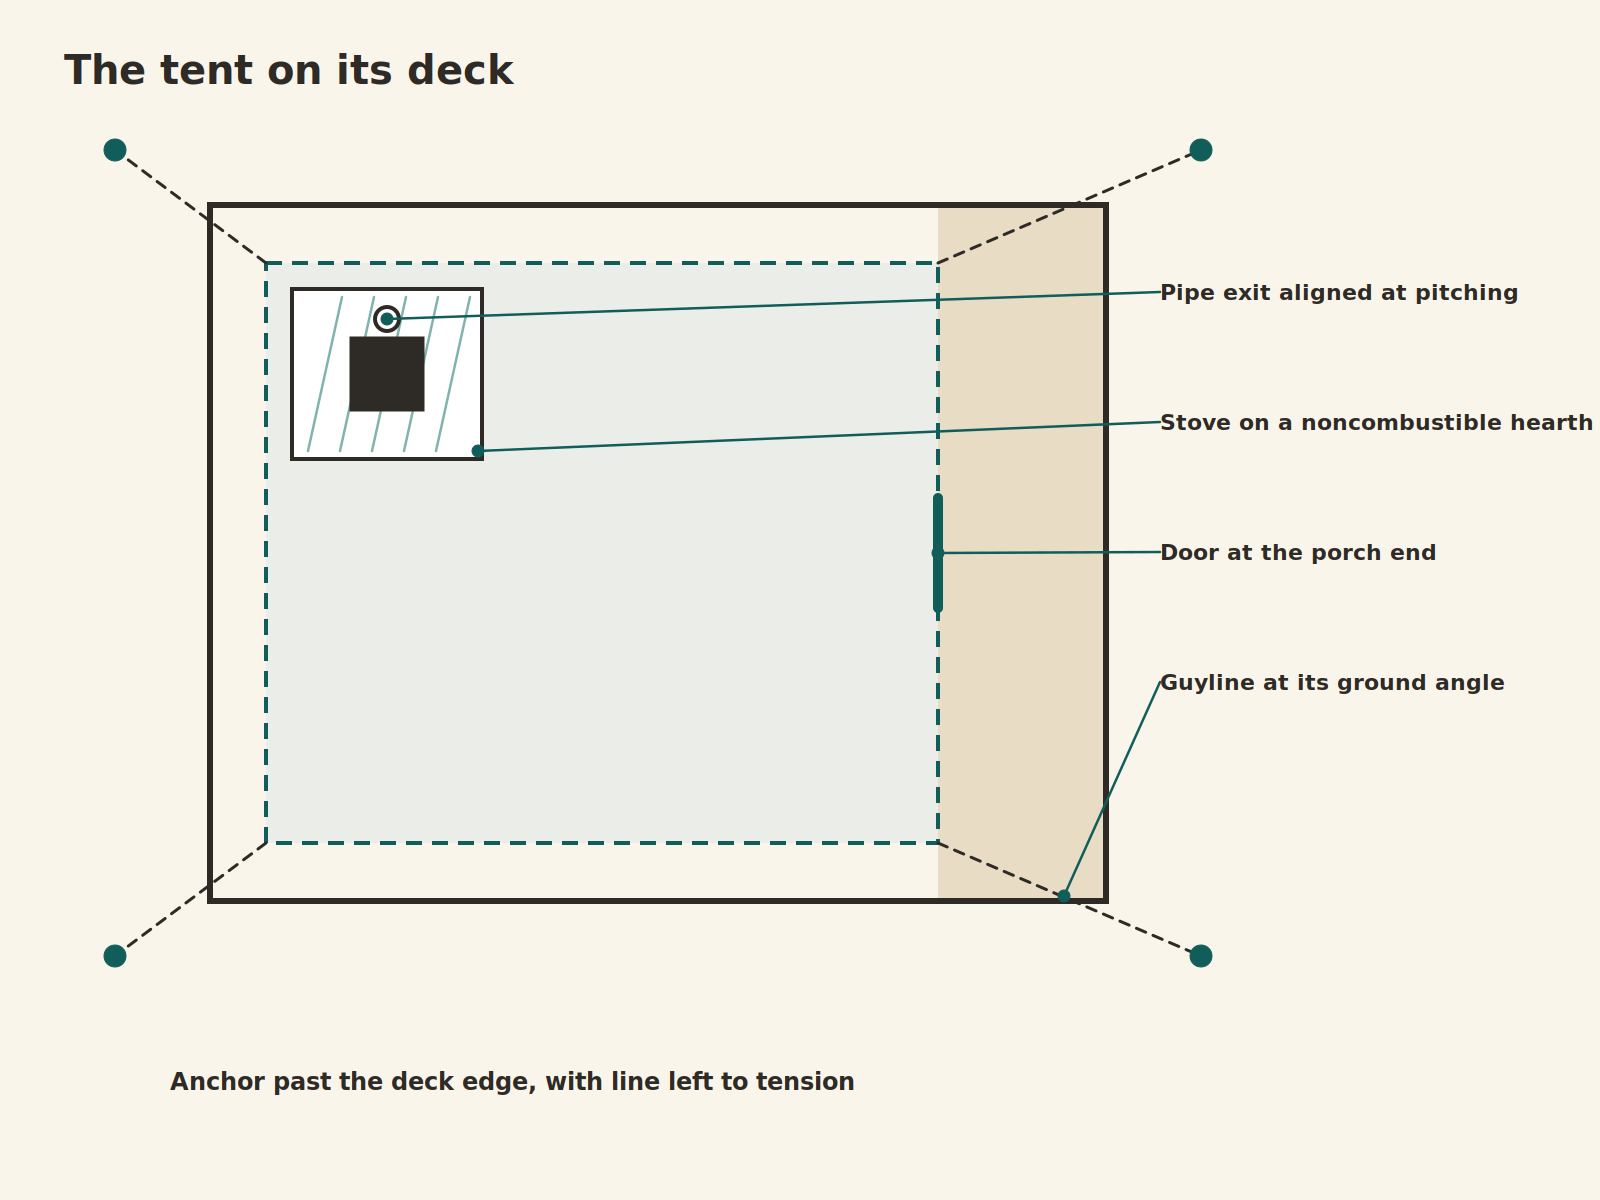
Pitch the tent in the same shape it would take on the ground. Anchor it to the deck, rather than to the earth it no longer touches.
- Fasten the tent down through its groundsheet or floor grommets. Use screws.
- Never fasten through the elastic loops or webbing. They are not load points, and they tear.
- Put a washer under each screw head, large enough that the head cannot pull through the grommet. The washer is the detail that makes the fastening hold in wind.
Hold the guyline angles the tent would have on the ground. A wall or bell tent’s walls are tension structures. A line run steeply down to the deck edge pulls the wall inward and sags it. That sagging sidewall is the commonest complaint of platform pitching.
Where the deck edge arrives before the angle does, choose an anchor beyond the deck:
- A ground stake off the deck.
- A short guy pole.
- A screw hook or eye bolt set into the framing.
Set the anchor where the line, continued at the angle it would take running to the ground, meets the earth. The angle is the instruction, and the anchor’s place follows from it.
Keep 1 to 2 ft of tensionable line between the anchor and the tent, so the pitch can be adjusted as the canvas moves with the weather.
Keep the porch edge clear and known. That edge is the exit everyone uses in the dark.
Checkpoint: the porch edge is clear, the guylines hold their ground angles, and each anchor leaves line that can be tensioned.
A stove changes the pitch in one way. That way was decided long before this step.
Its position inside the tent follows the stove jack, and the jack’s corner set the tent’s orientation back at Step 1, with the porch at the door end.
On the deck, the stove stands on a noncombustible hearth surface that runs under and around it, sized to the stove maker’s instructions, never on bare deck boards.
A ground pitch site is usually earth, and a wood deck is the one common tent floor that burns.
Align the pipe’s exit as you pitch. Sleep a working carbon monoxide detector in any stove heated tent.
One tent side fitting belongs in this passage. A stove jack is part of the tent, not the platform, and no platform hardware substitutes for it. If your tent has no jack, or its jack is worn or torn, the fix is a replacement panel sewn or fitted to the tent, sized to the tent maker’s pattern. The named one is a 9.4 × 9.4 in panel with a rain flap. For that fitting, look at the SoloWilder DIY Hot Tent Stove Jack.
Clearances between the stove and the tent’s walls and furnishings follow the stove maker’s instructions. Use the instructions for the stove you own.
Field guidance commonly cites 36 in from stove to wall or furnishings. That figure is conservative field practice borrowed from residential stove work, not a tent stove code.
No code or standard written for stoves on tent platforms turned up in the research behind this guide. Local fire rules remain the camper’s own check.
This passage orients the platform decisions. The stove’s manual governs the stove.
If the land is not yours to keep: portable and floating forms
Everything above builds a fixture, and a fixture is the wrong answer on land you hold lightly. This section sorts the remaining forms by how you hold the land, which is the question that actually decides among them.
Land you lease, borrow, or hold for a season wants a foundation that comes back up. Pour nothing. Bury nothing.
The floating form from Step 1, precast blocks on grade under an unanchored frame, goes down in a day and comes back up without a hole to fill.
Its one maintenance habit is releveling. Use a jack and shims when a block settles.
Sectional portable platforms, deck panels on ground bearing frames that pin or fold together, serve the same tenure.
They serve that tenure at a manufactured price and a manufactured weight. The community record states the trade honestly: a portable deck costs several times its lumber equivalent per square foot. What the premium buys is reversibility.
Land you hold for days at a time is the portable form’s home ground. An event pitch or a rental site is the case.
Stout Tent’s portable line is the class’s visible example, sold direct as complete platforms.
No structural teaching transfers to a manufactured panel. Its maker’s instructions govern it whole.
Three parts of this guide do transfer to every portable and floating deck:
- Sizing. A tent needs its margins and its porch on any deck.
- Site. Drainage decides a portable pitch as surely as a permanent one.
- Pitching. A portable deck’s edge arrives sooner than a permanent one’s. Guylines run past it to anchors off the deck from the first night.
The range runs lighter than a framed deck. Two bought forms sit at its light end. Both go down without a hole and come back up without a trace.
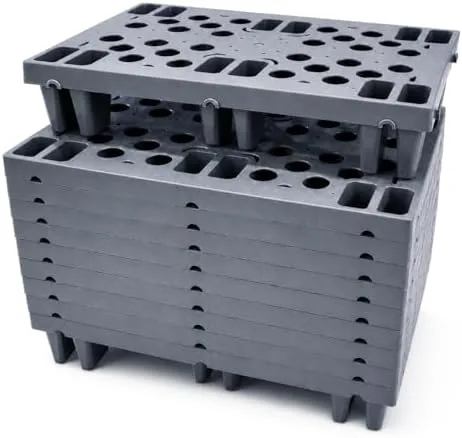
The lightest raised answer is a storage product. Romlits Heavy Duty Plastic Pallets are interlocking HDPE sections that snap together without tools.
Each section measures 11.8 × 19.7 in and stands 3.9 in tall. The listing rates each section at up to 661.3 lb. The open grid drains and airs, and it is a hard, patterned surface under a tent floor.
Scale is the honest limit. One section covers about 1.6 sq ft, so one 10 pack covers about 16 sq ft.
A 10 × 12 ft tent footprint takes about nine packs, once full sections are laid out to the rectangle. The lift stays low against the built platform, and the sections ask for ground that is already nearly flat.
For a raised floor you can lay in an afternoon and lift again when the season ends, check the Romlits Heavy Duty Plastic Pallets.
One step lighter still is no platform at all. Where the ground is already flat and drained, the need is often moisture, cold, and floor wear, not height or level.
A liner answers that need at ground level. The Drymate Jumbo Tent Carpet Mat is a carpet of 7 ft 4 in × 8 ft 4 in with a waterproof backing.
It rolls out inside the tent or under it, and it trims to fit without fraying. It adds no height and corrects no slope. At about 61 sq ft it covers just over half the floor of a 10 × 12 ft tent.
For that ground level answer, look at the Drymate Jumbo Tent Carpet Mat.
The platform’s first maintenance: the finish
The build is finished and the finish is not, because fresh pressure treated lumber cannot take stain yet. A guide that schedules the finish as the build’s last weekend teaches a failure owners learn once and remember.
New treated lumber leaves the yard saturated. Stain laid over it cannot penetrate, and it peels.
The drying interval is measured in weeks to months, and the trade treats 30 days as the floor. One to six months of drying weather is the common real range. Kiln dried after treatment lumber is the exception that can be ready in weeks.
Let the water test decide, because it is free and it is physical.
Sprinkle water on the boards. If the water soaks in and darkens the wood, the surface will take stain.
If it beads on the surface, the lumber is still too wet. Wait and test again. Do not coat and hope.
When the boards pass, a semi-transparent stain is the mainstream choice for treated pine. It shows the grain through its pigment. The pigment is what stands against ultraviolet light.
Many current products are stain and sealer in one. Several stain labels discourage a separate sealer over them. Follow the label of the product you choose, instead of stacking two products by habit.
The same passage carries the platform’s whole aging record. Owners report three failures. The finish is only one of them.
Water at the post bases. Post bases rot where water ponds against wood. The standoff bases and piers finished above grade are built to prevent that. Keeping soil and mulch from creeping up against the pier tops keeps the ponding from coming back.
Finish wear and cupping. Finishes grey and peel on their cycle. Boards cup as they dry and weather.
The drying interval keeps the first coat off wet lumber. Recoating on the label’s cycle manages the finish thereafter. The water test times the recoats too: when water soaks into the boards and darkens them instead of sitting on the finish, the coat is ready for renewal.
Movement. Read the movement with a level each spring, and look the frame over in the same pass, posts, connectors, and fasteners, for rot, corrosion, and looseness.
A floating form out of level is expressing its nature. Releveling it is maintenance, not repair.
A pier build out of level is different. It has a footing problem worth investigating. Its foundation was the one part designed never to move.
Frequently asked questions
How much does it cost to build a tent platform?
This guide does not print a range, because no published source prices this structure and an unattributed range helps no one price a yard trip. The materials list at Step 2 is the cost answer: it names every item and its count, so the total is one priced trip to your own yard away. Three decisions move that total more than any other: the footing form, piers against blocks; the decking material; and whether the labor is yours or hired.
How long does it take to build a tent platform?
About two days of work for two people builds the worked example’s frame and decking. Elapsed time runs longer and should be planned as such. The piers cure on Step 5’s clock before the frame loads them. The finish waits weeks to months behind the build, while the treated lumber dries.
When can I stain a new tent platform?
When the water test says so. Sprinkle water on the boards. If it soaks in and darkens the wood, the surface will take stain.
If it beads, the lumber is still too wet. Wait and test again.
The trade treats 30 days as the floor. One to six months of drying weather is the common real range. The maintenance passage at the end of the build carries the full timing.
What size platform does my tent need?
Your tent’s size plus 1 ft on both sides and at the back and 3 ft at the front for the porch. Step 1 states the doctrine and Step 2’s conversion formulas turn it into your own materials list for any tent size.
Do I need a permit for a tent platform?
Your local office decides. Its reading is the answer where you build.
Under the model code, a platform needs no permit only when all four conditions hold. It is 200 sq ft or less. It stands no more than 30 in above grade at any point. It is attached to no dwelling. It serves no required exit door.
Zoning, setback, and lease terms apply whether a permit does or not.
That is a test to run against your own build and site. It is not a status this guide claims for the worked build. Step 1 carries the full passage.
Which footing form should I choose for a tent platform?
Use piers where the build is permanent and your winters work the ground. Use packed posts where the makers’ semi-permanent standard fits your soil and how long you hold the land. Use blocks where the platform has to stay reversible.
Step 1’s footing passage teaches the choice on three inputs. They are permanence, winter, and soil.
Are deck blocks enough for a tent platform?
On firm, drained, stable soil under a low platform, yes: the floating form is a legitimate foundation, and it relevels when a block settles.
On soft, wet, sloping, or frost active soil, the answer changes. Blocks take a platform out of level. They keep it there between relevelings. The pier form is the honest answer.
Step 1 teaches the choice.
Will a platform make my tent warmer or keep it dry inside?
Neither, and any guide that promises otherwise is selling. A platform does not insulate the tent floor and does not stop a leak in the tent itself. It gives the tent a level, dry, durable surface to stand on, which is the honest whole of the benefit.
Can I build a tent platform on a slope?
Within limits, yes.
- Cut the posts to the site, so the deck stays level on its falling line.
- Keep the deck at or under 30 in above grade where the permit test matters.
- Put a step or a graded landing at the porch edge where the slope makes it high.
A steep site is outside this guide. There, posts stand tall and bracing becomes the structure’s real problem. Treat that site as engineered work.
Notes
- No code document governs a tent platform by name. This guide rests its structural figures on two sources. It uses the International Residential Code’s deck provisions. It also uses the American Wood Council’s deck construction guide built on them. Those are the nearest prescriptive standard for a raised wood structure people sleep on. For connectors, concrete, treatment, and finish labels, it rests on manufacturers’ documents. The build is a worked example figured on that standard. It is not a plan drawn for any reader’s site. Where those documents are silent and the field has settled a practice, the text follows the practice. The pitching doctrine is the case in point. This note is its label.
- The 36 in frost depth in the worked build is an illustration, not a recommendation for any site. Your local frost depth is the figure: the pour depth is that depth plus the pier’s stand above grade, and the concrete conversion formula at Step 2 rescales the count to the pour depth.
- The finish figures in the maintenance passage rest on named labels. One stain label requires 30 days on new pressure treated lumber, with a water absorption test. Another sets its limit at a moisture content at or below 12 percent. Finishes are named as classes in the article under the named set ruling. The labels are recorded here as documentation.
- The materials list’s buy column carries ordinary waste and cull allowance over the required counts, most visibly in decking, joists, and fasteners. A careful builder with straight stock may buy closer to required; the buy column is written for the ordinary yard run.
- Eighteen listings now stand verified, all supplied by Daniel from his own Amazon searches and direct links on 2026-10-30. Two are linked in the portable section: the Romlits Heavy Duty Plastic Pallets (B0G4N9RN7W) and the Drymate Jumbo Tent Carpet Mat (B000VBKAO4). Sixteen more are linked at their points of use, fifteen of them tools and one a tent fitting: the SKIL circular saw (B01BD81BLO), the DEWALT drill driver (B00ET5VMTU), and the IRWIN claw hammer (B01HD6N77Q) at Step 2; the CRAFTSMAN tape measure (B0BVXXLP3T), the ACE Supply nylon twine (B0BFCDFWVS), and the WYOMER carpenter pencils (B0BNSRMV8S) at Step 3; the VNIMTI shovel (B0BG26DD9X), the VNIMTI and XtremepowerUS post hole diggers (B0CVVG3ZZB and B0851SZCDH), the CRAFTSMAN torpedo level (B08DJDWHQ9), and the BlumeTrec tamper (B0FCFVF3RM) at Step 4; the GlobMarble mixing tub (B011PI7U7G), the True Temper wheelbarrow (B09J1G14TD), and the MARSHALLTOWN margin trowel (B00002N5P3) at Step 5; the Swanson Tool S0101 speed square (B00002255O) at Step 6; and the SoloWilder stove jack (B08XTK9YFT) at Step 10. The materials stand apart. Daniel looked for the lumber, concrete, and connectors on Amazon and did not find them there, so they are lumber yard purchases and carry no links by nature, as Step 2 states. The kit and plans passages name their markets and one direct sold example without links.
Sources
- International Residential Code, sections R105.2 (work exempt from permit) and R403.1.4 and R403.1.4.1 (footings and frost protection), as adopted and amended locally.
- American Wood Council, DCA 6, Prescriptive Residential Wood Deck Construction Guide: joist and beam span tables, footing sizing method, and the treatment table summarizing the AWPA use categories.
- Simpson Strong-Tie, connector installation guidance and the Strong-Drive SD connector screw specification (hanger fastener requirements).
- QUIKRETE, product data sheets for fast-setting and high early strength concrete mixes (strength by age), and post setting guidance.
- American Wood Protection Association, standard U1 use categories, ground contact UC4A against above ground UC3B.
- Thompson’s WaterSeal and Ready Seal application labels (drying and moisture requirements on new pressure treated lumber).
- Common Ground Alliance, the 811 call before you dig program, linked at Step 4.
- CanvasCamp, Rainier Outdoor, White Duck Outdoors, and Stout Tent build and pitching guides, read as field consensus for the packed post form, the margin and porch doctrine, and the pitching doctrine.
- Romlits Heavy Duty Plastic Pallets, Amazon listing as supplied by Daniel on 2026-10-30 (section dimensions, pack count, and the per section load figure).
- Drymate Jumbo Tent Carpet Mat, Amazon listing as supplied by Daniel on 2026-10-30 (dimensions, material, and waterproof backing).
- SKIL 5280-01 circular saw, Amazon listing as supplied by Daniel on 2026-10-30 (15 amp motor, 7-1/4 in blade, laser guide).
- DEWALT DCD771C2 drill driver kit, Amazon listing as supplied by Daniel on 2026-10-30 (20V Max XR, battery and charger included).
- IRWIN 1954888 claw hammer, Amazon listing as supplied by Daniel on 2026-10-30 (20 oz, steel).
- VNIMTI gardening shovel, Amazon listing as supplied by Daniel on 2026-10-30 (56 in, round blade, fiberglass handle).
- VNIMTI post hole digger, Amazon listing as supplied by Daniel on 2026-10-30 (58 in, fiberglass handles), and XtremepowerUS electric post hole digger, Amazon listing as supplied by Daniel on 2026-10-30 (1500W, 6 in bit).
- SoloWilder DIY hot tent stove jack, Amazon listing as supplied by Daniel on 2026-10-30 (9.4 × 9.4 in panel, rain flap).
- CRAFTSMAN CMHT37443S tape measure, Amazon listing as supplied by Daniel on 2026-10-30 (25 ft, fraction markings), ACE Supply nylon twine, Amazon listing as supplied by Daniel on 2026-10-30 (#18, 250 ft), and WYOMER carpenter pencils, Amazon listing as supplied by Daniel on 2026-10-30 (octagonal, 100 pack).
- CRAFTSMAN CMHT43191 torpedo level, Amazon listing as supplied by Daniel on 2026-10-30 (9 in, magnetic), and BlumeTrec steel tamper, Amazon listing as supplied by Daniel on 2026-10-30 (8 × 8 in plate, 48 in handle).
- GlobMarble mixing tub, Amazon listing as supplied by Daniel on 2026-10-30 (17 gallon, polyethylene), and True Temper wheelbarrow, Amazon listing as supplied by Daniel on 2026-10-30 (steel, 6 cu ft, never flat tire).
- MARSHALLTOWN margin trowel, Amazon listing as supplied by Daniel on 2026-10-30 (5 × 2 in), and Swanson Tool S0101 speed square, Amazon listing as supplied by Daniel on 2026-10-30 (7 in).


Thank you for your knowledge!