What is a Rainfly on a Tent? Essential Camping Protection

A rainfly is a crucial component of your tent designed to protect you from the elements. It is an outer layer that shields your tent from rain, wind, and even harsh sunlight, keeping you dry and comfortable during outdoor adventures.

Understanding what a rainfly does can enhance your camping experience and help you make informed decisions when selecting a tent, such as a group multi-room tent, a lightweight backpacking tent, a convenient SUV tent, or even just setting up your tent at your perfect campsite.

Most tents come with a custom-fitted rainfly, which is not usually compatible with other tent models. Choosing the right tent with the right rainfly improves your camping experience.

Various rainfly styles are available with different tents, each made from different materials and catering to different weather conditions and camping styles. Whether you’re facing a downpour or just want extra protection from the sun, knowing how to effectively choose, use, and care for your tent’s rainfly is essential for a successful trip.

Key Takeaways

  • A rainfly protects your tent from rain and other weather.
  • Various materials and types exist to suit different camping conditions.
  • Proper use and maintenance of your rainfly enhances both performance and durability.

Purpose Of A Rain Fly

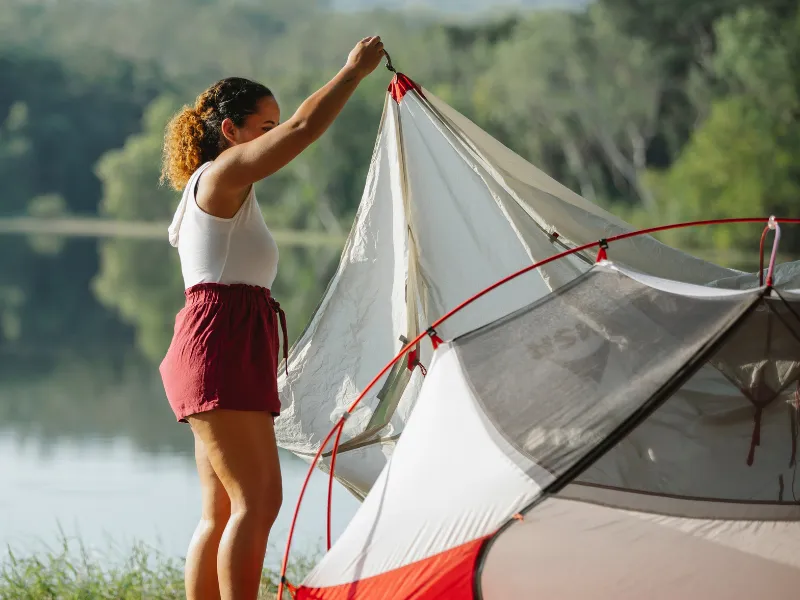
setting up a rainfly
Photo: ©Uriel Mont via Canva

A rain fly is an essential component of your tent setup. It primarily keeps the interior of the tent dry during heavy rain. When a downpour hits, water can easily seep through the tent fabric, but a rain fly acts as a barrier, redirecting moisture away.

Beyond protecting you from rain, the rain fly also provides additional insulation. It traps a layer of air between the tent and itself, enhancing warmth, especially on chilly nights.

Here are a few purposes of a rainfly:

  • Water protection: Ensures a dry camping experience.
  • Insulation: Adds warmth by trapping air.
  • Privacy enhancement: Provides an extra layer that makes your camping space feel more private.
  • UV protection: Shields you from harmful sun rays.

When selecting a rainfly, consider the material and design. A well-constructed rain fly will significantly improve your camping comfort. 

Key Benefits:

  • Moisture Protection: The rain fly prevents water from seeping into your tent, keeping your gear and sleeping area dry. This is crucial during heavy downpours or morning dew.
  • Wind Resistance: A well-fitted rain fly can help stabilize your tent in windy conditions. It keeps the structure taut and reduces the risk of damage.
  • Condensation Control: Condensation can occur when the air inside your tent warms up from your body heat. A rainfly helps create airspace, reducing this effect and keeping the interior comfortable.
  • Temperature Regulation: Without a rain fly, your tent can overheat in direct sunlight. The fly provides shade, helping regulate the internal temperature during hot days.

Additional Considerations:

  • Dew Protection: Dew can accumulate in the early morning, dampening your sleeping gear. A rainfly helps minimize this issue.
  • Versatile Use: You can use your rain fly independently as a tarp or shelter, providing extra utility during outdoor adventures.

Types Of Rain Flies

Full-Coverage Rain Flies

Full-coverage rain flies extend over the entire tent, providing maximum protection from rain, wind, and UV rays. These are ideal for those who often camp in unpredictable weather conditions. The extra coverage helps keep the interior of your tent dry, even during heavy downpours.

These rain flies usually feature robust materials that resist tearing and are often equipped with waterproof coatings. Their weight can vary, but you can expect them to weigh between 1.5 to 3 pounds, depending on the size and material. Although they may add a bit of bulk, the peace of mind is worth it. They also help maintain airflow, which reduces condensation inside your tent, enhancing your camping experience.

Roof-Only Rain Flies

Roof-only rain flies are designed to cover just the top of your tent. They are a great option to save weight while still providing some weather protection. This type is minimalistic and often used when you anticipate milder conditions.

One of the advantages of roof-only designs is that they allow for more breathability. You can still enjoy starry nights by simply using a mesh tent underneath. Weighing around 1 to 2 pounds, they won’t weigh you down during your hikes. However, be cautious; you might be exposed if the weather suddenly turns.

Ultralight Rain Flies

Ultralight rain flies cater to minimalist campers and backpackers who are focused on reducing pack weight. Typically made from advanced materials, these rain flies are engineered to offer substantial water resistance while extremely lightweight. You might find some that weigh under a pound.

Despite their slim profile, ultralight options still provide essential coverage, but be prepared to sacrifice some durability. They can ripper easier, and they are best suited for fair weather conditions or when you’re preparing for a spontaneous adventure. Always consider your needs and the weather when choosing an ultralight option.

Materials Used In Rain Flies

Common Fabrics

Nylon

  • Lightweight and durable.
  • Often treated for water resistance.

Polyester

  • More UV-resistant than nylon.
  • Retains strength better in wet conditions.

Silnylon

  • A blend of silicone and nylon.
  • Known for its excellent waterproof qualities and low weight.

Waterproofing

Most rainflies are equipped with waterproof coatings. These often include:

  • Polyurethane (PU) coating: Commonly used for its reliable waterproofing, but heavier and can weaken the fabric with time.
  • Silicone coating: Provides superior waterproofing and durability. Silicone coatings strengthen the fabric but are more expensive.
  • Silicone/PU blend: A mix of both used for various manufacturer reasons.

The effectiveness of a rainfly isn’t solely about the fabric; the seams play a critical role, too. Sealed or taped seams are also essential to prevent water from seeping through, ensuring a dry interior.

Rainfly (and general tent fabric) waterproof rating is measured in millimeters of pressure. This means that a rainfly with a 2000mm waterproof rating could sustain 2000mm of water on top of it before it leaks. You only need about 1200mm for a rainfly per MSR.

Breathability

Some materials offer water resistance but remain breathable. Unfortunately, due to weight, durability, and cost, most tent fabrics, including the rainfly, aren’t breathable and waterproof simultaneously.

Weight vs. Durability

Consider what you prioritize in your camping gear. Lighter fabrics are great for backpacking, while more durable options are ideal for car camping. Both have their place in your outdoor adventures.

History And Evolution Of Rain Flies

The rainfly’s journey began with simple tarps used by early campers. These basic covers provide essential protection from the elements, allowing you to stay dry during unexpected rain showers.

As camping gear evolved, so did the rain fly. The introduction of lightweight nylon in the 1960s marked a significant milestone. This material was not only durable but also had excellent waterproofing properties.

Modern rainflies utilize advanced materials like silicone-coated nylon and polyester. These fabrics are incredibly lightweight and packable, making them ideal for backpackers. You can find rainflies with a high waterproof rating, often exceeding 3000mm. This means they withstand heavy rain effectively.

Design improvements have also been made. Many rainflies now feature a tapered shape to shed water better. At the same time, additional guy lines help secure them against strong winds.

Today’s rainflies are versatile. Some are integrated into the tent design, offering quick setup, while others can be pitched separately for long-term camping. As you consider your camping adventures, remember that investing in a quality rainfly can enhance your outdoor experience significantly. 

Choosing The Right Rain Fly

Key Factors

  • Climate: Think about the weather conditions where you’ll camp. If you’re heading into heavy rain or high winds, opt for a robust, waterproof rain fly.
  • Camping Style: Are you a minimalist or do you prefer extra comfort? Consider a lightweight fly for backpacking, while a heavier one can provide more protection for car camping.
  • Tent Type: Your tent will usually come with a rain fly. You must consider the rain fly and the whole tent setup because they are generally inseparable. Quality usually follows price, so a budget tent will probably have a budget rain fly, which may or may not work depending on your situation.

Sizing Matters

A rainfly that is too small won’t offer adequate protection. Conversely, a rain fly that’s too large can trap moisture underneath.

Material Quality

Look for materials with a high denier count for durability. Nylon is commonly used, but polyester can offer better UV resistance to a degree. Nylon is often lighter, while polyester is cheaper and more common on budget tents.

Additional Features


Consider a rain fly with features such as vents or awnings. Vents help reduce condensation inside your tent, while awnings can provide extra space for gear.

How To Use A Rain Fly
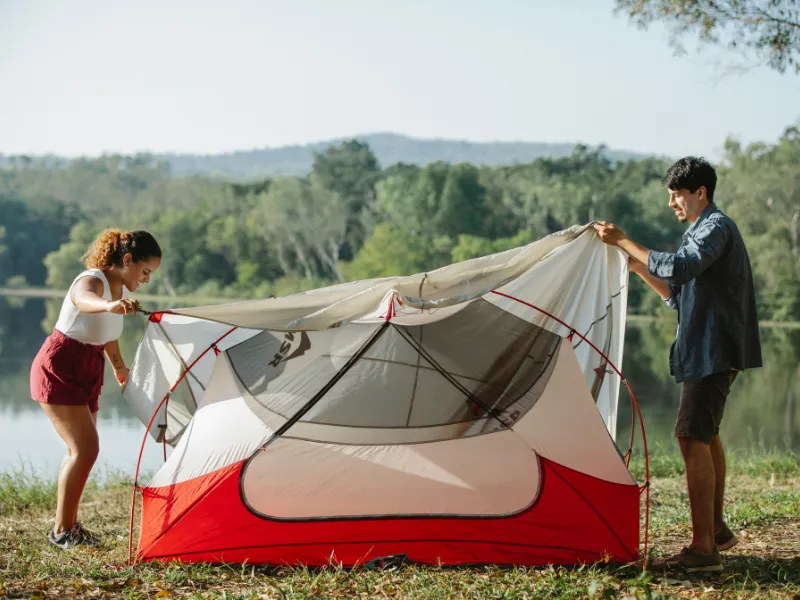
Photo: ©Uriel Mont via Canva

Proper Installation

First, pitch your tent securely and stake it down. Make sure the fly is compatible with your tent model.

Next, drape the rain fly over the tent, completely covering all openings. 

Check the alignment; the fly should overhang the tent equally on all sides to prevent water pooling. Many rainflys have color-coated tags or grommets that align with the main tent.  

Use guy lines to stake the fly out for stability, minimizing flapping in the wind. Adjust the tension of the lines to keep the rain fly taut while allowing some give for wind gusts.

After setup, inspect quickly for damage or wear on the fabric and hardware. This proactive step can prevent leaks on a rainy night.

Maintenance And Care

Maintaining your rain fly increases its durability and performance. After each use, clean the fly. 

Rinse dirt and debris with cool water using a soft cloth if needed. Avoid washing machines or lots of soaps, as they can damage the fabric’s waterproof coating. 

Dry with a towel or air dry. Don’t put it in a dryer. 

Store the rain fly in a cool, dry place to prevent mold and mildew. Usually, you can store the rainfly with the tent to make sure everything is together and you don’t forget it on your next camping trip. Make sure the fly is completely dry before packing it away. Inspect all components, including stakes and guy lines, for damage and replace them as needed.

Consider periodically applying a water-repellent treatment to the fly as part of your maintenance routine to restore its waterproof qualities if needed. 

Alternative Uses For Rain Flies

As standalone shelters or tarps

You can easily set up a rain fly as a standalone shelter. Simply stake it down using trekking poles or nearby trees. This creates a quick, lightweight shelter for cooking or relaxing without needing a full tent.

Creating shade

Your rain fly can provide much-needed relief on hot, sunny days. Hang it above your picnic area for a cool, shaded space to enjoy lunch. 

Windbreak

A rain fly can act as an effective windbreak. Position it strategically to shield your cooking area from gusts, which will keep your campfireor stove more efficient.

Gear protection

 You can use the rain fly to protect your gear if rain threatens. Place it over backpacks or other items to keep them dry. This is especially useful during unexpected weather changes.

Additional camping space

On days when you don’t need a rainfly on your tent, expand your living space by setting up a rainfly away from it. This creates an outdoor lounge area for gear storage or relaxing with friends.

Environmental Considerations

When selecting a rainfly for your tent, consider the impact on the environment. Look for options made from eco-friendly materials. Materials like recycled polyester or nylon reduce plastic waste and lower your carbon footprint.

Manufacturing processes play a significant role too. Brands that emphasize sustainable practices minimize harmful emissions and utilize less water. Researching the manufacturer can lead you to more environmentally responsible choices.

Proper disposal of old rainflies is another crucial aspect. Instead of tossing them in the trash, consider recycling or donating. Some outdoor retailers offer programs to recycle old gear, keeping it out of landfills.

Troubleshooting Common Rain Fly Issues

Dealing with Leaks

 If you notice leaks, it could be due to worn seams or fabric. Inspect all seams for signs of wear. Use a tent cleaner or distilled vinegar to clean the area, then apply seam sealant.

Condensation Problems

Condensation can be frustrating. Ventilation helps reduce moisture buildup. Ensure your rain fly has enough vents. When you set up, create space between the tent and fly to allow airflow.

Mold Growth

If mold appears, act fast. Scrub the affected area with a sponge and tent cleaner. Dry it completely to prevent further mold growth.

Tree Sap and Bird Droppings

These can damage your rain fly. Remove sap by rubbing alcohol and gently cleaning bird droppings with distilled vinegar. Be careful not to damage the fabric.

Repairing Tears

Small tears can be mended with a fabric patch or repair tape. Clean the area, apply adhesive, and place the patch. For more extensive damage, consider professional repair options.

Packing And Storing Rain Flies

Folding Technique

  1. Clean First: Make sure your rainfly is dry and free of dirt. Dirt can cause wear over time.
  2. Fold Neatly: Lay it flat and fold it into thirds lengthwise. Then, fold it from top to bottom. This prevents creasing and helps maintain its shape.

Packing Essentials

  • Use a stuff sack or a compression bag for easy transport. Avoid packing it too tightly to prevent damage.
  • Keep patching tape handy for any on-the-go repairs. You never know when a small tear might occur!

Long-Term Storage Tips

  • Store your rainfly in a cool, dry place. High humidity can lead to mold and mildew.
  • Avoid direct sunlight during storage, as UV rays can weaken the fabric.

Additional Recommendations

  • Inspect your rainfly regularly for damage.
  • Treat it with a fabric conditioner or waterproofing spray for extra protection against the elements.

Advanced Features Of Modern Rain Flies

Modern rain flies have several advanced features that enhance your camping experience. These innovations improve protection from the elements and make setup easier.

One key feature is tension adjustments. These allow you to create a tighter fit, reducing the risk of water pooling on the fabric. A taut rain fly translates to better performance in heavy rainfall.

Color-coded attachment points streamline the setup process. You can quickly and easily connect the rain fly to your tent, leaving you more time to enjoy your surroundings rather than struggling with complicated instructions.

Another valuable addition is the use of reflective elements. These enhancements improve visibility at night, helping you locate your tent in low-light conditions. Brightly colored or reflective cords will save you from stumbling in the dark.

Many modern rain flies are now designed to integrate with tent ventilation systems. This ensures that while you’re protected from rain, you still enjoy airflow to reduce condensation inside your tent. Adequate ventilation is essential for a comfortable night’s sleep.

Rain Fly Design Considerations

Shape Matters

The shape of the rainfly significantly impacts water runoff and wind resistance. A sloped design encourages rain to flow off easily, while a flat surface may collect water. Ensure the fly extends over the sides of the tent to enhance coverage.

Seam Placement and Reinforcement

Pay attention to seam placement. Reinforced seams reduce the risk of leaks, which is crucial when camping in wet conditions. Look for rainflies with double-stitched seams or taped seams for added durability and protection.

Weight vs. Coverage

It’s essential to balance coverage with weight and packability. If you’re backpacking, opt for lightweight materials that pack down small. A rainfly that offers adequate coverage without adding excessive weight is ideal for multi-day trips.

Material Quality

Consider the rainfly’s material. Nylon and polyester are common choices, with coatings like polyurethane enhancing water resistance. Always check the waterproof rating; a minimum of 1,200 mm is often recommended for good weather protection.

Rain Flies In Different Climates And Conditions

When choosing a rainfly, consider the climate and conditions of your camping location. Each environment presents unique challenges. A rain fly selection is essentially a tent selection, so don’t just look at the rain fly but look at the tent system as a whole.

In tropical environments, you face high humidity and frequent rain. So, you need a rainfly that is waterproof and breathable. Look for materials that wick moisture away while keeping you dry.

For desert camping, UV protection is crucial. The sun can be intense, so select a rainfly that shields against harmful rays. A fly with reflective qualities helps manage heat while providing necessary shade during the day.

In cold weather, you need a rainfly with a high snow load capacity. A sturdy rainfly designed to support heavy snowfall prevents collapse. Insulation properties also keep warmth inside the tent, helping you stay comfortable.

If you’re into backpacking, weight matters. So, you should opt for a lightweight, durable rainfly that packs small without sacrificing protection. Look for a quick-set feature to ease setup in adverse weather.

Climate TypeKey Features
TropicalWaterproof, breathable materials
DesertUV protection, reflective qualities
Cold WeatherSnow load capacity, insulation
BackpackingLightweight, easy setup

Customizing And Modifying Rain Flies

DIY Waterproofing Treatments

You can apply waterproofing sprays to your rain fly to improve its water resistance. Look for products designed for nylon or polyester. A light coat every few seasons can prolong its life.

Adding Attachment Points or Guy Lines

Sometimes, your tent might need additional stability in windy conditions. Adding attachment points can help you better secure your rain fly in such cases. Remember you will probably weaken the fabric at that point, so recommend placing a grommet if you do this. Use sturdy cordage to create guy lines that anchor your rain fly to the ground.

Creating Custom Rain Flies

If you own a non-standard tent or a hammock, consider creating your rain fly. Measure the dimensions carefully, and use durable, lightweight materials. A well-fitted rain fly can significantly improve your shelter against the elements. I would use a tarp as a rainfly for my hammock camping.

Quick Tips

  • Use silnylon or ripstop nylon for a light and durable custom rain fly.
  • Always practice setting up your modifications before your trip.
  • Consider using a tarp as an alternative rain fly if you need extra coverage.

Material Advancements

New fabrics are emerging, such as lightweight silnylon and ripstop nylon, which offer excellent waterproofing. These materials provide durability without adding extra weight to your pack.

Integrated Technology

Some brands are introducing rain flies with built-in solar panels. These devices can be charged while enjoying the outdoors. Imagine staying connected without sacrificing your wilderness experience.

Improved Ventilation

Modern designs focus on airflow, reducing condensation inside your tent. Look for rain flies with adjustable vents and guy lines that allow you to customize your shelter based on weather conditions.

Versatile Attachments

Future rain flies may feature magnetic or quick-clip systems for faster setup. This innovation helps you establish your shelter quickly, especially during sudden downpours.

Color Customization

Check out options that offer reflective colors or patterns to enhance visibility at night. This simple addition increases safety and makes finding your tent easier after dark.

Rain Fly Safety Considerations

Proper Anchoring in High Winds

Make sure your rain fly is securely anchored. Use guy lines and stakes to prevent it from being blown away.

  • Tip: Consider adding ties to trees or sturdy rocks in a particularly windy area.

 Fire Safety and Flame-Retardant Materials

Check whether your rain fly is made of flame-retardant materials. This can significantly reduce the risk of fire hazards.

  • Avoid cooking or using open flames near your tent to minimize risks.

Regular Inspections

Inspect your rain fly regularly for wear and tear. Look for holes or weak seams that could compromise its effectiveness.

  • Action Step: If you notice any damage, repair it immediately to maintain safety.

Don’t forget to get your camping checklist and camping meals planned before your trip. Also choosing a good campsite is essential to an enjoyable camping trip.

FAQs

What is the difference between a tent with a rain fly vs. a waterproof tent?

Rain flies and waterproof tents serve different purposes and have distinct advantages. Here’s a concise comparison:

Rain Flies:
Versatility: Can be used separately as a standalone shelter or tarp.
Ventilation:Allow better airflow, reducing condensation inside the tent.
Temperature regulation: Help keep the tent cooler in hot weather.
Modularity: Can be removed in dry conditions for stargazing or better views.
Weight savings:Some ultralight options for backpackers.
Ease of replacement:Can be replaced if damaged without buying a whole new tent.

Waterproof Tents:
Simplicity: All-in-one solution, no need for separate components.
Setup speed: Generally quicker to set up than a tent with a separate rain fly.
Potentially more weatherproof: Fewer seams and entry points for water.

Choosing between a rain fly and a fully waterproof tent depends on the camping style, expected weather conditions, and personal preferences.

Many campers prefer the versatility and ventilation benefits of a tent with a separate rain fly, while others opt for the simplicity of a fully waterproof tent.

Top 5 Multi-Room Tents for Family and Group Camping

A multi-room tent offers the ideal blend of space and privacy, making it especially suitable for families or groups of friends. These tents provide separate areas for sleeping and living, enhancing comfort duringoutdoor adventures.

We spent numerous hours researching the top multi-room tents to discover which ones provide ample space, durability, and comfort. Check out our favorites below to ensure an enjoyablecamping experience. 

Best Multi-Room Tents


CORE 12-Person Instant Cabin Tent

Key Features

  • Instant Setup: Pre-attached poles enable a 2-minute setup process
  • Spacious Interior: 18′ x 10′ floor area fits three queen mattresses with extra room
  • Three Rooms: Includes two room dividers for privacy
  • Weather Protection: H20 Block Technology and fully taped seams for excellent water resistance
  • Adjustable Ventilation: Ceiling and ground vents for optimal airflow

Product Description

The CORE 12-Person Instant Cabin Tent offers an impressive blend of space, convenience, and weather protection. Its standout feature is the rapid setup time – just two minutes, thanks to pre-attached poles. This is particularly beneficial for late arrivals at the campsite or those who prefer to spend less time on tent assembly.

The tent’s spaciousness is remarkable. According to customer reviews and specs, it comfortably accommodates up to three queen-size air beds, making it an excellent choice for large families or groups. Two room dividers create three separate living spaces, adding a welcome level of privacy.

Weather protection is another strong point. The H20 Block Technology and fully taped seams keep you dry during unexpected rain showers. The included guylines and steel stakes provide stability in windy conditions, contributing to a worry-free camping experience.

However, the tent’s weight of nearly 48 pounds is a significant drawback for those planning to camp far from their vehicles. While the ventilation system performs well in moderate weather, it could get stuffy during hot days, although the mesh ceiling helps somewhat.

Our Product Rating

CategoryScore (out of 10)
Weather Protection9
Livability and Comfort8
Durability8
Versatility7
Price and Value7
Ease of Setup10
Aesthetics and Design8
Total Score8.3

Additional Features

  • Multiple Storage Pockets:Keep small items organized and off the floor
  • Electrical Port Access: Allows for running a power cord into the tent
  • Mesh Windows: Provide great views and allow air circulation without letting in bugs

Specifications

FeatureDescription
Setup Time2 minutes
Dimensions18′ x 10′
Center Height80 inches
Number of Rooms3
Weight47.8 pounds
Material68D Polyester
Waterproof RatingH2O Block Technology

Also Great 12-Person Multi-Room Tent

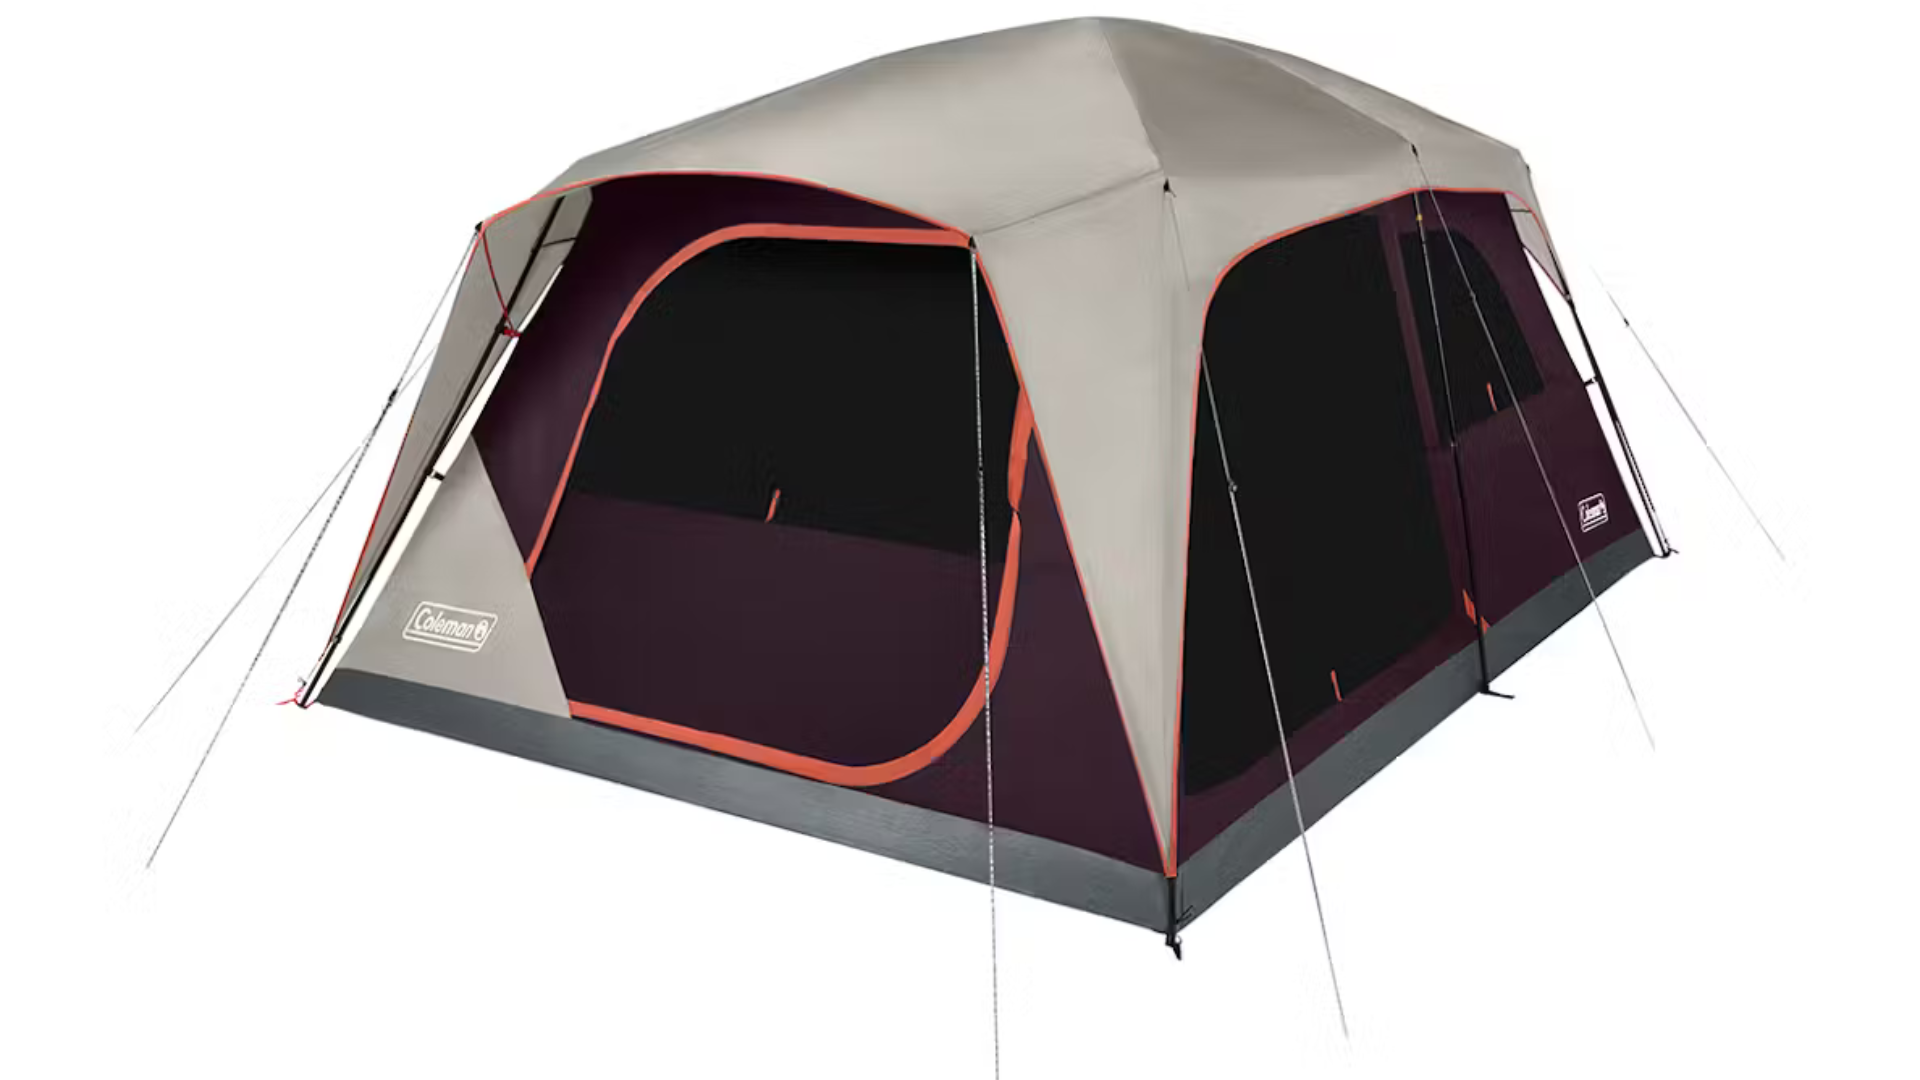
Coleman Skylodge Camping Tent

Key Features

  • Easy setup with color-coded poles
  • Excellent ventilation with large windows
  • Spacious interior accommodating multiple queen-size airbeds
  • WeatherTec system for superior water resistance
  • Convertible screen room for bug-free lounging

Product Description

The Coleman Skylodge Camping Tent is an excellent choice for large families or groups seeking comfort and space during their camping adventures. With its straight-wall design, this tent offers ample headroom, allowing campers to stand up and move around comfortably inside.

One of the standout features is the abundance of natural light, thanks to the floor-to-ceiling windows. The convertible screen room adds an extra dimension to the camping experience, providing a perfect spot for relaxing without being bothered by insects.

The WeatherTec system is a notable feature based on our research. According to customer reviews, despite light rain, the tent’s interior remains dry, thanks to its durable floor and inverted seams. Reviewers also report the tent withstands winds up to 35 mph, enhancing its reliability in various weather conditions.

While not instantaneous, the color-coded poles and sleeves make the setup more manageable. However, it can still be time-consuming, especially when attempted alone. The tent’s size and weight can make transportation challenging, so it’s best suited for campsites easily accessible by car.

With ample interior space and the option to create up to three separate rooms using dividers, this tent offers exceptional versatility for large groups. The wide door design facilitates easy movement of air mattresses and gear. At the same time, built-in storage pockets help keep small items organized.

Our Product Rating

CategoryScore (out of 10)
Weather Protection8
Livability and Comfort9
Durability7
Versatility7
Price and Value6
Ease of Setup6
Aesthetics and Design8
Total Score7.5

Additional Features

  • Side awningsfor shaded outdoor living spaces
  • Large mesh windows for ample ventilation
  • Built-in storage pockets for organization

Specifications

FeatureDescription
Capacity12 persons
Dimensions15.5 x 11 ft. 
Center Height7 ft. 
Number of RoomsUp to 3 with dividers
Weight34.5 lbs. 
MaterialNylon
Waterproof RatingWeatherTec™ system with inverted seams

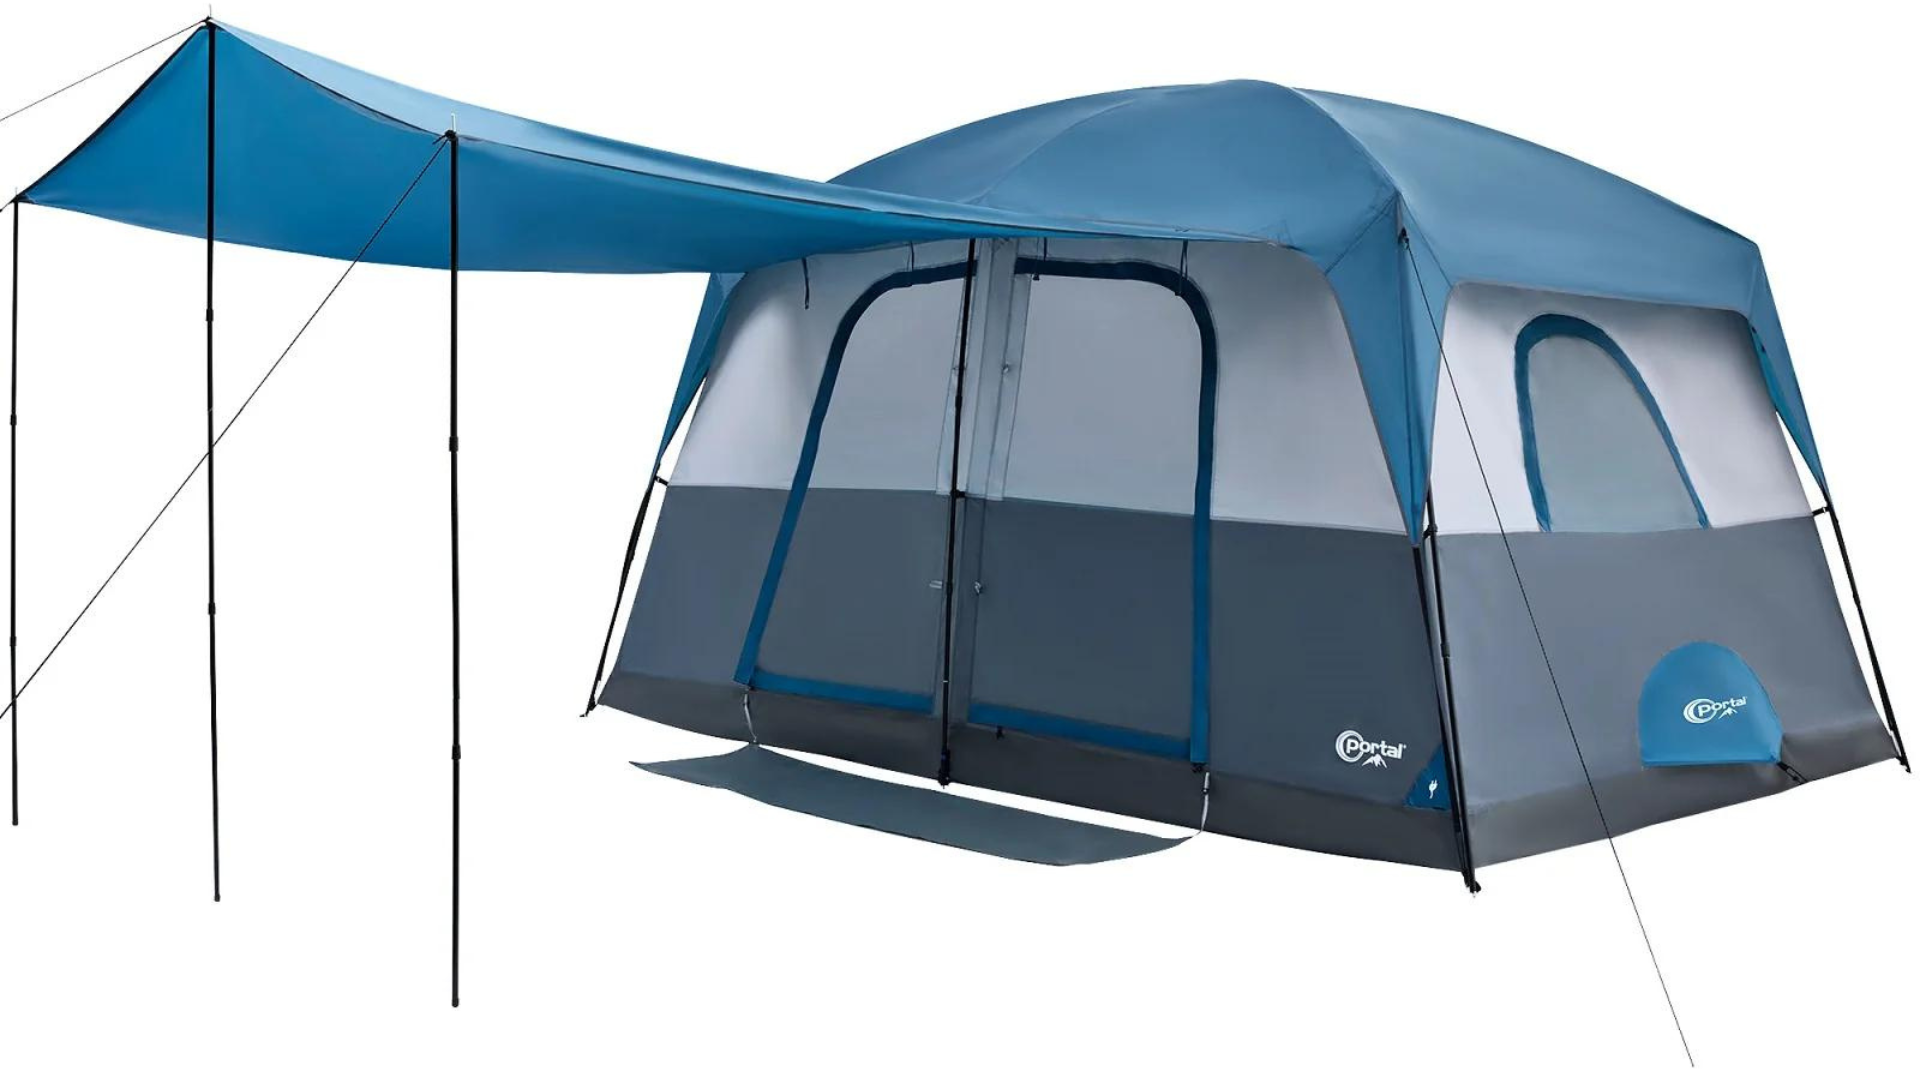
PORTAL 10-Person Camping Tent with Porch

Key Features

  • Spacious interiorwith 84-inch center height
  • Functional front porch area for sheltered outdoor activities
  • Excellent ventilation with multiple windows and vents
  • Two-room design for privacy
  • Weather-resistant construction

Product Description

The PORTAL 10-Person Camping Tent with Porch offers a delightful camping experience, combining spaciousness with practical features. The roomy interior easily accommodates multiple air mattresses with room to spare. With an impressive 84-inch center height, even tall campers can stand and walk comfortably inside.

A standout feature of this tent is the attached porch, which allows you to enjoy meals or simply relax. This additional covered space enhances the overall camping experience in fair and inclement weather.

Ventilation is another highlight of the PORTAL tent. With two large doors, six mesh windows, two ground vents, and a mesh ceiling, the tent maintains excellent airflow, keeping the interior cool and well-aired. This feature is particularly appreciated during warm-weather camping trips.

Due to its size and weight, setting up the tent requires at least two people. While this might be seen as a drawback, the benefits of space and comfort more than compensate for the extra effort needed during setup.

The PORTAL 10-Person Camping Tent excels in space, ventilation, and overall comfort, making it an ideal choice for family camping trips or large groups. Despite the slightly more involved setup process, the functionality and comfort provided by this tent make it a solid choice.

Our Product Rating

CategoryScore (out of 10)
Weather Protection8.5
Livability and Comfort9
Durability8
Versatility8.5
Price and Value9
Ease of Setup7.5
Aesthetics and Design8
Total Score8.3

Additional Features

  • Color-coded poles for a more straightforward setup
  • Multiple interior pockets for organization
  • Electrical cord access port for convenience
  • Robust frame for wind resistance

Specifications

FeatureDescription
Capacity10 person
Dimensions14′ x 10′ ft
Center Height7 ft
Number of Rooms2 with divider
Weight41.2  lbs
Material68D Polyester
Waterproof RatingPU1000mm water resistance coating

Also Great 10-Person Multi-Room Tent

UNP Family Camping Tent

Key Features

  • Spacious interioraccommodating up to 10 people
  • User-friendly setup process with color-coded poles
  • Excellent ventilation with large mesh windows and roof
  • Two-room setup with privacy divider
  • Weather-resistantconstruction

Product Description

The UNP Family Camping Tent is a solid choice with several strengths and minor weaknesses. The spacious interior comfortably accommodated our group of ten with room to spare, making it an excellent choice for family or group outings.

One of the standout features is the ease of setup. Two people can set up the tent in under 10 minutes without complicated tools or instructions. The color-coded poles and clear guidelines contribute to this user-friendly setup process.

Ventilation is another strong point of the UNP Family Camping Tent. The large mesh windows and roof ensure excellent airflow, keeping the interior cool and reducing condensation. This feature is particularly appreciated during warmer camping trips.

Based on our research, the tent’s weatherproof features are reliable. According to customer reviews, it holds up well in rain without leaking. The included privacy divider, which turns the tent into a two-room setup, adds convenience and versatility to the camping experience.

However, reviewers report some flimsy zipper issues. Additionally, customer reviews note that folding the tent back into its bag is challenging when attempted alone.

Our Product Rating

CategoryScore (out of 10)
Weather Protection8.5
Livability and Comfort9
Durability7.5
Versatility8
Price and Value8
Ease of Setup9
Aesthetics and Design7
Total Score8.1

Additional Features

  • Two large doors for easy access
  • Multiple storage pockets for organization
  • E-portfor bringing electrical power inside the tent

Specifications

FeatureDescription
Capacity10 people
Dimensions18 x 9 ft
Center Height6.5 ft
Number of Rooms2 rooms with divider
Weight21 lbs
Material185T polyester
Waterproof RatingPU1000mm water resistance coating

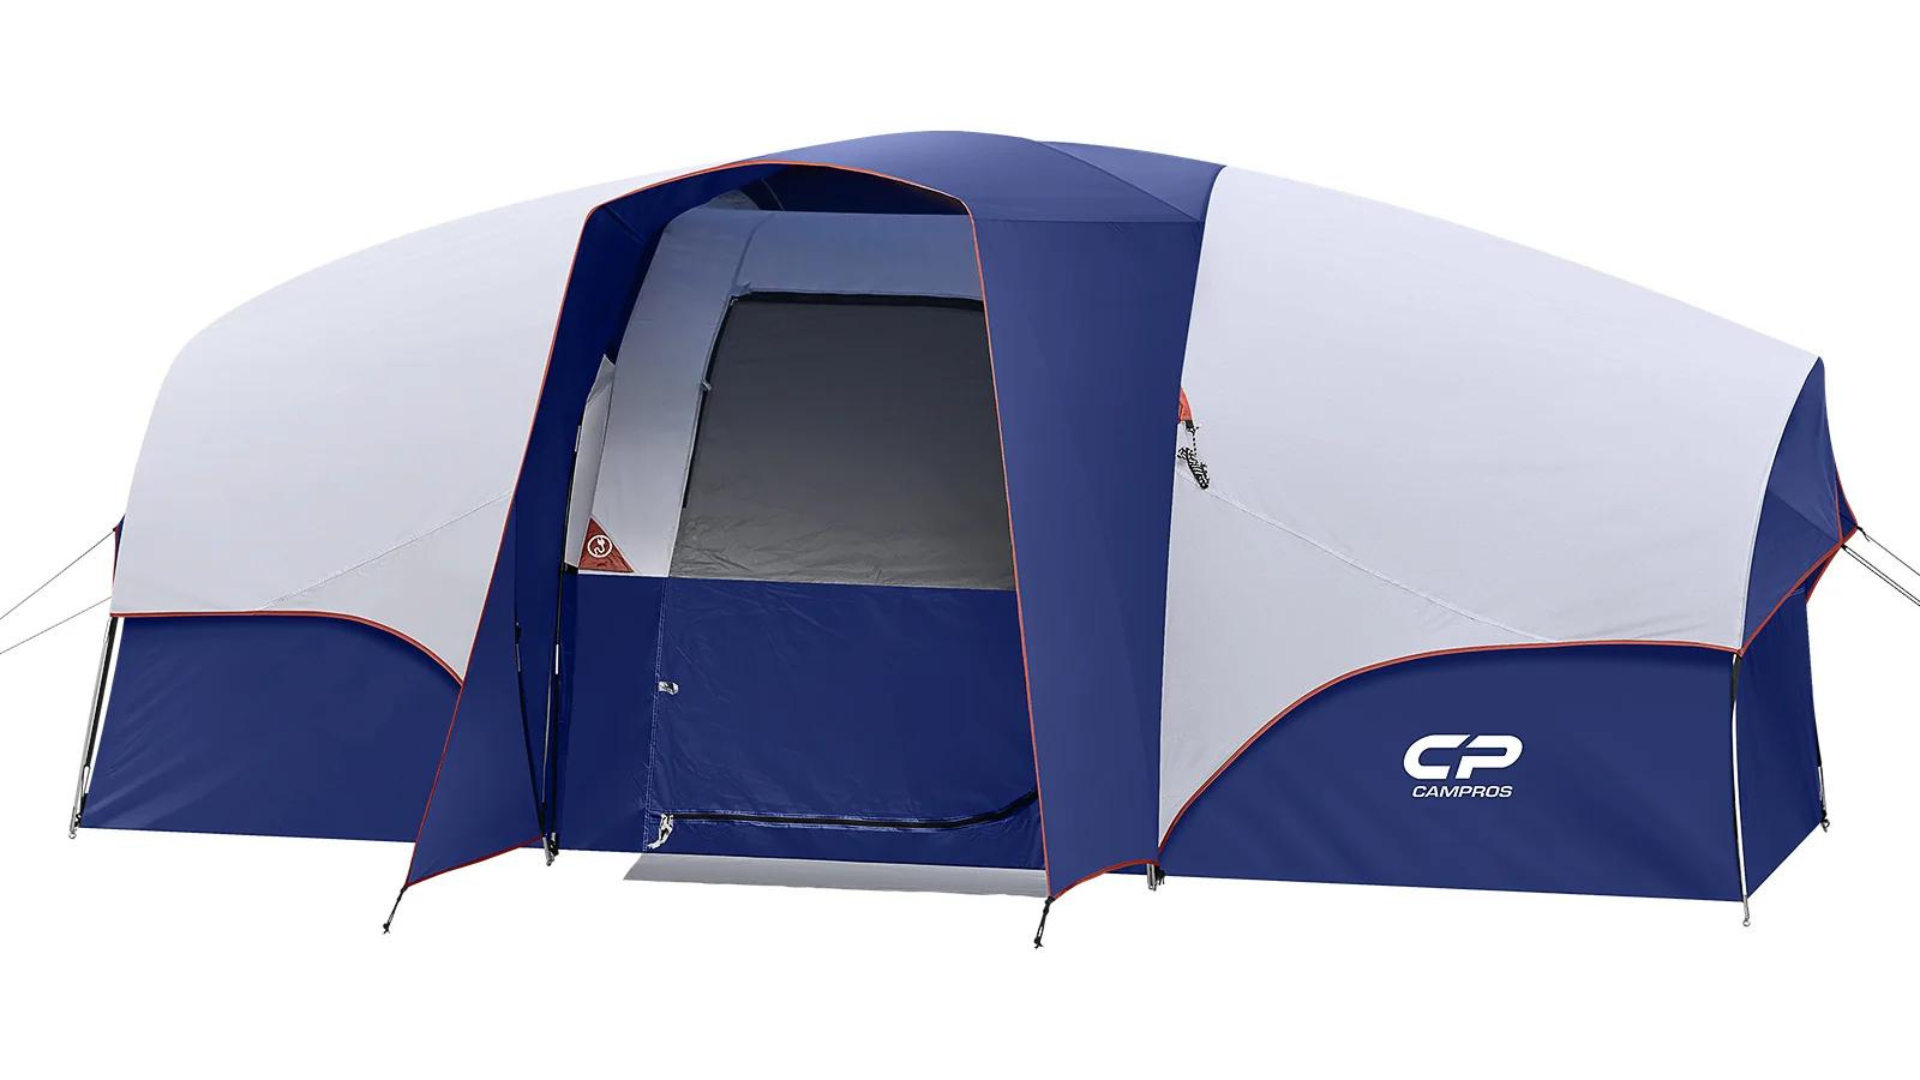
CAMPROS CP Tent

Key Features

  • Generous interior space with straight wall design
  • Effective water resistance with sealed seams
  • Quick and simple setup with color-coded poles
  • Privacy dividers for creating separate rooms

Product Description

The CAMPROS CP Tent has proven to be a reliable choice for family camping trips, offering a blend of spaciousness, ease of use, and weather protection. 

Thanks to the color-coded poles, the tent’s setup is straightforward. If you’re familiar with the setup process, two people working together could erect the tent in about five minutes. This quick setup is a significant advantage, especially when arriving at a campsite later in the day or in less-than-ideal weather conditions.

One of the tent’s standout features is its spacious interior. The straight wall design and 72-inch center height allow for comfortable movement inside. We fit a queen and a full mattress with room to spare, making it an excellent choice for larger groups or families who appreciate extra living space.

Weather protection is another strong point of the CAMPROS CP Tent. The waterproof material and sealed seams kept you completely dry in our research. This level of weather resistance provides peace of mind, knowing you’ll stay protected from the elements.

The inclusion of privacy dividers is a thoughtful touch. They allow for the creation of separate rooms, which is useful for changing clothes or creating individual sleeping areas within the tent.

However, it’s worth noting that some users have reported issues with durability, particularly with the poles and fabric. This might be a concern for those planning extended or frequent camping trips.

Despite these minor considerations, the CAMPROS CP Tent scores well across various categories, making it a reliable option for family camping adventures.

Product Rating

CategoryScore (out of 10)
Weather Protection9
Livability and Comfort8
Durability7
Versatility8
Price and Value9
Ease of Setup9
Aesthetics and Design7
Total Score8.3

Additional Features

  • Multiple windows for enhanced ventilation
  • Interior storage pockets for organization
  • Electrical cord access port
  • Sturdy carry bag for easy transport

Specifications

FeatureDescription
Capacity8 People
Dimensions14 x 9 ft
Center Height6 ft 
Material185T Polyester
Water Resistance1000mm coating
Number of Rooms3 with Privacy Divider
Weight17.4 lbs

Our Research Process

To pick the best multi-room tents, we used a quantitative review method. Each tent received a total score based on different weighted categories. Here’s how we did it:

CategoryWeightCriteria
Weather Protection25%Waterproofness, ventilation, wind and snow resistance based on hydrostatic head rating, denier count, and ventilation design.
Livability and Comfort20%Interior space, peak height, floor area, number of vestibules, storage pockets, amenities using floor area, peak height, number of vents.
Durability15%Construction quality, materials, reinforcements based on user reviews, manufacturer’s reputation using denier count, pole material, and reported longevity.
Versatility10%Suitability for different weather conditions, terrains, weight-to-space ratio, adaptability based on the tent’s weight, and packed size.
Price and Value5%Price vs. features, quality, warranty, customer service.
Ease of Setup20%Setup time, complexity of instructions, number of people needed, using setup times from reviews and videos.
Aesthetics and Design5%Visual appeal, design style, color choices, and unique features.

The Competition

TentTotal Score
CORE 12-Person Instant Cabin Tent8.3
PORTAL 10-Person Camping Tent8.3
CAMPROS CP 8 PersonTent8.3
UNP Camping Tent 10-Person-Family Tents8.1
PORTAL 8-Person Family Camping Tent8.1
Coleman Skylodge 12-Person Camping Tent7.5
Ozark 10-Person 2-Room Cabin Tent7.4
KTT Extra Large Tent 10-12-14 Person7.3
OakPedion 8-Person Tent7.0
CAMEL CROWN Camping Tents 10 Person Family6.8
MoNiBloom 5-8 Person Tent6.5
EVER ADVANCED 10-Person Camping Blackout Tent6.2
Outvita 8/10 Person Camping Tent5.9

CORE 12-Person Instant Cabin Tent stands out with top marks for weather protection, comfort, and ease of setup. This tent is well-loved for its spacious interior and reliable weather resistance.

Coleman Skylodge 12-Person Cabin Tent is a close contender, offering excellent livability and durability. Its screened room is a notable feature, providing added comfort.

PORTAL 10-Person Camping Tentbalances all categories well, making it a versatile choice without breaking the bank. It’s known for easy setup and good weather resistance.

UNP Camping Tent 10-Person-Family Tentsscore high for comfort and interior space, making it perfect for families. Reviewers praise its durability and thoughtful design.

CAMPROS CP Tent 8-Person Camping Tent offers a great budget option without sacrificing comfort and space. Its lower price point makes it accessible to many.

PORTAL 6/8 Person Family Camping Tent also provides value and functionality, designed for smaller groups while retaining key features.

Ozark 10-Person 2-Room Cabin Tentand KTT Extra Large Tent offer ample space but lag slightly behind higher-ranked tents in ease of setup and weather resistance.

Smaller or more budget-friendly options like OakPedion 8-Person Tent and CAMEL CROWN models deliver basic features suitable for shorter trips or fewer people. The MoNiBloom 5-8 Person Tent and Outvita 8/10 Person Camping Tent round out the list with decent scores in most categories but might have limitations in more extreme conditions or larger groups.

We were disappointed that there really aren’t any great modular tents or multi-room tents for more than 12 people. It seems like there could potentially be a market here for larger, multi-room tents, especially with a modular design.

Comprehensive Multi-Tent Buying Guide

Tent Size and Capacity

Floor Space

  • Measurement:When selecting a multi-room tent, carefully measure the floor space to ensure it comfortably accommodates your group. A good rule of thumb is to allow at least 30 square feet per person for a spacious feel. Consider not just the number of people but also their size and the amount of gear they’ll bring. Remember, a cramped tent can quickly dampen the camping experience, so err on more space when possible.
  • Layout: Think critically about the tent’s layout and how it will function for your group. Imagine moving through the space, setting up sleeping areas, and storing gear. A well-designed layout can make a significant difference in comfort and convenience. Look for tents with thoughtful floor plans that separate sleeping areas from shared spaces, allowing for privacy and more accessible organization.
  • Height: Pay attention to the ceiling height in your multi-room tent. Adequate headroom can transform the camping experience, allowing you to stand up straight and move around without constantly ducking. Look for tents with a peak height of at least 6 feet in the center, and pay attention to how the ceiling slopes. Some tents offer near-vertical walls, dramatically increasing the usable space inside.
Sleep Capacity

  • Number of Occupants: When evaluating a tent’s sleep capacity, remember that manufacturers often list the maximum number of people who can squeeze in side by side. In practice, you’ll want more space for comfort. A good approach is to choose a tent rated for 2-4 more people than will be using it. This ensures everyone has enough room to spread out and store their gear without feeling cramped.
  • Comfort: Prioritize comfort over maximum capacity when choosing your multi-room tent. While an 8-person tent may fit eight sleeping bags, it will be much more comfortable for a group of six. This extra space allows for gear storage, changing clothes, and moving around without disturbing others. When in doubt, size up – you’ll appreciate the extra room, especially on longer camping trips or in inclement weather when you spend more time inside the tent.
Number of Rooms

  • Room Dividers: Look for tents with removable room dividers, as these offer the flexibility to adapt the space to your needs. These dividers can create private sleeping areas at night and be removed during the day for more open living space. When shopping, check how easy it is to set up and remove the dividers and whether they provide adequate privacy and noise reduction.

  • Privacy: Consider the level of privacy each room in the tent offers. This is particularly important for family camping or when sharing with friends. Look for dividers extending fully from floor to ceiling with minimal gaps. Some high-end tents even offer solid fabric dividers instead of mesh for enhanced privacy.
  • Usage: Think carefully about how you’ll use each room in your multi-room tent. A well-planned tent can have designated sleeping, storage, and living areas. For example, it could have a central living area for gathering, separate sleeping quarters for adults and children, and a vestibule for storing dirty gear. Consider tents with vestibules or awnings that can serve as mudrooms or outdoor living spaces.

Weather Resistance

Season Rating

  • 3-Season vs. 4-Season: Choose between a 3-season and 4-season tent based on when and where you’ll be camping. 3-season tents are lighter and more ventilated, suitable for spring, summer, and fall use in mild conditions. They typically have more mesh panels for airflow. 4-season tents, on the other hand, are designed to withstand harsh winter conditions, with sturdier poles and less mesh. If you camp year-round or in unpredictable mountain environments, a 4-season tent might be worth the investment.
  • Temperature Range: Consider the temperature range you’ll encounter on your camping trips. A good multi-room tent should be versatile enough to keep you comfortable in various conditions. Look for features like adjustable vents, which allow you to regulate airflow and temperature inside the tent. Some tents offer removable layers or convertible designs that adapt to different seasons.

Material and Durability

  • Fabric:Your tent’s durability largely depends on its fabric quality. Look for materials like ripstop nylon or polyester, which resist tearing and abrasion. Pay attention to the denier (thickness) of the fabric – higher numbers indicate greater durability. For the floor, consider a tent with a higher denier fabric or a separate footprint for added protection against rocks and moisture.
  • Poles: Sturdy poles are crucial for a tent’s stability and longevity. Aluminum poles offer an excellent balance of strength and lightweight. In contrast, fiberglass poles are more budget-friendly but may be less durable in the long run. When examining pole quality, look for seamless construction and reinforced stress points. Some high-end tents use carbon fiber poles for the ultimate strength-to-weight ratio.
  • Seams: The strength of a tent’s seams can make or break its weather resistance. Look for double-stitched, taped seams, which provide extra protection against water penetration. During your inspection, pay close attention to high-stress areas like corners and pole attachment points. Quality tents will have reinforced seams to prevent tearing under tension.

Rainfly Coverage and Waterproof Coatings

  • Complete Coverage:A full-coverage rainfly is your best defense against wet weather. It should extend well beyond the tent body, directing water away from the walls and doors. Look for designs where the fly can be guy-lined out away from the tent body, creating an air gap that improves ventilation and reduces condensation.
  • Waterproof Ratings: When evaluating a tent’s waterproofing, look for a hydrostatic head rating of at least 1500mm for the fly and 3000mm for the floor. These numbers indicate how much water pressure the fabric can withstand before leaking. Higher ratings mean better water resistance but typically have a higher price tag and potentially less breathability.
  • Sealed Seams: Ensure all seams are factory-sealed to prevent water from seeping through the stitching. Some tents come with sealed seams, while others may require you to seal them yourself. If you need to seal the seams, use a high-quality seam sealer and pay extra attention to stress points and areas where water is likely to pool.

Wind Resistance

  • Design: An aerodynamic tent design can significantly improve wind resistance. Look for low-profile shapes with multiple anchor points. Dome-style tents often perform well in windy conditions because they can shed wind from all directions. Some tents feature wind-responsive venting systems that automatically adjust to changing conditions.
  • Guy Lines: Multiple guy lines are essential for stabilizing your tent in windy conditions. Look for tents with pre-attached, reflective guy lines for easy, low-light setup. The more anchor points a tent has, the more stable it will be in strong winds. Practice setting up your guy lines before your trip to ensure you can quickly secure your tent if the weather turns.
  • Stake Quality: High-quality stakes are crucial for keeping your tent grounded in windy conditions. Look for sturdy aluminum or steel stakes rather than lightweight plastic ones. Y-shaped or V-shaped stakes offer better-holding power in loose soil. Consider carrying extra stakes and a mallet for secure anchoring in various ground conditions.

Condensation

  • Ventilation:Proper ventilation is critical to reducing condensation inside your tent. Look for multiple vents, including low vents to allow cool air in and high vents to let warm, moist air escape. Some tents feature adjustable vents that can be opened or closed depending on weather conditions, allowing you to fine-tune the airflow.
  • Mesh Panels: Mesh panels promote airflow while keeping insects out. Look for tents with large mesh panels on the doors and windows and mesh roof sections. The more mesh, the better the ventilation, but remember that this can also affect warmth in cooler conditions.
  • Rainfly Design: A well-designed rainfly should allow for ventilation without compromising waterproofing. Look for rainflies with built-in vents or the ability to be propped open at the corners. Some innovative designs feature “eyebrow” vents over doors and windows, allowing air circulation even when the fly is fully deployed.

Ease of Setup and Takedown 

  • Easy Assembly: When choosing a multi-room tent, prioritize a tent that is straightforward to setup. Look for color-coded poles and connection points, which can significantly speed up the setup process. Some tents feature clip-on attachments instead of pole sleeves, making connecting the tent body to the frame much easier. Consider the number of people typically available to help with setup – some larger tents may require multiple people to erect safely.
  • Instant Setup: Instant tents have gained popularity for their convenience. These models often have pre-attached poles that must be extended and locked into place. While they can be heavier and bulkier when packed, the time saved on setup can be worth it, especially for frequent campers or those with limited mobility.
  • Provided Instructions: Clear, detailed instructions are crucial, especially for complex multi-room tents. Look for tents that come with well-illustrated setup guides. Some manufacturers even offer online video tutorials, which can be incredibly helpful for visual learners. Before your first camping trip, practice setting up your new tent at home. This will familiarize you with the process and allow you to identify potential issues before you’re out in the wilderness.
  • Weight: Consider the tent’s weight and packed size, especially if you’ll carry it any distance from your vehicle. While car camping allows for heavier, more spacious tents, you’ll still want to ensure it’s manageable for your group to transport and set up. Some tents come with multiple storage bags to distribute the weight among several people, which can be particularly useful for larger family tents.

Ventilation and Airflow

  • Ventilation System:A well-designed ventilation system is crucial for maintaining comfort in your multi-room tent. Look for tents with multiple vents strategically placed to promote air circulation. High and low vents create a chimney effect, drawing cool air in from the bottom and expelling warm, moist air from the top. Some advanced tents feature adjustable vents that allow you to fine-tune airflow based on weather conditions and personal preference.
  • Ceiling Vents:Ceiling vents play a vital role in managing the tent’s internal climate. They allow hot air to escape, reducing condensation and keeping the interior cooler during warm weather. When examining ceiling vents, check for sturdy, weatherproof covers that can easily open and close inside the tent. Some high-end models feature vents that can remain open even during light rain, thanks to clever design features like small awnings over the openings.
  • Cross Ventilation:Effective cross ventilation can significantly improve comfort in your multi-room tent. Look for designs with windows or vents on opposite sides of the tent, allowing for natural airflow that helps regulate temperature and reduce stuffiness. When setting up your tent, orient it to take advantage of prevailing breezes. Remember, good ventilation isn’t just about comfort; it also helps prevent condensation that can promote mold and mildew growth, extending your tent’s life.

Safety Features

  • Fire Retardant: Look for tents that meet CPAI-84 fire-safety standards, the industry benchmark for tent flame resistance. While fire-retardant chemical treatments can slow the spread of fire, they wear off over time—CPAI-84 compliance is the more reliable indicator. Always practice fire safety around your tent regardless.
  • Reflective Elements: Look for tents with reflective elements on guy lines, zippers, and tent corners. These small but important features increase visibility in low-light conditions, reducing the risk of tripping hazards around your campsite. Some tents even incorporate glow-in-the-dark zipper pulls or tent pegs, which can be incredibly helpful when nature calls at night.
  • Secure Closures: Check all zippers and closures for security and ease of use. Look for heavy-duty, snag-free zippers that operate smoothly. Some tents feature lockable zippers to secure your tent, which can be particularly reassuring when camping in busy areas or leaving your tent unattended. 

Customization and Expandability

  • Modular Design:Tents with modular designs offer the flexibility to adapt to different group sizes and camping needs. Look for options that add or remove sections, creating a customized living space. Some innovative designs even allow you to connect multiple tents, creating a sprawling campsite setup perfect for large groups or family reunions.
  • Connectable Tents: Check if the tent can be connected to other tents or shelter systems. This feature can be handy for large-group camping, allowing you to create separate spaces for sleeping, dining, and socializing. When evaluating connectable tents, consider how easy they are to link together and whether the connections are weatherproof. You may also consider an SUV tent that connects to your vehicle.
  • Accessory Compatibility: A tent compatible with various accessories can significantly enhance your camping experience. Look for models that offer add-ons like gear lofts, lighting systems, or custom groundsheets. Some manufacturers produce entire ecosystems of compatible products, allowing you to customize your tent to your specific needs over time.

Convenience Features

Vestibules/Awning

  • Storage:Vestibules provide additional storage space, keeping your main living area clutter-free. When evaluating vestibules, consider their size and shape. Look for designs that offer enough room to store bulky items like coolers or camping chairs while allowing easy access to the tent’s entrance. Some tents feature multiple vestibules, particularly useful for larger groups or gear-heavy trips.
  • Protection: A well-designed awning can significantly enhance your camping experience by providing a sheltered outdoor living space. Look for awnings that offer adequate protection from both sun and rain. Some innovative designs feature adjustable awnings that can be positioned to block wind or maximize shade depending on the sun’s position. Consider the ease of setup and stability in windy conditions when evaluating awning designs.
  • Size:Vestibules and awnings can vary significantly between tent models. When assessing size, consider your typical camping style and gear requirements. Larger vestibules can serve as mudrooms or gear organization areas for family camping or longer trips. Some tents offer the option to add extra vestibule space with attachable accessories, providing flexibility for different trips.

Windows and Doors

  • Number: A multi-room tent’s number of windows and doors can significantly impact ventilation, accessibility, and overall comfort. Multiple entry points are handy in larger tents, allowing occupants to come and go without disturbing others. When evaluating windows, consider both their size and placement. Strategically placed windows can provide scenic views and improve cross-ventilation.
  • Mesh: High-quality mesh on windows and doors is essential for keeping insects out while allowing air to circulate. Look for fine, durable mesh that can withstand regular use without tearing. Some advanced tents feature different mesh grades for various parts of the tent, using finer mesh in sleeping areas for better protection against smaller insects.
  • Zippers: The quality of zippers can make a big difference in your camping experience. Look for oversized, sturdy zippers that operate smoothly, even when the fabric is tense. YKK zippers are known for their reliability. Some tents feature two-way zippers on doors, allowing for ventilation options and easier access. Consider how the zippers are protected from the elements, such as storm flaps or welded seams.

Interior Pockets

  • Storage:Multiple interior pockets can significantly enhance organization within your multi-room tent. Look for a variety of pocket sizes and styles to accommodate different items. Mesh pockets are excellent for visibility and breathability, while solid fabric pockets offer more privacy. Some tents feature hanging organizers or removable storage systems that can be customized to your needs. Consider how the pockets are distributed throughout the tent – ideally, each sleeping area should have easy access to storage.
  • Accessibility: The placement of pockets is just as important as their number. Ensure that pockets are easily reachable from sleeping areas, allowing campers to keep essential items like flashlights, phones, or water bottles within arm’s reach. Some tents feature pockets at different heights, catering to adults and children. Look for pockets near doors for storing shoes or other items you might need when entering or exiting the tent.
  • Size: Pocket sizes should accommodate a range of items. While small pockets are helpful for personal items, more oversized pockets or gear lofts can hold bulkier gear. Some tents offer specialized pockets, such as tablet-sized pockets for electronics or insulated pockets to keep drinks cool. Consider your typical camping gear and choose a tent with pocket sizes that match your needs.

Clips and Loops

  • Hanging Gear: Strategically placed clips and loops can significantly expand your tent’s storage capacity and organization options. Look for sturdy loops along the ceiling for hanging lanterns or gear lofts. Some tents feature adjustable clips or daisy chains along the walls, allowing you to customize your storage setup. These features are beneficial for keeping gear off the ground in wet conditions or for drying clothes inside the tent.
  • Durability: Ensure clips and loops are securely attached to the tent’s structure. They should be reinforced to handle the weight of hanging gear without tearing or pulling away from the fabric. Metal clips or loops are more durable than plastic ones, though they may add slightly to the tent’s overall weight. Test the strength of these features before relying on them to hold valuable or heavy items.
  • Placement: The placement of clips and loops can significantly affect their usefulness. Look for options that offer versatility in different areas of the tent. Ceiling loops should be placed in the center and towards the corners for more hanging options. Wall clips or loops should be at various heights to accommodate different gear sizes. Some tents feature external loops for hanging wet gear or attaching guy lines for extra stability in windy conditions.

Integrated Flooring

  • Material: The floor of your multi-room tent is your barrier against ground moisture and should be made of durable, waterproof material. Look for heavy-duty fabrics like ripstop nylon or polyester with a high denier count. Some tents feature a “bathtub” floor design, where the waterproof material extends a few inches up the tent walls, providing extra protection against splashing or standing water.
  • Seams:Pay close attention to how the floor seams are constructed and sealed. Factory-taped seams offer the best protection against water ingress. Some high-end tents feature welded seams, which can be even more waterproof than taped seams. Check that the seams are reinforced at high-stress points, particularly where the floor meets the walls and around stake-out points.
  • Attachment: How the floor attaches to the tent walls can impact waterproofing and durability. Look for designs where the floor material wraps up the sides of the tent before connecting to the walls, creating a waterproof barrier. Some tents offer removable floors for easier cleaning or the option to use just the rainfly and poles for a lightweight shelter. Consider whether this flexibility is important for your camping style.

Portability and Storage

  • Packed Size: Consider how the tent’s packed size will fit in your vehicle and storage space at home. Some multi-room tents can be bulky when packed, so measure your available space before purchasing. Look for tents with compression straps or stuff sacks that help reduce packed size. Some models feature separate bags for poles, tent body, and rainfly, allowing for more flexible packing options.
  • Carrying Case: A durable, well-designed carrying case can make transporting your tent much more manageable. Look for cases with reinforced handles and sturdy zippers. Some high-end tents come with backpack-style carrying cases, which can be particularly useful if you need to take the tent any distance from your vehicle. Consider whether the case has extra pockets for stakes, guy lines, or repair kits.
  • Weight Distribution: Weight distribution becomes an important factor for larger multi-room tents. Some manufacturers offer modular packing systems where different components can be carried separately, allowing you to distribute the weight among group members. This can be particularly useful for family camping trips where gear needs to be carried some distance. Consider whether the tent can be partially set up with just the rainfly and poles for a lighter option on some trips.

Electrical Access

  • E-Port: Built-in electrical ports can be a convenient feature for campers who need to power devices or use electric heating. Look for weatherproof designs that can be securely closed when not in use. Some tents feature multiple e-ports in different rooms, allowing for more flexible power distribution. Consider the port’s size and whether it can accommodate various cord types.
  • Cable Management:Good cable management features can help organize your tent and reduce tripping hazards. Look for tents with built-in cable routing options, such as fabric sleeves or loops along the tent walls. Some advanced designs include integrated cable organizers or power strip pockets to keep electronics tidy and moisture-protected.

Color and Visibility

  • Campsite Visibility: The color of your tent can affect how easily you can locate it in a crowded campground or forested area. Bright colors like orange or yellow are obvious, which can be beneficial in emergencies. However, if you prefer a more discreet camping experience, earth tones like green or brown might be more suitable. 
  • Heat Absorption: Tent color can impact internal temperature. Lighter colors reflect more sunlight, potentially keeping the tent cooler in hot weather. Darker colors absorb more heat, which can be beneficial in cooler conditions but may make the tent uncomfortably warm in direct sunlight. Consider the climate you’ll be camping in most frequently when choosing a color.
  • Aesthetics: While functionality should be the primary concern, your tent’s aesthetic appeal can enhance your overall camping experience. Choose a color that you find visually pleasing, and that complements your other camping gear. Some manufacturers offer multiple color options for the same tent model, allowing you to personalize your choice.

Price and Value

  • Budget:Determine your budget based on how frequently you plan to use the tent and in what conditions. While opting for the cheapest option is tempting, investing in a higher-quality tent can save money in the long run through improved durability and camping experiences. Consider the cost per use over the expected lifespan of the tent.
  • Features vs. Cost: Compare features across different price points to find the best value for your needs. Make a list of must-have features and nice-to-have features to help prioritize. Spending a bit more can get you significant upgrades in materials, waterproofing, or convenience features that greatly enhance your camping experience.
  • Warranty:Check the manufacturer’s warranty. A longer warranty period often indicates the company’s confidence in its product’s durability. Some brands offer lifetime warranties against defects, providing peace of mind for a significant investment. Consider also the brand’s reputation for customer service and honoring warranty claims.

Brand Reputation and Reviews

  • Brand Reputation: When investing in a multi-room tent, the brand’s reputation can strongly indicate quality and reliability. Look for manufacturers with a long-standing history in outdoor gear production. These companies often have extensive experience in tent design and materials, leading to more refined and durable products. However, don’t dismiss newer brands entirely – some may offer innovative features or exceptional value. Research the brand’s commitment to customer service and its policies on repairs or replacements, as this can make a significant difference if issues arise with your tent.
  • Customer Reviews:Reading through customer reviews can provide valuable insights into the real-world performance of a tent. Consider reviews from users with similar camping habits or who have used the tent in conditions similar to what you anticipate. Look for patterns in the feedback – if multiple users mention the same pros or cons, these are likely accurate reflections of the tent’s performance. Be wary of reviews that seem overly positive or negative without specific details. Some experienced campers have found that reviews mentioning long-term use (over multiple seasons) are particularly helpful in assessing a tent’s durability and value.
  • Expert Reviews: Seek out reviews from outdoor gear experts and professional testers. These individuals often have experience with a wide range of tents. They can provide comparative insights that average users might miss. Look for reviews that include rigorous testing in various weather conditions and over extended periods. Some reputable outdoor magazines and websites conduct annual tent tests, which can be an excellent resource for up-to-date information on the latest models. Remember that while expert opinions are valuable, your needs may differ from their testing criteria, so balance their advice with your requirements.

Environmental Impact

  • Eco-Friendly Materials: Many campers are increasingly concerned about the environmental impact of their gear. Look for tents made from recycled materials or those produced using environmentally friendly processes. Some manufacturers now offer tents made from recycled polyester or use PFC-free water-repellent coatings. While these options may sometimes come at a higher price point, they allow you to minimize your environmental footprint while enjoying nature.
  • Sustainable Practices: Research the brand’s commitment to sustainable manufacturing practices. Some companies have initiatives to reduce waste, use renewable energy in production, or offset their carbon footprint. Others may have programs for recycling old tents or repairing gear to extend their lifespan. Supporting these brands can align your purchases with your environmental values. Consider also the packaging – some eco-conscious brands are moving towards minimal, recyclable packaging for their tents.
  • Leave No Trace:Choose a tent that supports Leave No Trace principles. This might include light-colored, discreet designs that blend into the environment or robust construction that doesn’t shed microfibers. Some tents come with educational materials on responsible camping practices. While these features might not directly impact the tent’s performance, they reflect a brand’s commitment to environmental stewardship and can help you camp more responsibly.

Maintenance and Care

  • Cleaning:Opt for tents with easy-to-clean materials and designs. Look for fabrics that can be wiped down or gently washed without damaging waterproof coatings. Some tents feature removable floors or flysheets that can be cleaned separately, making maintenance easier. When purchasing, check the manufacturer’s cleaning recommendations – some may suggest specific cleaning products or methods to maintain the tent’s performance and longevity. Experienced campers often recommend cleaning your tent after each trip, even if it doesn’t appear dirty, to prevent the buildup of invisible contaminants that can degrade the fabric over time.
  • Repair:Check if a repair kit is included with the tent or available for purchase separately. A good repair kit should consist of patches for both the tent body and the rainfly and seam sealer. Some high-end tents have more comprehensive repair kits, including spare parts for zippers or poles. Familiarize yourself with basic repair techniques or look for tents from brands that offer repair services. Making minor repairs in the field can be crucial for extending your tent’s lifespan and ensuring a successful camping trip, even if mishaps occur.
  • Storage: Proper storage is essential for extending your tent’s lifespan. Look for tents with breathable storage bags, which allow any residual moisture to evaporate. Store it loosely in a cool, dry place away from direct sunlight. Some campers recommend periodically setting the tent indoors during long storage periods to air it out and check for any developing issues. Consider whether your tent has adequate storage space when not used, as proper storage can significantly impact its longevity.

Unique Multi-Room Tent Features for Family Camping

  • Kid-Friendly Features: When camping with children, look for tents with features designed to enhance safety and enjoyment for younger campers. Lower windows allow kids to enjoy views and feel connected to the outdoors. Glow-in-the-dark zipper pulls can help children navigate the tent at night without fumbling. Family-oriented tents include built-in night lights or star-gazing panels in the roof, making bedtime more exciting for kids. Consider also the layout of the tent – some models offer smaller ‘cubby’ areas that children love to claim as their own space.
  • Pet Compatibility: For families camping with pets, certain tent features can make the experience more enjoyable for everyone. Look for durable flooring that can withstand paw traffic and is easy to clean. Some tents offer pet doors or lower mesh windows that allow pets to see outside without compromising the tent’s insect protection. Consider ventilation – good airflow is critical when camping with pets to manage odors and keep everyone comfortable. Some campers recommend tents with removable room dividers, allowing you to create a dedicated space for your pet if needed.

Unique Multi-Room Tent Features for Festival Camping

  • Blackout Technology: For festival-goers, sleep quality can significantly impact the experience. Look for tents with blackout or dark room technology, which can block up to 99% of daylight. This feature allows for better sleep, especially after late nights, and can keep the tent cooler during hot days. Some tents offer this technology in specific rooms, allowing for versatile use of the space.
  • High Visibility: In a sea of tents at a festival, quickly locating your own is crucial. Opt for tents with bright colors or unique patterns. Some brands offer customizable flags or banners that can be attached to your tent. Reflective guy lines or tent corners can help you find your way back in the dark.
  • Sound Insulation: While no tent can completely block festival noise, some models offer better sound insulation than others. Look for tents with thicker fabrics or double-wall construction. Some high-end models even incorporate sound-dampening materials in their design. While these features add weight, they can significantly improve sleep quality in noisy environments.
  • Multiple Entrances: In the busy atmosphere of a festival, having multiple entrances to your tent can be a game-changer. This feature allows for easier access and better traffic flow, especially when sharing the tent with friends. Look for designs where each room has its entrance for maximum convenience.
  • Security Features: Festival camping often means leaving your tent unattended for long periods. You will want to consider how to secure your tent. Look for tents with lockable zippers or built-in security pockets for valuables. Some models offer reinforced stake-out points that are more difficult to tamper with. While no tent is entirely theft-proof, these features can provide security and peace of mind.
  • Group Compatibility: For festival-goers camping with friends, look for tents that can connect to others. Some models offer linking systems that allow you to create a communal space between individual sleeping areas. This setup can enhance the social aspect of festival camping while still providing private spaces when needed.

Unique Multi-Room Tent Features for Living in a Tent Full-Time

  • Durability: Durability is paramount for those planning to live in a tent full-time. Look for tents with the toughest materials, such as high-denier ripstop fabrics and military-grade waterproof coatings. Aluminum poles offer the best balance of strength and weight for long-term use. Some expedition-grade tents are designed for extended use in harsh conditions and may be suitable for full-time living.
  • Ventilation: Good air circulation is crucial when living in a tent full-time to prevent condensation, mold, and odors. Look for tents with multiple vents, including ground-level vents and roof vents. Some models offer adjustable ventilation systems that can be fine-tuned for different weather conditions. Consider also the placement of doors and windows to create cross-ventilation.
  • Structural Stability: Look for tents with robust internal frames to avoid sagging and maintain livability over time. Geodesic or semi-geodesic designs often offer the best stability for long-term use. Some tents designed for base camping or expedition use feature extra poles or reinforced stress points that can withstand continuous setup. Consider also the quality of the guy-out points and stakes, as these play a crucial role in maintaining the tent’s shape over time. Consider whether the tent will fit nicely on a tent platform as a long-term base.
  • Entrance Design: When living in a tent full-time, the entrance becomes a heavily used feature. Look for designs with vestibules large enough to serve as a mudroom or storage area. Some tents offer multiple entrances, which can be particularly useful for long-term living, allowing you to designate areas for different purposes. Consider also the design of the door itself – large, D-shaped doors tend to be more convenient for frequent use than smaller, zippered entrances.

TL;DR

For those seeking multi-room tent camping accommodations, the CORE 12-Person Instant Cabin Tent is the top choice for large groups. It offers rapid setup, excellent weather protection, and ample living space with three separate rooms. For a slightly smaller option, the PORTAL 10-Person Camping Tent provides outstanding features, including a functional front porch and robust weather resistance. Families or smaller groups might prefer the CAMPROS CP 8-Person Tent, which offers easy setup and good value without sacrificing comfort or space.

Other noteworthy options include the Coleman Skylodge 12-Person Camping Tent, known for its excellent livability and durability, and the UNP 10-Person Family Tent, which scores high on comfort and thoughtful design. Each tent provides unique features to enhance your camping experience, from instant setup capabilities to superior ventilation systems and weather protection.

FAQs

What are the benefits of multi-room tents?

Multi-room tents offer increased privacy, better organization, and versatile living spaces. They allow for separate sleeping and living areas, making them ideal for families or groups of friends camping together.

How much privacy do multi-room tents offer?

Multi-room tents offer good privacy with room dividers. For example, the CORE 12-Person Instant Cabin Tent features two room dividers, creating three separate spaces for enhanced privacy.

How do I choose the right size multi-room tent for my needs?

To ensure comfort, choose a tent rated for 2-4 more people than will actually use it. Consider both sleeping space and gear storage. An 8-person tent like the CAMPROS CP Tentwould be suitable for a family of four.

What are the common complaints about multi-room tents?

Common complaints include weight and bulk when packed, complexity of setup for some models, and potential issues with waterproofing in heavy rain. However, high-quality tents like those recommended in the article address many concerns with features like easy setup systems and robust weather protection.

Best Bushcraft Backpacks

Bushcraft backpacks are essential gear for outdoor enthusiasts who enjoy hiking, camping, and surviving in the wild. These backpacks must be durable and versatile, with enough space to carry essential items like a knife, fire starter, water, and food. They also work as great bug out bags. Designed to withstand rough conditions, a reliable bushcraft backpack can make all the difference in your adventures.

Consider size, material, weight, and organization when choosing a bushcraft backpack. The backpack should be lightweight enough to carry easily yet roomy enough for all your essentials. Look for strong materials like heavy-duty nylon or canvas, which can endure harsh environments. Good organization features, like multiple compartments and external straps, help keep your gear accessible.

We researched multiple bushcraft backpacks to find the best options that balance durability, functionality, and comfort.

Best Bushcraft Backpacks

Let’s explore the best bushcraft backpacks we’ve found. Our top picks balance rugged durability and practical features to last through your wilderness adventures.

Our Top Pick: Maxpedition Falcon-II Backpack

Photo: maxpedition.com

The Maxpedition Falcon-II Backpack is a must-have for any serious bushcrafter due to its ergonomic design and durable materials. It also makes a great individual bug out bag.

Pros

  • Extremely durable construction
  • Comfortable to wear for long periods
  • Spacious with numerous compartments

Cons

  • A bit pricey
  • Might be too large for casual use
  • Water resistance could be improved

Based on specs and customer reviews, the 1050-Denier nylon is incredibly sturdy and resists both abrasion and water. Reviewers report the padded straps and waist support make a noticeable difference during long hikes, distributing the weight evenly.

Based on customer reviews, the spacious compartments are a standout. The main compartment’s clamshell opening makes packing and finding items easy. There’s enough room for all essential gear and more. Reviewers especially like the extra pouches and PALS attachment points, which are perfect for organizing small items.

On the downside, the price might be steep for some. For casual outings, it might feel too large. Additionally, while it handled light rain well, we think an extra rain cover could be worthwhile.

Overall, the Maxpedition Falcon-II Backpack is an excellent choice for serious outdoor adventurers. It combines functionality, durability, and comfort in one rugged package.

Also Great: Blitz 35 Tactical Pack

Photo: mysteryranch.com

This pack is perfect for those needing a reliable and versatile backpack for various wilderness situations or as a bug out survival bag.

Pros

  • Extremely durable build
  • Great for carrying heavy loads
  • Multiple compartments for easy organization

Cons

  • Relatively heavy at 4.44 pounds
  • Can be too large for short day trips
  • High price point for some budgets
  • Some might find it uncomfortable to wear

Based on specs and customer reviews, the durability of the construction stands out. It is robust and can handle heavy loads without a problem. The pack has numerous compartments, making it easy to keep gear organized. Reviewers appreciate the multiple access points and the convenient laptop sleeve.

On the downside, this pack is heavier at 4.44 pounds. There might be better choices for shorter trips where every ounce counts. The large size can be overkill if you’re just hiking for a day. Lastly, it’s worth noting that the price might be a bit steep for some.

Despite these cons, the Blitz 35 Tactical Pack is a solid investment if you need something versatile and reliable for more extended adventures. It’s a pack built to last and ready to tackle almost any adventure.

Our Budget Pick: OneTigris WILD ROCKET 45L Backpack

Photo: onetigris.com

This is a solid choice for those needing a rugged and spacious bushcraft backpack.

Pros

  • Sturdy 500D Cordura material
  • Ample storage with 45L capacity
  • Versatile MOLLE webbing

Cons

  • A bit heavy at 4.6 lbs
  • The material doesn’t stretch
  • No included hydration bladder

Based on specs and customer reviews, the OneTigris WILD ROCKET 45L Backpack’s durability stands out. The 500D Cordura nylon is tough and suited for rough bushcraft conditions. Reviewers report it holds up well whether scrambling up ridges or pushing through dense forests.

The storage options are impressive. With a large main compartment, multiple pockets, and specialized axe holders, organizing our gear is a breeze. We appreciated how the roll-top closure kept everything secure, and the 45L capacity ensured we had enough space for all essential items.

On the downside, it’s relatively heavy. At 4.6 lbs, reviewers note it adds noticeable weight when loaded with gear. Despite this, the MOLLE webbing allows customization with add-ons, which reviewers find valuable on extended trips. Note that a hydration bladder must be purchased separately if needed.

The Wild Rocket Bushcraft Pack balances durability, versatility, and storage, making it a reliable choice for any rugged outdoor adventure or as a bug out bag.

Buying Guide

You must consider a few key factors when looking for the best bushcraft backpack.

Capacity: Consider how long you plan to be in the wilderness. A 20-30 liter pack might work for day trips. For longer adventures, opt for 40-60 liters.

Material: Strong, water-resistant materials like nylon or canvas are essential. They can withstand rough use and protect your gear from getting wet.

Comfort: Comfortable straps and a padded back support make a big difference. Look for adjustable and padded shoulder straps. A comfortable, padded hip strap is more important in our opinion, for any long-distance travel.

Key Features

FeatureWhy It Matters
Multiple CompartmentsKeeps everything organized
Reinforced StitchingEnsures the backpack can handle heavy loads
Water Bladder CompatibilityAllows easy access to water
MOLLE WebbingUseful for attaching extra gear
Hip Belt/StrapHelps distribute weight evenly

Weight: Aim for a lightweight backpack. Heavy packs can tire you out quickly, especially when filled with gear.

Durability: Reinforced stitching and robust zippers are signs of a durable pack.

Additional Tips

  1. Try Before Buying: If possible, test the backpack in-store. Load it up and walk around to feel how it feels.
  2. Season: Consider the season you’ll be using it. Winter adventures need more space for extra clothes.

Budget: Set a budget, but remember that investing more in a quality pack can save us money and discomfort in the long run.

TLDR;

After thoroughly researching the top bushcraft backpacks, it’s clear that each has its strengths. However, the Maxpedition Falcon-II Backpack stands out as the best overall choice. Its ergonomic design, durable 1050-Denier nylon construction, and comfortable wear make it ideal for serious outdoor adventurers. Despite its higher price, the Falcon-II offers unmatched functionality and durability, ensuring it can withstand the most demanding conditions.

For those seeking a balance between durability, versatility, and storage, the OneTigris WILD ROCKET 45L Backpack is a solid contender. Its 500D Cordura material and ample storage options make it perfect for extended trips. However, its weight might be a consideration for some.

Ready to elevate your outdoor adventures? Choose the best bushcraft backpackthat suits your needs and embark on your next wilderness journey. Click the links to explore more and make your purchase today!

FAQs

What size backpack should I get for bushcrafting?

The size of your bushcraft backpack depends on the duration of your trip and the amount of gear you need to carry. Here are some general guidelines:

Day trips: 20-30 liters.
Weekend trips: 30-50 liters.
Multi-day trips (3-5 days):50-70 liters.
Extended trips (5+ days): 70-90+ liters.

What materials are best for a bushcraft backpack?

Durability is key for bushcraft backpacks. The best materials include:

Cordura Nylon: Known for its high durability and resistance to abrasions.
High-Density Canvas:Offers toughness and longevity.
Polyester: Lightweight and resistant to water.

Best SUV Tents of 2026

We researched and reviewed 40+ SUV tents, including standalone and tailgate tents, looking for the best SUV tent for the money.

An SUV tent can enhance your car camping experience and make it more accessible and convenient. Unfortunately, most SUV tents are of poor quality, and the wrong SUV tent will dampen your SUV camping experience due to poor fit, frustrating setup, and terrible weather performance. 

A handful of SUV tents, including the Napier Sportz SUV Tent, did meet our criteria and are likely to help make your SUV camping trip more enjoyable. 

As a budget-minded family, we’re currently enjoying and using our best budget SUV tent, the Vevor SUV tent, for our summer car camping trips, including our big trip to Yosemite last June.

Photo: Daniel Borkert/OutdoorFootprints.com

Best Overall SUV Tent

Napier Sportz SUV Tent

Napier Sportz SUV Tent

Best SUV Tent for Families
Floor size:9′ x 9′
Peak height:91″
Capacity:4-5
Rating:8.35/10.00
See on Amazon

Pros

Great for families

Fits most SUVs

Double-walled

Vertical walls

Easy setup with pole hub

Awning integrated into rainfly

Concerns

Vehicle sleeve not waterproof

We think the Napier Sportz tent is the best SUV tent currently available. Napier has a 30+ year reputation for creating SUV tents. They’re known to fit well on most SUVs and seem to set up pretty quickly, although we found it difficult to set up with only one person. 

We like the two tent doors for accessibility and the included awning. We also like the fact that it is a two-wall tent with a separate rainfly. This design means you will get better ventilation and better weather protection. Unfortunately, Napier didn’t extend the rainfly over the vehicle attachment sleeve, so you might get water leaking through this area in a heavy rainstorm. 

The Sportz SUV tent is a free-standing tent that lets you detach your vehicle to explore during the day. The 9’ x 9’ floor space with almost vertical walls provides an adequate living space with room to sleep around four people comfortably. We could easily fit our queen-size air mattress with plenty of room on the sides to move around and put our other stuff. You could also squeeze in a king-size air mattress for you and your partner and have 2 to 3 kids sleep in the available SUV trunk area. Many of the leading SUV car manufacturers recommend this tent for their SUVs. Honda sells this exact model with their logo on it. 

We think this is the best SUV tent for the money, with adequate quality and features. While not perfect, it will enhance the overall car camping experience and is our primary recommendation for SUV tents.

Woman camping with Napier Sportz SUV Tent attached to her white SUV
Photo: napieroutdoors.com

Best Budget SUV Tent

Vevor SUV Tent

Vevor SUV Tent

A solid, well-priced SUV tent for families
Floor size:8′ x 8′
Peak height:87″
Capacity:3-5
Rating:7.4/10.00
See on Amazon

Pros

Good for small families

Fits well on most SUVs

Double-walled

Performs adequately in rain and wind

Concerns

Average material quality with average durability

Poor setup instructions

We found dozens of budget SUV tents. Most tents we researched on Amazon fall into the budget price range. Unfortunately, most of these tents were subpar in design and quality in our research. 

We were impressed with the relative quality and design of the Vevor SUV tent. Most SUV tents at this price point suffer from weather protection, but the Vevor SUV tent seemed to perform adequately in the rain and wind. It’s not nearly as durable as the Napier Sportz SUV Tent, but it does well in weather conditions as a double-layer tent for half the price of the Sportz SUV Tent. 

The tent is slightly smaller, with 8’ x 8’ of floor space, but we could still fit our queen air mattress with room to spare. We primarily used the floor space to set up our toddler’s pack ‘n play as a sleeping area while we slept in the back of the SUV. The manufacturer lists this as an eight-person tent, but we found it could realistically hold 3-5 people. We would recommend 3-4 people max. 

It also fits well on most SUVs without difficulty. The instructions for setting it up could’ve been much better, but then again, it’s a budget tent, and setting it up is relatively straightforward. We didn’t really like the fiberglass poles with elastic cords as they felt difficult to push through the 3 different sleeves that support the tent and the elastic cord felt like it might snap easily. It does come with several spare parts, so that’s nice if needed. It also fits pretty tight on the back of our Honda Passport (same size as a Honda Pilot) and requires backing up just right to fit the staked-down tent.

The Vevor SUV Tent isn’t made with the highest-quality materials. The floor material felt durable. We thought the zippers were kind of lightweight and could potentially be a durability problem in the future. Still, we consider it the best budget option out of the dozens of SUV tents we reviewed.

Photo: Stacy Borkert/OutdoorFootprints.com

Another Great SUV Tent

Kelty Caboose

Kelty Caboose

An innovative SUV tent design with an open, covered living space suitable for couples or small families.
Floor size:7′ x 7′
Peak height:78″
Capacity:2-3
Rating:8.05/10.00
See on Amazon

Pros

High-quality materials and design

Large tent door

Great weather protection

Concerns

The tent and SUV space feel disconnected

Fits 2-3 people max

We love the Kelty brand and were excited to see they made an SUV tent. The design isn’t quite the same as the other SUV tents we reviewed, as it has a semi-open connection to your vehicle rather than an enclosed sleeve. This design is nice if you want to get into your car while avoiding the rain, but it doesn’t let you use your SUV to expand your living space like other SUV tents. It almost feels like two separate spaces with a tarp covering the outdoor gap between the car and the tent. This setup might be what you’re looking for, but we didn’t think it made much functional sense for what we’re looking for in an SUV tent. 

The tent is the highest quality of all the SUV tents we reviewed. Unfortunately, it’s a bit on the small side at 7’ x 7’. Our queen air mattress can squeeze in, but it’s tight. 

The best use of this setup would involve putting the kids in the tent and the adults in the back of the SUV and using the middle covered area as a covered living space with an outdoor rug, table, and chairs.

Friend camping with their Jeep attached to their Kelty Caboose SUV tent.
Photo: kelty.com

Best Tailgate SUV Tent

Napier Sportz Cove

Napier Sportz Cove

Best SUV tent for solo travelers or couples
Floor size:n/a
Peak height:n/a
Capacity:1-2
Rating:8.15/10.00
See on Amazon

Pros

Great vehicle fit (2 size options)

Awning with integrated structure

Good weather protection

Great privacy

Easy, fast setup

Concerns

Doesn’t work for families or kids due to space limitations

The Napier Sportz Cove is the best tailgate SUV tent in our research. Tailgate tents cost less and are often of higher quality.  This tailgate tent design lets you open your trunk while keeping bugs out and getting fresh air in. This also slightly extends your useable space, which a tall person like me appreciates. 

The Sportz Cove attaches well to most small—to mid-sized SUVs. Napier offers two size options for this tailgate tent, so review the fit chart before purchasing. Fit is a common complaint for most tailgate tents, so we were pleased to see how well it fit. This tent has an ingenious awning with a single-pole integrated support. The setup was also fast compared to other SUV tents. The Sportz Cove also held up well in rain and wind without significant leaking around the seals.

The only main concern with the Sportz Cove is related to the intrinsic limitations of tailgate tents, which is limited space. The tailgate SUV tent works excellent if you travel solo or as a couple. If you have kids or need more space, then you will likely want a larger SUV sleeve tent.  

In our opinion, the Sportz Cove is a solid choice for a tailgate-style SUV tent. 

Couple camping in with their Napier Sportz Cove attached to their SUV.
Photo: napieroutdoors.com

The SUV Tent Competition – 40+ SUV Tents Ranked

Standalone-Sleeve SUV Tents Rankings

Family camping in the desert with their Napier Sportz SUV tent attached to their white SUV
Photo: napieroutdoors.com

We reviewed and researched 32 SUV tents that were available for purchase while publishing this review.

RankStandalone SUV TentsSizeRating
1Napier Sportz SUV Tent9′ x 9′8.35
2Napier Sportz SUV Tent with Mesh Room10′ x 10′8.15
3Kelty Caboose Tent7′ x 7′8.05
4Napier Backroadz SUV Tent10′ x 10′7.95
5Rightline Gear SUV Tent8′ x 8′7.75
6Vevor SUV Tent8′ x 8′7.4
7Portal 2-in-1 5 Person SUV Tent10′ x 8′7.35
8UNP SUV Tent10′ x 9′7.25
9Timber Ridge SUV Tent10′ x 8′7.05
10Trekway SUV Tent9′ x 9′6.95
11Joytutus SUV Camping Tent7′ x 7′6.95
12Idoogen Mobility A4 SUV Tent16′ x 7′6.85
13KingCamp SUV Tent15′ x 9′6.85
14Aomxay SUV Tent6′ x 6′6.8
15Ytaoeo SUV Tent9′ x 9′6.75
16H&ZT SUV Tent10′ x 10′6.75
17GoHimal SUV Tent8′ x 8′6.7
18Coumy SUV Tent10′ x 8′6.45
19Lelekdo SUV Tent11′ x 6′6.4
20GeerTop Instant SUV Tent10′ x 10′6.3
21Idoogen Mobility A1 SUV Tent10′ x 8′6.25
22MC Tomount SUV Tent10′ x 10′6.2
23S’more Glamping SUV Tent10′ x 10′6.1
24Hasika SUV Tent8′ x8′6.1
25Gardimax SUV Tent10′ x 10′6.05
26Headery SUV Car Tent 8′ x 8′5.65
27Maizoa SUV Tent8′ x 8′5.2
28Wasagun SUV Camping Tent8′ x 8′5.2
29Outsunny SUV Tent7′ x 6′5.1
30Elikoya SUV Tent 8′ x 8′5.1
31Qaoar SUV Tent10′ x 5′4.65
32Pumbba SUV Tent10′ x 5′4.6

Editorial Note: The Outdoorfootprints.com editorial team researched and rated these standalone-sleeve SUV tentsin May 2024. All tents were available at the time of research and rating.

Tailgate/Hatchback SUV Tents Rankings

Couple camping by the lake in their Sportz Cove SUV tailgate tent on their black SUV.
Photo: napieroutdoors.com

We found ten available tailgate SUV tents that we reviewed and rated. Almost all the tents were within the same price range. The primary differences were the quality of materials, ease of setup, and vehicle fit.

Note that we rated the Tailgate SUV tents with the Standalone-Sleeve SUV tents but are ranking them separately.

RankTailgate SUV TentsRating
1Napier Sportz Cove SUV8.15
2M Karmater SUV Tailgate Tent7.45
3Camp Toad Universal SUV Tent7.1
4Idoogen Mobility Bat6.8
5Joytutus Tailgate Tent6.7
6Idoogen Mobility A06.55
7Hrefeu SUV Tailgate Tent6.55
8Hasika Shade Awning6.5
9Heytrip SUV Tailgate Tent6.35
10Dlucky SUV Trunk Tents6.2

Editorial Note: The Outdoorfootprints.com editorial team researched and rated Tailgate SUV Tents in May 2024 (reviewed and updated in March 2026). All tents were available at the time of research and rating.

Research and ranking criteria listed
Grid: Daniel Borkert/outdoorfootprints.com

Vehicle Compatibility 

Rating Weight = 10%

We reviewed the SUV tent’s compatibility with different SUV models and sizes. A poorly fitting tent results in frustration while setting up, contributing to a frustrating camping experience. Also, a well-fitting tent seals to a vehicle, keeping the rain and wind out. 

Most SUV tents specify a universal fit, but users, in reality, experience a variety of vehicle fits or, unfortunately, primarily poor fits. Also, tailgate tents usually seem to run on the smaller size and don’t fit a larger SUV. All these factors contributed to your vehicle compatibility rating. 

Livability and Comfort 

Rating Weight = 25%

The livability of an SUV was of top importance for us. We got an SUV tent because we want to enhance our camping experience. With this goal in mind, we looked at the features of an SUV tent, such as the tent’s interior space, peak height, and floor area. These all objectively contribute to a more comfortable camping experience. 

Many SUV tents had similar floor space but didn’t have vertical walls. In our experience, this tent design limits the usable living space. Minor features such as an awning, storage hooks and pockets, windows, and doors also contributed to our livability and comfort rating. 

Ease of Setup and Takedown

Rating Weight = 20%

Setup and takedown are a significant factor in our reviews of the plethora of SUV tents. Most SUV tents failed in this category.

We have found that an easy-to-set-up tent is often used more often for camping. If an SUV tent has all the features but is difficult or takes a long time to set up, we probably won’t use it often on our camping adventures. 

We considered the tent’s setup and takedown process, including the attachment mechanism to the vehicle. We also factored in the time required and the clarity of instructions. Many manufacturers give an unrealistic setup time in our research. Also, many manufacturers didn’t provide unambiguous instructions. We also found that most tents require two people for setup. 

Weather Protection

Rating Weight = 20%

A significant factor is how our SUV tent performs in the weather. We wanted to know if it could withstand rain and how it performed in the wind. We also considered internal condensation, which proper ventilation mitigates. 

We examined each tent’s technical features, including its hydrostatic head (HH) rating, denier count (D), and ventilation system design. However, based on user feedback, we primarily evaluated each tent’s real-world waterproofness, ventilation, and resistance to wind and rain. We also examined the stake-down system with guylines and the pole material. 

Unfortunately, most SUV tents use the cheaper fiberglass pole material, which often means poor durability and wind resistance. 

Durability and Longevity

Rating Weight = 15%

We also wanted to evaluate how well-constructed and long-lasting an SUV tent might be. We want a tent that lasts more than a few camping trips, ideally for many years. 

We evaluated the SUV tent’s construction quality, materials, and reinforcements. We scored them based on the thickness of the material (denier) and pole material, reported longevity in user reviews, warranty offered, and the manufacturer’s reputation. 

Over 90% of the SUV tents we reviewed were made with cheap materials and poorly constructed. A similar number were manufactured by unknown companies with little to no warranty guarantee. 

Aesthetics and Design 

Rating Weight = 5%

We like well-designed and aesthetically appealing gear, including SUV tents that function and look great. This ranking is somewhat more subjective, but there is evidence that brightly colored tents are less hot and more comfortable inside. 

In determining this score, we considered color choices, style, and unique features like awnings or vestibules. Because this is a more subjective criterion, we weighted it less than other more functional criteria, such as ease of setup, weather protection, durability, and livability. 

Price and Value 

Rating Weight = 5%

We also looked at each tent’s price compared to its features and construction quality. We compared this to tents of similar price, size, and features, giving it a value score. This criterion also was weighted less since we’d generally expect lower quality SUV tents at lower price points and higher quality tents that cost more due to more expensive materials and manufacturing. This rule of thumb wasn’t always the case, as we found out during our research, but for the most part, you get what you pay for with SUV tents.

SUV Tent Buying Guide – Factors We Consider Important

SUV Tent Types

You and your family love the great outdoors and value flexibility when camping. A sleeve-standalone SUV tent catches your eye—it can detach from your SUV while leaving the roomy tent structure standing. An SUV tent means you can break camp quickly for a day trip without packing everything up. You envision lounging in the spacious tent at night after adventuring during the day. 

SUV tents differ from the popular roof-top and truck bed tents, which you should consider separately. You need to consider which tent type meets most of your needs.  

A key difference is that most SUV tents attach in some manner to the vehicle’s trunk. There are two common SUV tent types: the Standalone-Sleeve SUV tent and the Awning or Tailgate SUV tent. 

Standalone-Sleeve SUV Tent

Vevor SUV tent attached with sleeve to a black SUV
Photo: vevor.com

The most common SUV tent type is a standalone ground tent with a sleeve to attach to an SUV, such as the Napier Sportz SUV Tent or the Vevor SUV Tent pictured above. This type of tent can detach from your vehicle while leaving your tent in place, allowing you to drive your SUV when camping without breaking down the tent space. 

Pros
  • Can use without SUV attached
  • Larger tent space
  • Sturdier in weather due to independent frame
  • More features available, such as pockets, doors, and windows
  • Double-wall models available (tent with a separate rainfly) 
Cons
  • More time to set up and take down
  • More complicated to setup
  • Bulkier tent size

Tailgate or Hatchback SUV Tent

Sportz Cove tailgate tent attached to the back of a SUV with a woman sitting in the tent.
Photo: napieroutdoors.com

Tailgate tents, such as the Sportz Cove, create a protected tent door when your back trunk is open, effectively creating an enclosed space with ventilation. They often frequently include a vestibule (covered porch) off the back of the trunk. 

Pros
  • Simple and quick setup and take-down
  • Less bulky to carry
Cons
  • Limited sleeping space
  • Requires take-down to drive SUV
  • It can be less weather-resistant 
  • Single-wall

Vehicle Compatibility

You recently traded in your old SUV for a brand-new model and are eager to take it camping. But you want to ensure the tent fits perfectly for an easy setup.  

Most SUV tents are universal fit, meaning they can be attached to most SUV models. 

Features to look for include universal fit, attachment points, and adjustable straps.

SUV Tent Size and Capacity

With two kids and a dog, tent size is crucial for family camping trips. You laugh, imagining your brood squished together like sardines in a tiny tent. You decide to go big – a tent rated for 6+ people will give everyone enough room to spread out and store your camping gear.

SUV tent size depends on how many people are camping, what kind of sleeping pad or mattress you use, and how much extra floor space you want. You should also consider additional space for camping cots and other camping gear. 

Also, consider how much space you will have when you choose your campsite. Most campsites can handle an SUV tent, but keep this in mind when choosing your SUV tent. 

Floor Space

Floor space is a crucial factor in determining sleep capacity and living space. It also determines what mattress, cot, or sleeping pad you can use inside. 

The peak height inside the tent also affects floor space. A tent with a sloped wall will have much less usable floor space than a more vertical-walled tent with the same floor space. 

Peak Height

Peak height is the height of the tent inside. Traditional car camping tents are usually around 6 feet tall (6’). Pole structure determines peak height. A dome tent with an X-shaped pole structure will have most of the peak height in the middle. This type of pole structure will also limit your livable floor space.

Sleep Capacity

The manufacturer usually provides sleep capacity. Industry standards determine sleep capacity by how many sleeping bags fit inside the tent. Sleep capacity provides a good standard for determining tent size, but don’t pick your tent based on sleep capacity alone because you’ll probably want more sleep room than the cramped space the manufacturer recommends. 

A good rule of thumb is to get two sizes up from what you will need. So, if you have two adults, a child, and a dog, get a tent accommodating at least six people. If you have only two adults, then get a four-person tent. Don’t skimp on size when you are car camping.  

SUV Tent Ease of Setup and Takedown

You may consider yourself handy, but a complicated tent set up after a long drive sounds like a personal nightmare. With an easy, frustration-free setup, you can relax quicker at your campsite instead of battling tangled pole sleeves.

Prioritize tents with a straightforward setup, including attaching/detaching from your SUV, staking down, and putting on the rain fly.

Look for color-coded poles, clear instructions, and minimal components. Consider how quickly you can set up the tent, especially after a long day of driving. 

Apart from tent quality and fit, ease of setup may be the most critical factor in making a trip more enjoyable. Don’t forget to test your gear at home before a trip so you can work out any kinks in the setup process.  

SUV Tent Weather Resistance

It is essential to consider how well your tent will withstand the elements, especially any type of precipitation or wind. 

Season Rating

Tent manufacturers rate tents with a season rating. Season rating is a quick way to know how well a tent might stand in the wind or a snowstorm.

Remember that season ratings have nothing to do with the temperature but indicate how sturdy they might be in snow or high winds.

Material and Durability

Look for a higher-denier ripstop fabric with good UV and water resistance. Also, look for reinforced seams and zippers. 

Manufacturers make SUV tents with polyester, nylon, or composite material. High-quality tent material usually has a higher denier (fabric thickness) with an integrated ripstop. If you look closely at the fabric, the ripstop gives it a faint checkered pattern. A higher denier is generally more durable but also more bulky. 

Look not only at the thickness of the walls but also the floor material, as this is in direct contact with the rocks and roots. 

Look also for reinforced/taped seams and zippers. 

Tent poles are also usually made of fiberglass or aluminum. Aluminum poles are preferred because they are stronger and can withstand windy days. 

Rainfly coverage and Waterproof Coating

Some tents are double-walled, so they have a separate rainfly that goes over the tent, while single-wall tents can take on rain directly. 

Often, tent material has internal waterproofing and a separate external coating. The tent fabric is usually coated with polyester urethane (PU), polyether urethane (PE), or silicone (Sil). Many are coated with a different coating on the inside vs. outside-facing fabric. Polyester urethane (PU) is the most common but degrades over time. Silicone is the most water-resistant, but it’s expensive. 

Most fabrics also have a hydrostatic head (HH) water resistance rating indicating how much water it takes to saturate the tent and, therefore, cause leaking through. The higher the HH number, the better. Greater than 1000-1500 HH is considered waterproof. 

Most SUV tent floors are made with a standard waterproof tarp-type material. We recommend putting down a ground cloth or additional tarp to protect the bottom of the tent from dew and condensation in order to keep the bottom of the tent clean and dry. We prefer to pack up our tent dry and clean to avoid airing it out again at home.

Wind Resistance

External guylines and stakes and a sturdy tent frame provide wind resistance. SUV tents should have adequate attachment points to your SUV and the ground with their guylines and stakes. 

Interior Condensation

A completely waterproof tent might keep moisture out. Still, you should consider how to get moisture out of your tent through ventilation. Otherwise, condensation will drip from the roof of your tent. 

Look for vents protected from the elements and allow adequate air movement outside. Also, look at the materials’ breathability. Consider a two-walled tent with a separate rain fly with built-in ventilation. 

SUV Tent Additional Features

Other tent features are more personalized depending on what you expect and want in a good SUV tent.

As someone who values little luxuries when camping, you might make a checklist of desired features: mesh ceiling panels for stargazing from the warmth of your tent, interior pockets to stash camping gadgets, and a vestibule to store muddy boots. After roughing it in basic tents for years, you can’t wait to experience these small camp amenities.

Windows and Doors

Consider how many doors you need and where you will need doors to access your tent. Two or more doors are preferable for a standalone-sleeve SUV tent for access and airflow in the summer heat. 

Windows also provide airflow, ventilation, and light. 

Vestibules 

A vestibule is a covered space outside of your SUV tent. You can use your vestibule as a covered patio or a place to store your boots and other gear. Look for extendable awnings for vestibule coverage. 

Interior Pockets

Pockets inside the SUV  tent walls help you organize small items such as books and maps. Interior pockets also provide places to put cell phones and flashlights at night. A properly placed pocket is nice to have and helps make your experience that much better. 

Clips and loops

Consider whether the SUV tent has clips and loop points inside to hang a light, speaker, or other items. 

Integrated Flooring

Most traditional tents have integrated flooring, which helps keep dirt and moisture out. However, some SUV tents don’t have any flooring, so ensure this is a feature you want. 

Mesh Panels

These are part of the roof structure and are usually part of two-walled tents with a rainfly for weather protection. Mesh panels can offer stargazing opportunities.

Color

Consider tent color as a minor factor. Brightly colored tents may feel more light and lively inside than dark or drab-colored tents. 

Other Features

Depending on the SUV tent, brands often offer other minor features. These features provide convenience and extra comfort, such as electrical access ports, clotheslines, and gear lofts.

Brand vs Generic SUV Tents

You may have had enough experiences with cheaply made, off-brand camping gear that didn’t hold up. This time, you’re willing to invest more for a quality branded SUV tent from a reputable company like Kelty or Napier. Their years of experience, rigorous materials testing, and dedication to customer service give you confidence in their products. Otherwise, you will need to go through the process of determining if a brand is reputable.  

Unfortunately, generic SUV tent manufacturers dominate the SUV tent space. 

Some auto manufacturers offer SUV tents for their SUVs. Honda offers a branded Honda Tent that fits the CR-V, Pilot, HR-V, and Passport. This Honda SUV Tent looks like a Napier Sportz SUV Tent with a Honda logo. 

Lincoln offers an identical non-branded SUV tent from Napier that fits the Lincoln Aviator, Corsair, Nautilus, and Navigator. 

Ford also offers the same Napier Sportz SUV Tent that they guarantee fits the Ford Bronco, Edge, Escape, Expedition, and Explorer. 

Reputation

A reputable brand builds trust through transparency, quality, and positive customer service. Look first at the quality of the materials and construction of the SUV tent. Look at customer experiences with a brand’s quality. 

Look second at the customer reviews, especially interactions with the brand. Look at the negative reviews, as these are usually things that went wrong and other customer experiences interacting with the brand’s customer service.  

Material Sourcing

Where are the materials used to manufacture the SUV tent? Does the brand indicate any effort in sustainable and ethical sourcing? 

Material sourcing for SUV tents is often challenging to assess. Still, a more reputable brand will have a company website that transparently offers this information. 

Look for eco-friendly materials and practices in manufacturing and ethical labor sourcing. 

Warranty

A brand’s warranty guarantee often indicates its commitment to quality. Avoid tents that offer unclear or no warranty on their SUV tent. 

Return Policy

The retailer from which you purchase your SUV tent sets the return policy. This policy is separate from the brand’s warranty. 

Unlike the warranty, the return policy doesn’t indicate SUV tent quality or the brand’s reputation. 

SUV Tent Portability and Weight

Look for compact designs that fit easily in your SUV’s cargo area. Evaluate the tent’s packed size and weight. Since you are car camping, portability and weight should be the last considerations, and they don’t matter as much as quality, fit, sizing, and ease of setup. 

Budget and Price

An SUV tent provides many similar benefits to a roof-top tent or a camper but is significantly more budget-friendly. 

SUV standalone tents are usually more expensive than hatchback or tailgate SUV tents. They also have significantly more room and versatility. A standalone-sleeve SUV tent generally ranges from $100 to $400, depending on tent size. 

Consider reusability, ease of use, size needed, and SUV fit as primary factors in determining your budget.

TL;DR

After considering all these factors and reviewing our grading criteria for SUV tents, we think the best SUV tent is the Napier Sportz SUV Tent. A great budget option is the Vevor SUV Tent.

If you are a solo traveler or a couple, we recommend saving money and getting the Napier Sportz Cove tailgate SUV tent.

FAQs

What are the differences between an SUV Tent vs. a Roof Top Tent?

SUV Tents attach to the rear of your vehicle and extend the trunk/cargo area into a camping room that sits on the ground. They can connect to SUVs, crossovers, minivans, or trucks. In contrast, Roof-Top Tents mount on your vehicle’s roof rack, allowing you to sleep off the ground. This offers increased comfort, security from wildlife, and quicker setup—but at a higher cost.

Why camp with an SUV Tent?

SUV Tents provide a comfortable home base for camping at a lower cost than RVs or hotel rooms. You get an extended living space connected to your vehicle for storage, changing, cooking, etc. The tent area allows you to sleep off the ground in your SUV while being protected from wind, rain, and critters. A popular SUV Tent model like the Napier Sportz SUV Tent costs around $300-$400, much less than a basic rooftop tent at $1000+.

How do SUV tents work?

SUV Tents attach to your vehicle’s rear door/trunk area using heavy-duty straps that secure to the wheel wells. An elastic sleeve wraps around the rear to create a weatherproof seal. An SUV tent is designed to extend your cargo space into a private tent room on the ground behind your vehicle.

How do you set up an SUV tent?

1. Find a level campsite and clear the ground behind your vehicle.
2. Unroll and stake down the tent floor.
3. Raise the tent body and poles per manufacturer instructions.
4. Connect the sleeve over your vehicle’s rear door/trunk opening.
5. Attach the strap connectors to the wheel wells and tighten them for a secure seal.

Can you use a truck tent on an SUV?

Truck tents are specifically designed to be mounted in an open truck bed, so they do not work well with enclosed SUV cargo areas. SUV tents, on the other hand, are a versatile choice that can adapt to SUVs, crossovers, minivans, and some trucks with covered beds.

How do you maintain an SUV tent?

1. Hand wash with a mild soap and lukewarm water. Avoid scrubbing waterproofed areas.
2. Thoroughly air dry before storing. Don’t pack away when damp to prevent mildew.
3. Clean with a soft brush or rag any debris, bird droppings, etc.
4. Inspect for rips or holes and repair with a tent patch kit.

How to Wash a Sleeping Bag: Step-by-Step Care Guide for Outdoor Enthusiasts

Washing your sleeping bag isn’t just about keeping it free of dirt and odors; it’s crucial to maintaining its insulation, comfort, and longevity. Whether down, synthetic, or hybrid, each type of sleeping bag requires specific cleaning to avoid damaging those critical insulating fibers.

Before washing your sleeping bag, it’s essential to understand the proper machine and hand washing techniques.

Key Takeaways

  • Regular cleaning maintains insulation and prolongs the life of your sleeping bag.
  • Different types of sleeping bags require different cleaning methods to prevent damage.
  • Proper sleeping bag maintenance includes preparing, washing, rinsing, drying, and storing.

When to Wash a Sleeping Bag

Frequency of Use

  • Regular Use: If you camp frequently or live in your tent, consider washing your sleeping bag monthly to annually to maintain its insulation and cleanliness.
  • Occasional Use: For those sporadic trips, washing as neededshould suffice.

As Needed Signs to Wash 

  • It has visible dirt and stains.
  • Unpleasant odors linger even after airing it out.
  • The insulating material, or loft, seems less fluffy, affecting warmth.

Remember, washing it too often can do more harm than good by damaging the insulation and fabric. Spot cleaning and airing out are your best bet for light dirt and smells.

Tips to Reduce Need to Wash

  • Consider using a sleeping bag liner, a protective barrier that keeps the bag cleaner.
  • Air out your bag daily during a camping trip and after each trip before properly storing it. 
  • Keep it off the ground and sleep on a mat or ground cloth. 
  • Sleep in clean clothes. 
  • Spot cleaning can reduce the need for full washes.

How to Machine Wash a Sleeping Bag

Photo: ©Mykola Pokhodzhay via Canva.com

Choosing the Right Machine and Settings

  • Machine: Opt for a front-loading washer without a central agitator, as these are gentler on your sleeping bag. If your home machine isn’t suitable, visit a local laundromat.
  • Detergent: If you have a down sleeping bag, use a cleaner like Nikwax or a gentle, non-detergent soap for synthetics. Avoid harsh chemicals like bleach or fabric softener, which can damage fibers.
  • Temperature and Cycle: Cold or warm water on a gentle cycle will treat your sleeping bag right, preserving its materials and loft.
  • Manufacturer Guidelines: Follow any particular manufacturer guidelines for your specific sleeping bag. 

Step-By-Step Machine Washing

  1. Preparation: Make sure to zip up your sleeping bag and turn it inside out.
  2. Protection: Place it in a large mesh laundry bag or pillowcase to avoid snags.
  3. Loading: Situate the bag loosely in the machine, adding the correct amount of specified soap.
  4. Washing: Start with a gentle wash cycle and an additional rinse cycle to clear any soap hanging around.
  5. Drying: Gently squeeze—not wring!—out the water and either spread your sleeping bag on a flat surface or dry it on low heat with dryer balls or clean tennis balls to prevent clumps.

How to Hand Wash a Sleeping Bag

Photo: ©joey333 via Canva.com

Hand washing your sleeping bag at home effectively keeps it clean without exposing it to the harsh churning of a machine washer. You’ll have more control over the wash, which reduces the risk of damaging your gear. 

Setup for the Hand Washing Process

  • Tub Selection: Grab a large, clean bathtub, plastic tub, or sink that comfortably fits your sleeping bag.
  • Water: Fill your chosen basin with lukewarm water. Extreme temperatures can harm the fabric and filling.
  • Soap: Opt for a gentle, non-detergent soap or a specialized cleaner like Nikwax Down Wash, particularly if your sleeping bag is down.

Step-by-Step Handwashing

  1. Prepare your sleeping bag by zipping it up and turning it inside out.
  2. Fill the tub with enough lukewarm water to cover the bag, then mix in the soap.
  3. Submerge the sleeping bag. Gently agitate and knead it to distribute the soap and cleanse thoroughly.
  4. Allow the bag to soak for 15 to 30 minutes, depending on its condition.
  5. Drain the soapy water and refill the tub with clean water to rinse.
  6. Gently squeeze and lift the bag, repeating the rinsing process until the water clears. The aim is to remove all soap residue.
  7. Squeeze out the excess water carefully without wringing the fabric. Move your bag to a suitable drying area.

How to Dry a Sleeping Bag

AI Photo: Daniel Borkert/Canva Magic Media™

It’s not just about drying it; it’s about preserving the integrity of the insulation, whether down or synthetic.

Dying Tips

  • Pick the Right Dryer: Use a commercial-size dryer with ample room or air-dry if you have the space. Your regular clothes dryer might be too small and damage the bag.
  • Temperature Settings: Always opt for low heat or no heat at all. High heat can damage the fibers and decrease the bag’s insulating properties.
  • Fluffing the Insulation: Add tennis balls or dryer balls to the dryer. These help break up clumps of insulation, facilitating even drying.

Step-by-Step Drying

Dryer Method

  1. Place your sleeping bag in a commercial dryer at the laundromat.
  2. Set it to low heat or air cycle.
  3. Check periodically, loosening any clumps of down or synthetic material.
  4. The process may take a few hours—patience is key.

Air-Drying:

  1. Lay the sleeping bag flat on a drying rack or clean area.
  2. Turn it over occasionally for even drying.
  3. Expect air-drying to take longer, even up to a couple of days.

When your sleeping bag is finally dry, shake it out, fluff it up for loft restoration, and store it uncompressed to maintain the insulation’s loft.

How to Spot Clean a Sleeping Bag

AI Photo: Daniel Borkert/Canva Magic Media™

Spot Cleaning Supplies

  • A soft brush, damp cloth, or sponge
  • Mild, non-detergent soap or sleeping bag-specific cleaner
  • Cold or warm water
  • Needle and thread for repairs
  • Cleaning solvent for tougher stains

General Spot Cleaning

  • Surface Dust: Gently brush off with your soft brush.
  • Mud: Dab with your damp cloth; there is no need to rub it in.
  • Heavily Soiled Areas: Apply a dab of your cleaning solvent to a cloth and tap it onto the problematic patch.

Spot Cleaning Stains 

  • Food & Sweat: Mixing warm water and dish soap will do. Just a dab, a rub, then rinse.
  • Blood: Cold water, with a touch of hydrogen peroxide, is your best bet.
  • Oil & Grease: Warm water and a sprinkle of baking soda can work wonders.
  • Mold & Mildew: Warm water with vinegar can help.

Apply your chosen solution directly to the stain and gently rub it with your cloth or sponge. Rinse meticulously with clean water and blot; don’t rub. Dry with a towel and air-dry. If you’re in a pinch, a low-setting hair dryer can help.

A little TLC can go a long way toward keeping your sleeping bag in good shape season after season. After cleaning it, remember to store it properly. Please share your sleeping bag cleaning tips in the comments.  

FAQs

How do I know what type of sleeping bag I have?

To identify your sleeping bag type, check the tag or label for the fill material. If it lists down feathers, you’ve got a down sleeping bag. Synthetic fill list materials like polyester. Knowing the type is critical to proper care.

Can I wash my sleeping bag with other items?

Washing your sleeping bag alone is best to prevent damage from other items and ensure a thorough cleaning. Overloading can reduce cleaning effectiveness and may damage the bag’s material.

What type of detergent is best for washing down sleeping bags?

Select a gentle, non-detergent soap specially formulated for down products such as Nikwax Down Wash or Grangers Down Wash. Regular detergents can strip down feathers of their natural oils, reducing loft and warmth.

Is dry cleaning a safe option for sleeping bags?

Generally, avoid dry cleaning your sleeping bag. The chemicals used can degrade the insulating properties. Always follow the care label for cleaning instructions to be safe.

Are there professional services available to wash sleeping bags?

Yes, professional cleaning services exist that specialize in outdoor gear. They have the proper equipment and expertise to safely clean and rejuvenate your sleeping bag without the risk of damage. I haven’t used them, and I’m not affiliated with them, but Rainy Pass looks like a good professional sleeping bag laundry provider.

How to Make Coffee While Camping: A No-Nonsense Guide for the Perfect Brew

Two coffee cups outdoors

How to make coffee while camping will vary significantly depending on whether you’re backpacking into the wilderness or setting up camp next to your car.

You’ll learn about the pros and cons of different brewing methods. Additionally, you’ll gain insights into the best strategies for each method, helping you maintain your coffee standards even when you’re miles away from the nearest café.

Key Takeaways

  • Choose a brewing method based on your camping style, from lighter backpacking coffee options to more elaborate coffee-making methods while car camping.
  • Learn various coffee-making methods and tips to ensure great taste and convenience in any outdoor setting.
  • Remember always to purify your waterto avoid potential illness.

Percolator Coffee

Photo: ©LoraClark via Canva.com

A percolator is a coffee maker often used for camping that brews coffee by continuously cycling boiling water through coffee grounds using gravity until the desired strength is reached. Here’s how to master the art of percolator coffee in the great outdoors.

Essentials for Percolator Coffee

  • A camping percolator with a metal filter basket
  • Coarse ground coffee
  • Water
  • A heat source such as a campfire or camping stove

Brewing Percolator Coffee in 6 Steps

  1. Fill the percolator with water just below the fill line.
  2. Place coarse ground coffee into the metal filter basket; a general guide is 1 tablespoon per cup of water.
  3. Assemble the percolator and place it over your heat source.
  4. Heat until you see or hear the coffee bubbling up into the glass dome, which should take several minutes.
  5. Once bubbling, lower the heat and let it brew for 5-10 minutes, depending on how strong you like your coffee.
  6. Remove it from the heat to avoid over-extraction and a bitter taste.

Pros of Percolator Coffee

  • Easy to use, even for beginners.
  • Brews large quantities, making it practical for groups.
  • Robust design, ideal for the ruggedness of camping.
  • Enjoys a vintage charm associated with classic camping.

Cons of Percolator Coffee

  • It can be bulky and heavy, not suited for lightweight backpacking.
  • Brewing is slower compared to other methods.
  • Coffee can become bitter or over-extracted if not monitored.

Tips for Perfection

  • Use coarse grounds to avoid silt in your cup.
  • Preheat water to speed up the brewing process.
  • Watch for the first signs of bubbling and remove from heat to prevent a burnt taste.
  • Avoid overfilling the basket to ensure even water flow and extraction.\

Instant Coffee

Photo: ©Africa images via Canva.com

When backpacking, instant coffee is your quickest route to a warm cup of caffeine. This type of coffee is freeze-dried into granules, so you can easily dissolve it in hot water.

What You’ll Need

  • Instant coffee of choice
  • Hot water
  • Cup or mug
  • Spoon (optional)
  • Additional flavorings like sugar, milk, or creamer (optional)

Brands to Consider

  • Starbucks
  • Voilà
  • Verve Coffee

Brewing Instant Coffee in 6 Steps

  1. Boil water using your camp stove or over a campfire.
  2. Place 1-2 teaspoons of instant coffee into your cup. (Adjust to taste)
  3. Pour hot water over the coffee granules.
  4. Stir with a spoon until the coffee is completely dissolved.
  5. Customize with sugar, creamer, or flavorings to your liking.
  6. Enjoy!

Pro-Tip: Experiment with the amount of instant coffee and water ratios to find your perfect strength.

Advantages of Instant Coffee

  • Fast: Ready in a matter of seconds.
  • Convenient: Minimal equipment needed.
  • Lightweight: An excellent choice for backpackers.
  • Economical: Often cheaper than other coffee-making methods.
  • Shelf-Stable: Long-lasting without refrigeration.

Disadvantages of Instant Coffee

  • Taste: It can be less flavorful compared to freshly brewed coffee.
  • Freshness: It might taste stale or artificial to some.

Enhance Your Instant Coffee Experience

Adding extras like milk, creamer, or a dash of cinnamon can also enrich the flavor. Sampling different brands such as Voilà, Verve, or Starbucks gives you a variety, each with unique profiles that might surprise you.

Single-Serve Coffee Bags

Photo: ©nenovbrothers via Canva.com

Let’s talk about the coffee single bag—a nifty invention that combines the simplicity of a tea bag with the robust flavor of coffee. Before your camping trip, you can buy or make your own coffee single bags with coffee filters or cheesecloth.

Essentials for Coffee Single Bag Brewing

  • Coffee grounds
  • Coffee filters
  • String (food-safe)
  • Hot water

Making your Own Single-Serve Coffee Bags and Brewing

  1. Fill a coffee filter with a single portion of your preferred coffee grounds.
  2. Tie the filter securely using a string, leaving one end long enough to dangle over the side of your cup.
  3. Heat water until just below boiling to prevent over-extracting the coffee and making it bitter.
  4. Place the coffee bag in your cup and pour hot water over it.
  5. Let it steep for 4-5 minutes. You can adjust the time for a weaker or more robust brew.
  6. Once done, remove and dispose of the coffee bag or compost it if possible.

Pros

  • Simplicity: It’s a no-brainer.
  • Portability: Tuck them in your backpack, and you’re set.
  • Cleanliness: No messy grounds to deal with after brewing.

Cons

  • Cost: These conveniences come at a price.
  • Waste: It’s single-serve, so there’s more packaging.
  • Choice: You might miss out on some specialty blends.
  • Strength: They can be less potent.
  • Consistency: Results may vary from cup to cup.

Tips for Single-Bagged Coffee

  • Heat is Key: Always use hot water—it extracts flavors more efficiently.
  • Steep Longer: Leave the bag in a bit longer for a bolder taste.
  • Double Up: Want a more intense brew? Go ahead and double-bag it.
  • Make It Personal: Crafting your own bags allows you to pick and mix coffee types and quantities.

Pour-Over Coffee

Photo: ©AngusChanPhoto via Canva.com

You’re not just making a cup of joe; pour-over is an art form that creates a brew with a depth of flavor that’s hard to match with standard drip coffee. 

The manual control during the pouring process allows for a more even extraction of oils and flavors from the coffee grounds, resulting in an aromatic and complex cup.

Equipment and Ingredients You Need

  1. Collapsible pour-over stand: Perfect for camping due to its portability.
  2. Paper filter: Essential for filtering the grounds from your coffee.
  3. Fresh coffee grounds: Medium-fine grind is ideal (16:1 ratio water to coffee).
  4. Hot water: Just off the boil.
  5. Mug or cup: Your trusty camping mug will do just fine.

Steps to Brew Pour-Over Coffee

  1. Prepare: Set the paper filter in the collapsible pour-over stand and place it over your mug.
  2. Pre-wet: Gently rinse the paper filter with hot water to remove the paper’s taste and preheat your mug.
  3. Bloom: Add your coffee grounds and pour a small amount of hot water enough to wet them. Wait for 30 seconds; this allows the coffee to “bloom” and release CO2, affecting the brew’s taste.
  4. Pour: Slowly and evenly pour the rest of the water over the grounds in a spiral motion, ensuring all the grounds are saturated.

Benefits

  • Brews a delicious, smooth, and balanced cup
  • Brings out the aromatic qualities of the coffee
  • Allows for a precise and versatile coffee experience

Drawbacks

  • More complex than other methods
  • Can be time-consuming
  • Requires some skill to perfect
  • Needs special equipment
  • Produces waste (paper filters)

Tips to Elevate Your Brew

  • Always opt for fresh grounds for the best flavor.
  • The ratio of water to coffee can be adjusted to suit your taste.
  • Be patient; pour slowly to ensure a uniform extraction.

French Press

Photo: ©Lolostock via Canva.com

When camping in the great outdoors, a French press does more than just brew coffee; it immerses you in a rich, full-bodied experience that instant coffee packets simply can’t match. Understanding how this trusty gadget works is straightforward: the French press is a beaker typically made of glass or stainless steel, with a plunger and a built-in filter screen that presses hot water through ground coffee.

What You’ll Need for a French Press

  • A French press
  • Coarse-ground coffee (4 Tbsp coffee for 16 oz of water or a ratio of 1:15)
  • Hot water, just off the boil
  • Stirring utensil (optional)
  • Timer

Step-by-Step Brewing Guide

  1. Preheat your French press by rinsing it with hot water. This keeps your coffee warm for a longer time.
  2. Add your coffee grounds to the press (3-4 Tbsp coffee for 16 oz of water or a ratio of 1:15)
  3. Pour in hot water, ensuring the grounds are fully saturated.
  4. Stir gently with a non-metal utensil to avoid cracking the glass.
  5. Set your timer and let the coffee steep for about 4 minutes.
  6. Plunge the press down slowly to avoid agitating the grounds, which can make your brew gritty.
  7. Serve immediately to capture the coffee’s peak flavor.

Benefits

  • Rich Flavor: The mesh filter does not absorb the oils and fine particles from the coffee grounds, so more flavor is retained in your cup.
  • Convenience: Simple to use with minimal parts; ideal for making multiple cups at once.

Drawbacks

  • Gritty Texture: Some grounds might escape into your brew, especially if the grind is too fine.
  • Cleanup: The grounds can be messy and a hassle to clean from the bottom of the press.

Tips for the Best Cup

  • Use filtered water for a cleaner taste.
  • Preheat the press to maintain the brewing temperature.
  • Stirthe grounds before steeping to encourage even flavor extraction.
  • A 4-minute steep is the sweet spot for a balanced brew.
  • Plunge slowly to prevent stirring up the grounds and over-extracting, which can turn your coffee bitter.
  • Enjoy your coffee immediately after plunging for the freshest taste.

Moka Pot

Photo: ©hsyncoban via Canva.com

A Moka Pot, often called a stovetop espresso maker, is a popular coffee gadget for brewing robust and espresso-like coffee outdoors or at home. Its design is simple yet brilliant; water in the lower chamber boils, and the resulting steam pressure pushes water through a basket containing the coffee grounds into the upper chamber where your brew awaits.

Equipment & Ingredients

  • A Moka Pot
  • Ground coffee, preferably a fine espresso grind
  • Water, filtered is best
  • Heat source, like a camp stove

Brewing a Moka Pot Step-by-Step

  1. Fill the bottom chamber of your Moka Pot with water up to the fill line.
  2. Place the ground coffee in the filter basket. Remember to fill it loosely to avoid over-extraction.
  3. Screw the top and bottom together tightly to prevent steam from escaping.
  4. Place the Moka Pot on your stove or heat source and start with medium heat.
  5. When you hear a hissing sound or coffee starts to emerge, turn the heat down low.
  6. Once the upper chamber is full or you hear a gurgling sound, remove from the heat – your coffee is ready.

Benefits

  • Strong and concentrated coffee
  • Simple to use and easy to transport
  • Durable for repeated use
  • Economical choice overall

Drawbacks

  • It can produce a bitter or metallic taste if not used properly
  • Prone to burn if left on heat for too long
  • Needs fine grounds for best results
  • It is somewhat challenging to clean thoroughly

Tips to Enhance Your Brew

  • Start with preheated water to minimize the time your coffee is on the heat, reducing bitterness.
  • Use filtered water for a cleaner taste.
  • Remove the pot from the heat just before it finishes to prevent a burnt taste.

AeroPress

Photo: ©Bogdan Sonjachnyj via Canva.com

Meet the AeroPress—an ingenious coffee maker perfect for any camping adventure. This lightweight and durable device uses air pressure to rapidly brew coffee, resulting in a smooth, flavorful cup every time.

What You’ll Need for AeroPress Coffee

  • AeroPress or AeroPress Go
  • AeroPress paper filters or metal filter
  • Coffee grinder (for fresh grounds)
  • Coffee beans (fine grind)
  • Hot water (just off the boil)
  • Stirrer (comes with AeroPress)
  • Mug

AeroPress Brewing Steps

  1. Place a paper filter in the AeroPress’s basket. 

Tip: Pre-wet the paper filter with hot water to eliminate the paper’s taste. If you’re using a metal filter, that’s fine too—no need to pre-wet.

  1. Attach the basket to the bottom of the brew chamber and place it on your mug.
  2. Add one scoop of fine coffee grounds into the chamber.
  3. Pour in hot water up to the desired level, then give it a quick stir.
  4. Insert the plunger and press down gently until you have a rich, delicious coffee.

Pros

  • Smooth & Clean Taste: Thanks to the fine filter
  • Quick & Consistent Brew: It only takes a minute
  • Travel-Friendly: Compact and highly portable, especially the AeroPress Go
  • Easy Cleanup: Just pop out the used coffee grounds and rinse

Cons

  • Paper Filters Needed: Unless you opt for a reusable metal filter
  • Only Small Amounts: Typically, one cup at a time
  • Stirring Required: For even extraction
  • Specific Grind Size Needed: Fine grounds work best

Expert Tips

  • Always use hot water, but not yet boiling, to preserve the coffee taste.
  • Try the inverted brewing method to steep your coffee like a French press.
  • Press the plunger down gently—patience yields a richer cup.
  • Don’t be afraid to experiment with the amount of coffee and brewing time.

Manual Espresso Machine

Photo: ©Mystockimages via Canva.com

These nifty hand-powered gadgets promise a rich and creamy espresso shot, complete with that desirable crema. The magic happens through finely ground coffee manually compressed into a puck onto which hot water is forced, giving you that intense shot we all crave.

What You’ll Need for Outdoor Espresso

  • Hand-powered espresso maker
  • Fresh, dark-roast coffee beans
  • Grinder (capable of fine espresso grind)
  • Hot water
  • Cup or mug
  • Optional: milk frother for lattes and cappuccinos

Manual Espresso Step-by-Step

  1. Preheat your manual machine with hot water.
  2. Grind your coffee beans finely, aiming for a texture like powdered sugar.
  3. Fill the basket with your grounds, tamp it evenly, and assemble the machine.
  4. Pour hot water into the boiler and apply pressure to the pump or lever.
  5. Pull the shot quickly, aiming for a 20-30 second extraction time.
  6. Optional: Froth your milk and pour over your shot for a velvety finish.

Benefits of a Manual Espresso Machine

  • You get an authentic, intense, and satisfying experience.
  • As versatile as your skills allow (lattes, americanos, etc.)
  • It’s just fun. 

Drawback of a Manual Espresso Machine

  • These machines can be expensive
  • A bit bulky and heavy. 
  • Requires a fair amount of skill
  • Need the correct grind to get that perfect shot.

Quick Tips for Camping Espresso

  • Always use fresh beans (the darker the roast, the better).
  • Tamp evenly to avoid channeling and achieve an even extraction.
  • Preheat the machine to maintain the extraction temperature.
  • Pull that espresso shot quickly once you start the infusion.

Cowboy Coffee

Photo: ©luza studios via Canva.com

Cowboy coffee has a long-standing history with outdoor enthusiasts who love a rich and robust cup of joe. It’s a simple process, requiring only a few tools, patience, and a bit of technique.

What You’ll Need for Cowboy Coffee

  • A durable pot or kettle
  • Fresh, clean water
  • Coffee grounds (coarsely ground works best)
  • A campfire or camping stove

5 Steps to Making Cowboy Cofee

  1. Fill your pot with one cup of water for each one cup of coffee you aim to make.
  2. Heat the water on your campfire or stove. Just before it boils, remove it from the heat.
  3. Stir in the coffee grounds—about 2 tablespoons per 8 ounces of water.
  4. Let it sit for about a minute, then stir again and brew for another few minutes.
  5. Settle the grounds by tapping the pot’s side or adding a small splash of cold water.

Pros

  • Easy to make fresh coffee with minimal equipment. 
  • Rich, robust cup of coffee

Cons

  • Takes some effort to avoid drink grinds
  • Easy to overdo or underdo it, resulting in bitter coffee or watery coffee

Tips for Cowboy Coffe

  • The key to a good cup of cowboy coffee is avoiding the grounds. 
  • Pour the coffee off gently, or throw a clean bandana or cloth over your mug and pour through that as a makeshift filter.

Check out the camping meals article for inspiration for your next camping trip food plan. Also, don’t forget to review the camping gear checklist before heading out on your next adventure. 

FAQs

How do I grind coffee beans while camping?

You’ve got several options for grinding coffee in the great outdoors. If you want to keep it simple and lightweight, consider investing in a quality hand grinder.

Hand grinders are compact, require no power, and give fresh grounds to boost your morning.

If you don’t mind carrying more weight, a battery-operated grinder is another excellent choice. It ensures you always have freshly ground coffee at the press of a button.

What method for making coffee works better for backpacking?

When you’re backpacking, every ounce matters. Opt for a lightweight and collapsible pour-over coffee maker, or embrace the simplicity of instant coffee — it’s featherlight and fuss-free.

If you prefer a robust coffee, an AeroPress or small French press made of plastic or another durable, lightweight material might suit your needs, so long as you’re okay with the extra weight. I prefer instant coffee for convenience, and they (Starbucks is my go to) make some tasty instant coffee nowadays.

What’s the best way to make coffee while car camping?

Car camping offers the luxury of less stringent weight restrictions, allowing you to be a bit more indulgent.

A classic percolator can make a strong pot of coffee over the campfire or stove—nothing beats the aroma in the morning air.

Alternatively, a drip coffee maker with a reusable filter can deliver that home-brewed taste if you’ve got a portable power source or camp stove.

Instant coffee remains a quick and viable option if you’re in a rush.

For true connoisseurs, nothing beats freshly ground beans brewed using your favorite method, whether a pour-over, manual espresso, or a French press. I prefer a French press while car camping myself.

Butane vs Propane Stove: Which Fuel is Better for Camping?

Butane vs propane stove: what is better for camping? I think a propane stove is a better choice for most camping trips in the USA.

Butane and propane stoves are two common options in portable cooking at camp, each with small advantages or disadvantages. From the ease of igniting a butane stove to the robustness of propane in colder environments, there are many factors to consider. 

Important safety warning: Never use a canister stove inside a tent, vehicle, or other enclosed space. Burning fuel in an enclosed area can cause deadly carbon-monoxide buildup and poses a serious fire risk. Always cook outdoors in a well-ventilated area.

Key Takeaways

  • Propane stoves excel in cold weather performance, while butanestoves are slightly more portable.
  • The difference in experience cooking with butane and propane for your camping trip is likely minimal and inconsequentialunless it’s below freezing. 
  • In below-freezing weather, propane stoves excel as the clear winner. 

What is Propane?

Propane is a liquid hydrocarbon gas commonly stored in tanks under high pressure, also known as liquid propane gas (LPG). Propane is probably most familiar as the fuel for your backyard BBQ grill.

Propane is a clean-burning fuel, producing minimal soot and fewer harmful emissions like carbon monoxide and carbon dioxide. This makes it a friendlier option for you and the environment, though it is still a greenhouse gas.

When camping in colder weather, you’ll appreciate propane. Its lower boiling point of -42°C means it vaporizes even at arctic temperatures, keeping your stove running smoothly. 

Here are some benefits of propane stoves that make them a solid choice for your outdoor adventures:

  • High heat output: You can cook your food or boil water quickly.
  • Consistent performance: It offers reliable cooking and is even great, thanks to its steady vapor pressure.
  • Versatility: Can be used in a range of conditions, which is excellent for different types of trips.
  • Large fuel canisters: This means less frequent replacements, which are a boon on more extended expeditions.

On the flip side, the only notable drawback is the heavier weight of high-pressurized steel propane canisters. 

What is Butane?

Photo: ©Daniel Borkert/OutdoorFootprints.com

Butane is also a liquid hydrocarbon gas stored in canisters under low pressure. It is known for its clean, odorless flame and is a popular gas stove fuel in some Asian culinary circles. Butane is also considered a greenhouse gas, so let’s be mindful of our beautiful wild spaces whenever we use it.

Butane’s boiling point is just below freezing (approximately 31°F/−0.5°C), so it doesn’t vaporize well in cold weather when temperatures dip.

Here are the benefits of a butane stove that you might consider: 

  • Weight and Size: Butane stoves are usually more compact and weigh less, making them great for car camping trips tight on space. 
  • Disadvantages: Butane stoves struggle in colder weather, and those compact canisters need more frequent replacing due to their smaller size.

Note that butane stoves are not used for backpacking(backpacking stoves use isobutane/propane mixtures that are incompatible). 

Practical Comparison of Butane vs Propane for Camping and Outdoor Use

Let’s distinguish the practical differences between butane and propane stoves, focusing on performance, portability, and cost.

Performance in Different Environments

When you’re out in the wild, the weather doesn’t always play nice, and the performance of your stove can make or break your camping cuisine experience. 

  • Propane: Propane vaporizes at -42°C (-44°F), so propane stoves will reliably output heat even when braving the chill.
  • Butane: Butane holds its own when things get warmer. Its higher boiling point is approximately −0.5°C (31°F), so on those sunny camping trips, butane stoves perform just as well.

Portability and Convenience

Size and weight are pivotal when considering portability.

Butane stoves have a potential advantage here. They are often designed with lightweight frames, weighing less than their propane counterparts.

  • Butane stoves: Smaller canisters, lighter build.
  • Propane stoves: Larger canisters, bulkier design.

Cost and Availability

Butane stoves are easier on your wallet, both in terms of initial purchase and ongoing use. A bottle of butane generally costs less than propane.

  • Cheaper bottle form makes butane stoves attractive for budget-conscious campers.
  • Widely distributed in urban areas and Asian markets, given butane’s popularity there.

Propane stoves might stretch the budget more if you opt for the small bottles. However, the cost can become more manageable if you invest in larger tanks or BBQ cylinders, trading off initial expenses for longer-term savings.

  • More costly small bottles, but economical in larger tanks
  • Propane’s rural prevalence and dominance in North American outdoors makes it a go-to there

Your choice might not be dictated by the price tag alone but by the standard fuel available where you plan to camp.

How to Pick the between Butane and Propane

  1. Prioritize Fuel Efficiency: Opt for the stove that will give you the most bang for your buck in your common camping conditions.
  2. Consider Portability: Lighter is better if you’re always on the move. Butane stoves typically win here.
  3. Examine Construction: Durability can make or break your cooking experience outdoors. Choose stoves with robust build quality.

Don’t overlook dual-fuel stoves or isobutane options—they provide a versatile middle ground. Don’t forget to review your camping checklistbefore your next adventure.

FAQs

How do butane and propane stoves vary in fuel cost and overall efficiency?

Propane is generally more affordable and burns hotter, translating to more efficient cooking, especially in windy or cold weather.

Butane can be costlier, and its efficiency can drop in cooler conditions, which might mean slightly higher fuel costs over time.

What factors should I consider when choosing between butane and propane stoves for a campervan setup?

For a campervan, you’ll want to weigh the stove and fuel storage size, the ease of obtaining refills, and the climate you’ll typically encounter.

Propane stoves are often favored for their versatility and fuel availability. Still, butane could be a better fit for lightweight and space-limited setups.

What is the difference between butane and isobutane?

Isobutane is a form of butane with a different molecular structure, which allows it to perform better in colder temperatures.

Isobutane/propane mixtures are also the preferred fuel for backpacking stoves.

How long does a butane or propane canister last?

A canister’s duration depends on many factors, such as stove efficiency, altitude, temperature, and cooking habits.

On average, a standard 8-ounce butane canister may provide around 2 hours of cooking time. In comparison, a 16-ounce propane canister could last about 4 hours.

How do I dispose of empty butane or propane canisters?

Proper disposal is vital to protecting the environment. Once entirely empty, puncture the canister to ensure it’s not refillable — but only where local recycling/disposal programs accept prepared canisters; check local rules first. Recycle it at a facility that accepts mixed metals. Never throw an unpunctured canister in the trash; it can present a hazard.

How to Shower While Camping: 5 Easy and Effective Methods

Learning how to shower while camping may not always be easy. You may face challenges such as finding a suitable shower spot, having enough water and privacy, and dealing with the weather and temperature. Fortunately, several solutions exist to overcome these challenges and enjoy a refreshing shower in the wilderness.

Key Takeaways

  • Portable Camp Shower: This convenient and flexible option allows you to shower anywhere with a shower bag or a pressurized system. However, it requires a water source, accessories, and cost considerations.
  • Public Showers: An accessible and ready-to-use option available at many campgrounds, RV parks, and truck stops, but may vary in quality, availability, and privacy.
  • Natural Bath in River or Lake: A refreshing and memorable option that lets you enjoy the natural scenery but requires respect for the environment, caution for the water temperature, and compliance with local regulations.
  • Wet Wipes: A simple and portable option that can temporarily replace a shower but may be wasteful, less thorough, and potentially irritating to the skin.
  • Sponge Bath: A thorough and relaxing option that uses a basin or bucket of water and a sponge or cloth but requires planning, water sourcing, and privacy

Portable Camp Shower

Photo: ©ihoe via Canva.com

A portable camp shower allows you to shower and stay clean anywhere in the great outdoors while car camping. Typically, these showers are designed to heat up using solar energy with a shower bag or large PVC pipe on the roof rack. Others might run on propane or batteries.

These can range from a simple gravity shower to a bucket and cup to a fancy pressurized hot shower setup. An additional pop-up shower tent can increase the privacy of this setup. 

Pros

  • Convenience: Easy setup and use.
  • Adjustable: Some offer temperature control and variable pressure.
  • Flexibility: Don’t rely on campground facilities.
  • Eco-Friendly: Can lessen environmental impact by avoiding contamination of lakes and streams. 

Cons

  • Cost: It can be more expensive than other options.
  • Bulk: Certain models are hefty and less compact.
  • Water Source: Requires nearby water or hauling in your supply.
  • Accessories: You might need a shower tent or a mat for complete privacy and comfort.

Tips

  • Set up at least 200 feet from natural water sources in an area so the grey water does not impact the local environment.
  • Hang the shower bag or pocket shower high enough to step underneath effortlessly.
  • Remember to use biodegradable soap only.
  • Heat water using the sun for a warm shower, or consider a battery-powered model for a hot shower.
  • Plan water usage to ensure you have enough for rinsing.

Public Showers

Photo: ©Grigorenko via Canva.com

Public showers are probably the best option for camping at a campsite or roving in your RV. Shared shower facilities are often at campgrounds, RV parks, and truck stops. 

Pros

  • Accessibility: Many campgrounds and parks offer shower facilities, so it’s not hard to come by with a bit of research.
  • No Setup Required: These are ready to use, unlike a pop-up shower tent or a privacy tent with a shower curtain.
  • Overall Cost: They’re either inexpensive with coins or tokens or free.
  • Privacy: You can enjoy a shower in relative privacy.
  • Sanitation: More often than not, they are cleaned and maintained regularly.

Cons

  • Availability: During peak seasons, they might have long lines,and some might require you to bring coins or tokens.
  • Time Limits: Some places impose shower time restrictions to manage usage.
  • Quality: This can vary from place to place, although most shower options are adequate. 
  • Shared Space: Your setup is more private.

Tips & Advice

  • Bring the Essentials:Pack your towel, soap, and shampoo, and remember to wear shower shoes or flip-flops to protect your feet.
  • Check First: Before you step in, test the water temperature and pressure.
  • Security: Always lock the door and keep your essentials within arm’s reach.
  • Efficiency: Keep it brief to be considerate to fellow campers waiting in line.
  • Cleanliness: Dispose of any personal trash.

Natural Bath in River or Lake

Photo: ©rick734’s Images via Canva.com

Taking a dip in a natural water source might make your camping trip memorable, but bathing in a natural body of water requires respect for the environment.

Tips

  • Avoid areas of a lake or river with a lot of boat traffic or where others get their drinking water.
  • Cold water can be refreshing but risky, causing a shock to the system, so ease in slowly.
  • If you need to soap up, use biodegradable soap — but even biodegradable soap must never be used directly in lakes, rivers, or streams. Do all washing and dispose of wastewater at least 200 feet from natural water sources. Regular soaps and shampoos can cause contamination, causing algae blooms that harm wildlife.
  • Check with local regulations, as some areas have strict rules against bathing in natural water sources.

Cons

  • Even in summer, natural water sources can be unexpectedly cold.
  • Bathing can stir up sediments,  potentially covering you in silt instead of cleaning you off.

Wet Wipes

Photo: ©Maridav via Canva.com

Sometimes, you can’t shower when camping, and grabbing a pack of body wipes and including them in your hiking essentials might be your most straightforward solution.

Body wipes are designed to clean off the day’s collection of dirt, sweat, and body odor for the body, face, hands, and feet. 

How to Use Wet Wipes

  1. Start with cleaner body parts and work towards dirtier areas. 
  2. Use wet wipes mindfully, as they aren’t always eco-friendly. 
  3. Dispose of used wipes responsibly in a trash bag—not in the wilderness.

Pros and Cons

  • Pros: Wet wipes are inexpensive, portable, and do not require water. They’re typically gentle and can temporarily replace a shower on your outdoor adventures.
  • Cons: They can be wasteful and are generally less thorough than a traditional wash-up. There’s also a chance of skin irritation, and they may leave behind a residual stickiness.

Tips

  • Opt for unscented, hypoallergenic, and alcohol-free options to reduce skin irritation.
  • Consider eco-friendly biodegradable wipes or even reusable cloth wipes to minimize environmental impact.
  • Pairing baby wipes with hand sanitizer or water can offer a smoother, more hygienic result.

Sponge Bath

Photo: ©pioneer111 via Canva.com

A sponge bath can be a good alternative to a traditional shower, lake, or stream.

How to do a sponge bath

  1. Set Up Your Supplies: Equip yourself with a basin or bucket, ideally filled with warm water from your campfireor stove. 
  2. Add Soap: A dash of biodegradable soap will do wonders for your hygiene without harming the environment.
  3. Go Step-by-Step: Tackle one body part at a time to stay organized, and rinse with a clean sponge or cloth.

Pros of a Sponge Bath

  • You can maintain a high level of cleanliness.
  • Gives you a reason to pause and relax for a bit.
  • You’re using resources sparingly, which is essential in the wild.

Cons to Consider

  • There are more quick ways to get clean; you must pace yourself.
  • Planning is required, and water sourcing needs consideration.
  • Privacy can be a concern if you’re in a busy camp area.

Tips and Advice

  • Begin with the face and move towards the feet, avoiding any cross-contamination.
  • If camping near the sea, remember that a sponge bath requires fresh water, never saltwater, to avoid skin irritation.

FAQs

What are some tips to stay clean while camping?

Some tips to keep clean while camping include packing essential hygiene products, choosing campsites with shower facilities, utilizing portable shower systems, and practicing regular personal hygiene habits to stay clean and refreshed during your camping trip.

How can I maintain personal hygiene while dispersed, wild camping?

You can maintain personal hygiene while camping by investing in a portable shower or utilizing alternative methods such as wet wipes, dry shampoo, and cleaning with a towel and soap.

What are the best ways to keep clean on an extended camping trip?

You can stay fresh for multiple days without a shower while camping by using body wipes and dry shampoo, changing clothes regularly, and practicing good personal hygiene habits such as brushing your teeth and washing your hands.

From Hiking to Whittling: 27 Outdoor Activities to Try on Your Camping Trip

Family enjoying activity while camping

Many outdoor camping activities can make your trip more fun, adventurous, and rewarding. Whether you’re looking for physical challenges, mental stimulation, or relaxation, there’s an outdoor activity for you.

Here are 27 outdoor camping activities you can enjoy on your next trip. I’ll also give you some tips and popular places for most activities so you should better know how to plan your outdoor recreational activities and make the most of your camping experience.

Key Takeaways

  • Outdoor camping activities can provide health, wellness, and enjoyment benefits, such as improving fitness and reducing stress.
  • There are many outdoor camping activities, such as hiking, biking, fishing, kayaking, geocaching, and more.
  • To choose the best outdoor camping activities for your trip, consider your goals, preferences, abilities,and the available resources and facilities at your campsite.

Hiking

Family of four hiking
Photo: ©Imgorthand via Canva.com

When you hit the trails for a hike, you’re not just treating yourself to an adventure but also engaging in a potent fitness activity that revitalizes your connection with nature. Hiking allows you to explore the great outdoors at your own pace.

Planning is vital before setting out. Start by selecting a trail suited to your hiking skill level. You’ll want to check out local maps and understand the terrain. Pack hiking essentials like water, snacks, a map, and a compass—or a GPS device—to ensure you’re prepared for your journey. Wear comfortable, sturdy footwear and dress in layers to adapt to changing weather conditions.

Remember, safety is paramount:

  • Inform someone about your hiking plan and expected return time.
  • Check the weather forecast before heading out.
  • Be wildlife aware and know what to do in an encounter.

While on the trail, keep a moderate pace and take regular breaks. This is not just a physical activity; it’s a chance to breathe in the scents of the forest, hear the sounds of wildlife, and feel the earth beneath your feet.

Lastly, practice Leave No Trace principles. This means packing out what you pack in, staying on marked trails to protect the surroundings, and being considerate of nature and fellow hikers.

Fishing

Father and son fishing
Photo: ©Sergey Nivens via Canva.com

Picture yourself by a tranquil lake at sunrise; there’s something exceptional about being surrounded by nature, rod in hand, waiting for that gentle tug. It’s both a peaceful and exhilarating way to start your day.

For the most enjoyable experience, you’ll want to gear up appropriately. Choosing a rod and selecting the right bait is essential. Live bait, such as worms, often works wonders, but artificial bait can be just as effective depending on the fish and conditions. 

After a day of fishing, you might want to build a cooking campfire and roast your catch as one of your delicious camping meals. 

Swimming

Family of four swimming together in lake
Photo: ©Lightguard via Canva.com

When camping with family or friends, swimming is a quintessential activity that works wonders for fun, fitness, and cooling off. Your kids will splish-splash their way to joy, and it’s a great way for everyone to bond. 

Swimming Safety Tips:

  • Swim in designated areas.
  • Buddy up, even if you’re a strong swimmer.
  • Wear life jackets for weaker swimmers, especially the young ones.
  • Keep a close eye on the weather and water conditions.
  • Be mindful of local wildlife and water currents
  • Avoid diving unless you know for sure it’s safe.

For the ultimate swimming experience during your trip, seek pristine lakes, gentle rivers, or coastal campgrounds known for their clear waters. However, remember that not all water bodies are safe and clean – make informed choices before jumping in. 

Birdwatching

Woman birdwatching with binoculars
Photo: ©Stephane Bidouze via Canva.com

Birdwatching, or birding, is more than just a pastime; it’s a way to connect with nature while sharpening your observational skills. As you tune into the diverse world of birds, you deepen your appreciation for wildlife and contribute to its conservation. Spotting a flash of color in the treetops or listening for a distinctive call can be unexpectedly thrilling and deeply satisfying.

When embarking on a birdwatching adventure during your camping trips, keep these pointers in mind:

  • Equip yourself with a reliable field guide to help identify various bird species.
  • Bring binoculars for a closer look at birds without disturbing them.
  • Keep a birding journal and note behaviors and characteristics like plumage, size, and sounds.

Discovering the best spots and the right season can drastically enhance your birdwatching experience:

Remember, early mornings and late afternoons are prime bird activity hours, so plan your excursions accordingly.

Biking

Mom and dad mountain biking with daughter
Photo: ©Sergey Novikov via Canva.com

Biking as an outdoor activity offers you the perfect blend of transportation, exercise, and the thrill of adventure. On two wheels, you can explore diverse terrains and soak in nature’s splendor at your own pace, from casual trail riding to adrenaline-pumping mountain biking. 

Always bring essential gear like helmets and repair kits. Here’s a quick guide:

  • Mountain Bikes: Ideal for rough terrain
  • Hybrid Bikes: For a bit of everything, roads and light trails
  • Road Bikes: Best on pavement for speed and distance

While exploring, remember to ride responsibly and store your bike securely at night to prevent damage or theft.

Venturing into the wilderness calls for preparedness. Here are some top trails to consider that promise both beauty and challenge:

Make sure your bike is tuned up before hitting the trails, and pack a map or use a GPS to keep track of your routes. 

Scenic Drives

Straight open road
Photo: ©paulbrady via Canva.com

Consider incorporating a scenic drive into the journey when planning your next camping trip. There’s something extraordinary about cruising through the mountains or a national park, where every turn in the road offers a new and breathtaking view. 

Before you head out, make sure your route is mapped and your vehicle is ready for the road. Here’s what I always do before I venture out:

  • Check the weather conditions: Always be prepared for what Mother Nature might throw at you.
  • Plan your stops: Identify campgrounds and lookouts ahead of time, especially if you have kids in tow.
  • Consider daylight: Aim to drive for the most vivid scenery during the day.

If you’re looking to put rubber to the road on some of the most striking drives, then here are a few you absolutely shouldn’t miss:

A scenic drive isn’t just a means to get to your camping destination; it’s an integral part of the adventure, beckoning you to slow down, breathe in the fresh air, and soak up the ever-changing canvas of the natural world.

Agrotourism

Mom, dad, and kids walking around farm
Photo: ©AleksandarNakic via Canva.com

Have you ever wondered how you can combine learning with your love for the outdoors? Agrotourism is the answer, blending agriculture and tourism into a family-friendly and educational experience. It’s all about farm-based fun, where you engage with the local way of life, dive into nature’s beauty, and support sustainable practices while having a blast exploring the fields and forests.

Research is vital to find a local farm to visit during your camping trip. Stop by a regional visitor center or search online for “agrotourism near me.” Here’s a quick list of various agrotourism ideas:

  • Orchard Trails: Wander and taste nature’s sweets
  • Farm Markets: Shop for fresh, local produce
  • Petting Zoos: Get up close with farm animals
  • Workshops: Learn traditional farming skills
  • Wagon Rides: Bounce along scenic trails
  • Farm-based Camping: Sleep under the stars within earshot of the countryside
  • Cycling Tours: Pedal through verdant fields

By visiting and supporting local farms, you create memories, contribute to the local economy, and promote environmental stewardship.

Horseback Riding

Mom and kids riding horses
Photo: ©Lana2011 via Canva.com

Horseback riding is an incredible way to soak in the grandeur of nature. 

Your best bet is to seek out local stables or tour operators near your camping destination. They’ll set you up with a horse that matches your riding ability and often guide you through trails tailored to your experience level. Always wear a helmet, follow the guide’s instructions, and treat your horse with the respect it deserves.

Here are a few practical tips for your equestrian adventure:

  • Booking: Reserve your riding slot in advance, especially during peak camping seasons.
  • Riding Gear: Wear comfortable clothes and sturdy footwear; avoid loose, fluttering garments that might spook your horse.
  • Approach: If you’re new to this, don’t worry! The guides will show you the ropes, from mounting to steering.

Looking for an unforgettable horseback trail? Check out the scenic vistas of Yosemite National Park or embrace the historical paths of Gettysburg. You’ll be trotting along routes etched into the history books.

Trail Running

Woman running a mountain ridge
Photo: ©Immagini di Michelangelo Oprandi via Canva.com

Trail running takes your fitness to nature’s domain, turning routine jogs into adventures. Imagine bounding over roots, weaving through trees, and taking in fresh oxygen while pushing your limits. You’ll get a blend of aerobic exercise and mental stimulation as you navigate diverse terrains, from gentle dirt paths to challenging mountain ascents.

Here’s how to gear up and hit those trails:

  • Start with proper footwear: Invest in trail running shoes with good grip and support.
  • Stay safe: Bring your GPS, snacks, and water. Always tell someone your route. 
  • Build your stamina: Begin with short trails, gradually increasing distance and elevation.

Training for trail running is different from training for the streets. Uncertain terrain makes flexibility and balance crucial. Include exercises like lunging and side-stepping to avoid tripping over nature’s hurdles. Don’t forget to rehydrate yourself properlyafter a great trail run!

Rock Climbing

Man helping woman climbing
Photo: ©Pancaketom via Canva.com

Rock climbing is a formidable test of strength and skill, often described as a vertical dance with nature. As you grip and search for footholds, you engage in a full-body workout that builds muscle, enhances coordination, and provides an adrenaline rush. Bouldering, its less height-focused sibling, offers similar benefits without needing ropes or harnesses.

If you’re keen to integrate rock climbing into your camping escapades:

  • Start Small: Find a local climbing gym or attend a beginner’s class. It’s vital to grasp the basics of technique and safety first.
  • Gear Up: Essential equipment includes a sturdy climbing harness, reliable shoes, a safety helmet, and a belay device.
  • Safety is Paramount: Always climb with a partner and check your gear before each ascent.

The United States has a bounty of rock climbing sites in its natural landscapes, offering climbers of all levels a chance to connect with nature while challenging their bodies. Some of the top destinations include:

Boating

Mom and child with dog on boat
Photo: ©blueorangestudio via Canva.com

Whether you’re guiding a sailboat across a gentle breeze or throttling a powerboat over waves, boating offers a fantastic mode for appreciating and exploring nature. The rhythmic sounds of water lapping against the hull can be incredibly soothing, making these experiences ideal for families looking to bond in the great outdoors.

When you’re planning a camping trip that includes boating, remember these tips:

  • Select a Suitable Watercraft: Marinas often provide rentals. Choose one that fits your group’s size and experience level.
  • Safety First: Always wear life jackets, and if you need clarification on operating a boat, feel free to ask for a quick tutorial.
  • Minimize Impact: If you opt for powerboating, be conscious that it utilizes fossil fuels, which can have environmental drawbacks. Whenever possible, consider eco-friendly alternatives such as sailing.

Here’s some quick guidance for your boating-themed camping escapade:

  • Family Fun: Look for calm lakes where water sports like tubing and waterskiing are popular.
  • Nature Immersion: For a tranquil retreat, paddle quietly in a canoe or kayak to observe wildlife.
  • Top Spots: Seek out renowned boating destinations like Lake Powell or the Finger Lakes, where 

OHV Trail Riding

ATV tour on gravel road in mountains
Photo: ©FS-Stock via Canva.com

Off-highway vehicles (OHVs), such as ATVs, motorcycles, and UTVs, bring unparalleled adventure to outdoor enthusiasts like yourself. Imagine the thrill of exploring rugged terrains, accessing remote campgrounds, or simply basking in the freedom of the wide-open trails.

Before you ride:

  • Safety first: Gear up with helmets, eye protection, and appropriate clothing.
  • Get trained: Educate yourself on OHV operation, trail etiquette, and environmental respect.
  • Rent smartly: Look for reputable rental programs, like Polaris Adventures, for high-quality equipment.

Despite the adrenaline rush, OHVs can be loud and disrupt wildlife. Always ride responsibly, stick to the trails, and minimize your environmental impact to preserve the great outdoors we love. Learn about Tread Lightly!

Top Spots for Thrills & Chills:

When camping with OHVs, balance the rush of adrenaline with moments of tranquility. Enjoy activities like fishing or hiking to appreciate nature fully. While OHVs can add adrenaline to your outdoor adventures, they’re not for everyone. Judge the risks, rent if you’re a newbie, and always put safety and nature care at the forefront. Happy trail riding!

Kayaking

Dad kayaking with his three kids
Photo: ©emholk via Canva.com

Kayaking is a marvelous way to engage in outdoor activities near a lake. It can grant you access to areas off the beaten path. Consider kayak or canoe camping. 

Choosing the right kayak is critical when gearing up for kayak camping. You want stability, storage space, and comfort for those long stretches on the water. Opt for kayaks designed for touring if you’re planning longer trips—these typically have ample storage for camping gear. Clean, drain, and dry your kayak thoroughly after your day on the water. 

Here are a few tips to enhance your kayaking outings:

  • For Families: Opt for tandem kayaks, which are great for bonding and sharing the paddling.
  • For Solo Paddlers: A single kayak offers agility and the chance to connect with nature one-on-one.
  • Paddleboarding: If you’re looking for a full-body workout, try stand-up paddleboarding, another fantastic way to explore the waterways.

As for the best spots for kayak camping, consider the calm waters of a nearby lake for a serene getaway or the meandering paths of a gentle river for a bit of exploration. Look for established campsites along the shores that cater to water adventurers. The Boundary Watersoffers an epic adventure for kayak and canoe camping. 

Tubing

Mom tubing with her daughter on her lap
Photo: ©Odua Images via Canva.com

Imagine yourself drifting down a serene river, surrounded by nature, as you bask in the sun with your family and friends. Not only is it a fantastic way to cool off, but it also offers an opportunity for socialization as you float along.

When you select a tube, consider the size and durability suited to your needs. It should comfortably support your weight and withstand the river’s challenges. Before hitting the water, properly inflate your tube to the manufacturer’s recommendations to ensure safety and performance.

Here’s a pro tip: learn the basics of riding a tube, such as steering with your hands and feet or linking up with other tubers to create a flotilla. Always wear a life jacket, regardless of your swimming skills, and watch river conditions for a safe experience.

For a memorable tubing outing, consider rivers known for their gentle flow and picturesque surroundings. Some favorite spots among campers include the Guadalupe Riverin Texas, the Saco River in Maine, and the Shenandoah River in Virginia. These locations are renowned for their clear waters and family-friendly atmospheres.

Treasure Hunt

Friend looking at a treasure map
Photo: ©Robert Kneschke via Canva.com

Treasure hunting isn’t just for the kids; it’s an all-ages, engaging activity that encourages creativity, fosters teamwork, and injects excitement into your camping experience.

Designing a treasure hunt might seem daunting, but it’s all about themed clues and hiding spots reflective of your natural surroundings. Start by crafting a narrative—maybe you’re pirates searching for buried gold or explorers on the trail of a lost artifact. Your clues can be riddles tied to the environment, leading campers from an ancient tree to a hidden stream.

Tips for Organizing Your Treasure Hunt:

  • Create a Map: Sketch out your campsite and mark potential hiding spots.
  • Safety First: Ensure all locations are safe, especially for kids.
  • Be Resourceful: Use natural elements like rocks or leaves to mark spots.

For the best themes, blend the location’s features with imaginative tales. A forest, for example, is ripe for an enchanted woodland quest or a Robin Hood-style caper. Here’s a simple clue to get you started: “Walk to where the water bends. The next clue hides where the river ends.”

Remember, the real treasure is the fun and bonding along the way. So grab your map and compass, round up your crew, and set off on a camping treasure hunt. 

Geocaching

Woman finding a geocache
Photo: ©SimpleFoto via Canva.com

Geocaching is a game that leads you through nature’s nooks, encourages learning through navigation, and fosters a sense of community as you share experiences with fellow geocachers.

Here’s how to get started:

  • Find a Geocache: Use your GPS or a smartphone with a geocaching app to locate hidden caches. You’ll find these by following specific coordinates.
  • Hide a Geocache: After finding a few, you might want to hide one. Choose a durable container and a non-invasive spot that won’t disturb the local wildlife or environment.
  • Log Your Experience: Inside each cache, there’s a logbook. Write down your geocaching handle and the date. Share your experience online and a cleaver hint or two for the next adventurer.

Tips for Successful Geocaching:

  • Respect nature: Leave no trace and be mindful of the environment.
  • Be prepared: Carry essentials like water, snacks, and a first aid kit.
  • Stay safe: Inform someone about your geocaching plans and location.

Letterboxing

Woman stamping a letterbox log
Photo: ©Leung Cho Pan via Canva.com

Letterboxing is an intriguing fusion of art, adventure, and collection, perfect for those who enjoy exploring the great outdoors with a creative twist. As you set up camp amid nature’s tranquility, consider adding a dash of mystery and treasure hunting to your experience. You’ll imbibe the wonders of your natural surroundings and connect with an age-old pastime that sparks creativity and a sense of discovery.

To begin your letterboxing quest, you’ll need to carve a personal stamp—it reflects your identity in this adventurous hobby. Once equipped, you must seek out hidden letterboxes by following clues that often lead you through scenic trails and seldom-visited wilderness corners. Here’s the crux of it:

  • Prepare: Craft your unique stamp and secure an inkpad and a notepad, which will serve as your logbook.
  • Discover: Use resources like Atlas Quest to find clues for letterbox locations in your camping area.
  • Collect: Upon discovering a box, stamp your logbook with the letterbox’s stamp and imprint your stamp in the letterbox’s logbook, a record of your presence there.

Foraging

Person carrying mushrooms and herbs they foraged
Photo: ©ClarkandCompany via Canva.com

When surrounded by nature’s bounty, foraging is a delightful activity that taps into your primal survival skills and offers a nutritious boost to your camping meals. I’m talking about the art of identifying and gathering wild foods—think of it as a treasure hunt, where the bounty is deliciously edible plants and mushrooms.

If you’re gearing up to forage, remember these essentials:

  • Safety First: Always carry a reliable guide to edible plants and mushrooms specific to your region. Some plants and mushrooms can be toxic, and mistakes can be dangerous.
  • Respect the Environment: Take only what you need without harming the ecosystem. For example, when harvesting berries, leave enough for wildlife and the continued health of the plant.

Here’s a simple way to get started on your foraging adventure:

  1. Identify: Start with easily recognizable foods like wild berries or dandelion greens.
  2. Gather: Use a gentle touch to avoid damaging the plant or its surroundings.
  3. Prepare: Wash your finds and prepare them as you would store-bought equivalents—many wild greens can be added to salads, while certain mushrooms are great in stir-fries.

Grab your bag and head to locales known for their abundance, like forest floors for mushrooms or riverbanks for wild herbs. Also, consider dehydrating your foraged foodfor other meals over the next few months. Try these quick recipes next time you camp:

  • Pine needle tea: Rich in vitamin C, it’s as simple as steeping cleaned needles in hot water. Identification warning: some evergreens (notably yew) are toxic and ponderosa pine is contraindicated in pregnancy — only harvest pine needles when you are certain of the species.
  • Wildberry compote: Heat berries over a fire with honey for a sweet treat.

Stargazing

Man shining flashlight towards Milky Way galaxy next to his green tent
Photo: ©ferrantraite via Canva.com

Stargazing, the simple act of looking up at the stars, offers a blend of wonder, knowledge, and a timeless romantic backdrop to any camping trip. From a family bonding experience to a serene moment of self-reflection, there’s something truly magnificent about the tranquility of the stars.

When you’re planning for a night of stargazing, keep these tips in mind:

  • Find a Dark Spot: Steer clear of light pollution. Nature reserves or national parks often offer the clearest views. Death Valley and the area just south of Grand Canyon National Park are prime examples.
  • Know When to Go: New moon phases and clear skies provide optimal conditions. Aim for times when the Milky Way’s glow is at its peak.
  • Gear Up: A telescope or binoculars can enhance the experience, but even the naked eye can catch constellations and shooting stars.
  • Capture the Moment: For photography enthusiasts, a tripod and a camera with manual settings can help you photograph the night sky. Use long exposures to capture the stars’ trails.

Photography

Woman taking photos outside with DSLR
Photo: ©Vadmary via Canva.com

When we talk about photography in the great outdoors, it’s not just about clicking the shutter—it’s about capturing the essence of those spontaneous family adventures and the beauty of nature surrounding us. It’s the art of holding onto those fleeting moments, whether basking in the golden hour or witnessing wildlife in action. Let’s take a journey through the lens.

Choosing Your Subjects

  • Landscapes: Find a vantage point that offers a vast perspective of nature’s splendor.
  • Wildlife: Be patient and consider a telephoto lens. 
  • Family and Friends: Capture candid and posed moments while exploring the wilderness.

Photography Techniques

  • Steady your camera with a tripod for sharp, high-quality images, especially in low light.
  • Master your camera’s manual settings to adapt to dynamic outdoor conditions.

Enhancing Your Photos

  • Edit photos to highlight the beauty you’ve captured but keep it authentic to the moment.
  • Share your experiences online or create a photo album to keep those memories alive.

Sketching

Woman sketching flowers outside
Photo: ©Spiritartist via Canva.com

Sketching in the great outdoors can be a remarkable way to connect with nature and unleash your creativity. You’re not just capturing the scene before you but interpreting the vibrant hues and dynamic light that only the wilderness can provide. It’s a practice that offers serenity and hones your artistic skills – all you need is a pencil and paper.

Begin by selecting a focal point in the natural landscape. Let this be the heart of your sketch: the rugged mountain outline, the intricate pattern of leaves, or a flowing stream. Here are a few pointers to guide your hand:

  • Outline your subject with gentle, loose strokes to capture the basic shape.
  • Shade lightly at first, building up layers to create depth.
  • Add color sparingly; sometimes, a touch of hues can bring a sketch to life.

Invest in a sturdy sketchbook and drawing pencils for your toolkit. A foldable stool and a lightweight easel can also enhance your comfort and stability as you draw.

Look for scenes that speak to you, those little moments of wilderness that stand out. The dappled light through a canopy of leaves, for example, or the way the sun sets the horizon ablaze, can be magic for your sketchpad. And remember, it’s about the experience, not just the outcome. So find your spot, take a deep breath of fresh air, and let nature guide your hand. It’s all about the fun of creating something unique and personal as you relish the tranquility of the outdoors.

Whittling

Man carving a wood horse
Photo: ©sercansamanci via Canva.com

Whittling is more than just slicing away at a piece of wood; it’s a craft that requires concentration and precision, often leading to a meditative state. When camping, having a knife and a simple block of wood can transform idle time into a session of creative expression. Here are a few tips to get you started:

  • Choose your tools wisely: A sharp pocket knife with a locking blade for safety or a specialized whittling knife will do. Keeping your blade sharp is crucial, as a dull knife is unsafe and makes for rough work.
  • Selecting your wood: Softwoods like pine or basswood are ideal for beginners due to their softer composition. Ensure the wood is dry; though fresh green wood is smoother and easier to cut, it’s prone to cracking as it dries.

Here’s a couple of whittling ideas that are perfect for the campsite:

  • Whittle a cooking utensil, like a simple spatula or spoon. They’re not just handy but also a fantastic reminder of your trip.
  • Craft an animal that makes a great camping souvenir.

Remember always to carve away from your body and use a glove to protect your holding hand. Whittling isn’t a race; take your time and enjoy the process. It’s a rewarding craft where the journey is just as enjoyable as the destination—a carved piece you can call your own.

Slacklining

Woman slacklining in forest
Photo: ©Gewitterkind via Canva.com

Slacklining, an activity that tests balance and agility, is a fantastic addition to camping activities. Initially conjured up by climbers in Yosemite to sharpen their balancing skills on rest days, it has since evolved into a fun pastime perfect for outdoor enthusiasts like you. You only need flat webbing, two sturdy points like trees or posts, and a sense of adventure.

Here’s how to get started:

  • Find the perfect spot: Look for two strong trees about 20 to 30 feet apart and with no obstacles in between.
  • Set up your slackline: Tie the webbing around each tree at a comfortable height. Use a ratchet or similar tensioning system to get the right amount of slack – not too tight or loose.
  • Walk the line: Begin by stepping onto the slackline with one foot while holding onto a friend or a tree for support. Focus your gaze on a fixed point ahead and walk slowly, placing one foot in front of the other.
  • Perform tricks: Once you’re comfortable walking, try sitting, turning, and even jumping on the line to add some fun tricks to your balance work.

Slacklines vary in length and tension, and they are suitable for different difficulty levels and fun. For beginners, a shorter and more low-lying line would be ideal. At the same time, seasoned slackliners might enjoy a longer and higher setup. Beyond the physical benefits, slacklining at a camp is a delightful way to bond with friends and family and share a few laughs — you’ll be surprised at how quickly you can progress from wobbly steps to confident strides.

Water Wars

Girls using water guns
Photo: ©torwai via Canva.com

When camping with family and friends, there’s no better way to add excitement to your day than with a good old-fashioned Water War. Picture this: you’re armed with water balloons in one hand and a water gun in the other. Laughter echos around you as everyone dashes and dodges, soaking wet but cool from the heat, the competition as intense as the midday sun.

Here are a few tips to get your Water War battle-ready:

  • Prepare Your Arsenal: Stock up on water balloons and reliable water guns. Aim for easy-to-fill balloons and guns with a good range and capacity.
  • Safety First: To avoid accidents, choose a spacious outdoor area away from camping gear and ensure the ground isn’t slippery.
  • Keep It Friendly: Remember, it’s all about fun. Set some basic rules to ensure no one gets hurt and everyone enjoys the game.

Outdoor Games

Cornhole board with bean bags
Photo: ©DavidPrahl via Canva.com

Outdoor games are a great way to add excitement and camaraderie to any camping trip. They’re not just for kids; games can also foster a sense of family and togetherness, making your outdoor experience memorable. 

When selecting games, consider your group’s age range and interests. Look for games that require minimal equipment and setup. Classics like Tag need nothing but open space and are perfect for getting everyone moving. 

Here are some all-time favorites perfect for campers of all stripes:

  • Tag: Always a hit, it’s simple and lively, and you can add variations to keep it fresh.
  • Capture the Flag: This team game combines stealth and strategy and is a hit with kids and adults alike.
  • Cornhole: Toss the bean bag into the hole, which is popular with teens and adults. 
  • Horseshoes: Popular game with older adults, although kids and young adults enjoy the challenge. 
  • Volleyball: Hang a net and mark the boundaries; you’ve got the recipe for a fun time. 
  • Bocce Ball: Classic beach game that is just as fun while camping.
  • Spike ball: Combine volleyball with four square and a circular net for a fast-paced game for teens and young adults. 

Yoga

Woman doing yoga outside her tent
Photo: ©miljko via Canva.com

Yoga is a practice that combines physical postures, breathing techniques, and meditation to foster harmony between your mind, body, and nature. When you’re camping, incorporating yoga can enhance your outdoor experience, promising relaxation and a chance to meditate amidst the tranquility of the natural world. 

When considering yoga styles for camping, opt for Hatha or Yin yoga. These styles focus on longer-held poses and are perfect for practicing with the serene backdrop of the outdoors. Yoga while camping isn’t about perfection; it’s about embracing the moment and your unique setting. 

Picnicking

Friend enjoying a picnic in the woods
Photo: ©Oneinchpunch via Canva.com

Picnicking is a delightful way to combine your love for the outdoors with the simple pleasure of dining al fresco. There’s something inherently comforting about spreading a blanket and unpacking a food basket amidst nature. It’s a casual yet intimate setting that invites relaxation and provides a scenic backdrop for your meal. Whether with family or friends, picnicking enhances your connection with nature and each other.

For the best experience, prepare by choosing foods that are easy to pack and serve. Items like sandwiches, fruits, salads, and cold cuts are perfect for a picnic. Pack utensils, napkins, and trash bags for an easy cleanup. Keep your food fresh and safe using a cooler with ice packs, especially if your picnic includes perishables.

When you’re camping, seek spots known for their views and tranquility. Lakeshores, streams, park meadows, and forest clearings are prime picnicking locations.

My favorite picnic was beside a beautiful river in Yellowstone National Park. Remember to respect the wildlife and environment; leave no trace after your meal.

Key Tips for Your Next Picnic:

  • Prepare: Opt for portable, non-perishable food items when possible.
  • Pack: Use a cooler to keep your food at a safe temperature.
  • Pick a Spot: Choose locations with beautiful views and minimal disturbance.
  • Protect Nature: Always clean up after yourself to preserve the outdoors.

Whether you’re a seasoned camper or a beginner, there’s always something new to try and discover in the great outdoors. Outdoor camping activities can enrich your trip and make it more memorable and satisfying. 

What outdoor camping activities do you enjoy? Leave a comment below! 

FAQ

What are outdoor camping activities?

Outdoor camping activities are any recreational or educational activities that can be done outside while staying in a tent, cabin, or RV. Some outdoor camping activities include hiking, fishing, biking, kayaking, birdwatching, and stargazing.

What are the benefits of outdoor camping activities?

Outdoor camping activities can provide many benefits for physical and mental health, such as reducing stress, improving mood, boosting immunity, enhancing creativity, and strengthening relationships. Outdoor camping activities can also help you appreciate nature and learn new skills. They also help your kids get all that energy out in a creative and fun way.

What are some fun camping activities for kids and families?

There are many fun camping activities for kids and families that can keep them entertained and engaged. Some examples are nature scavenger hunts, attending outdoor programs, completing junior ranger activities, playing games like tag, swimming, biking around camp, hiking, and making s’mores.

What are some camping activities for couples?

Camping can be a romantic and adventurous way to spend time with your partner. Some camping activities for couples are cooking a special meal, watching the sunset or sunrise, cuddling by the fire, reading or listening to music together, and playing card or board games. If you and your partner are feeling adventurous, you can also try some more challenging activities like rock climbing, kayaking, or zip-lining.

How to Build a Tent Platform: 10 Steps for a Solid Camping Setup

Building your tent platform is not just about practicality; it’s a project that adds a touch of personality and comfort to your camping experience.

Whether you have set your sights on a serene lakeside or a secluded forest spot, constructing a platform allows you to choose your perfect viewmore permanently. A well-built platform can also enhance the aesthetics of your campsite, blending functionality and protecting the environment. 

Key Takeaways

  • A tent platform ensures comfort and protection by providing a level and dry area for tent setup.
  • Construction involves careful planning, such as designing the platform, selecting materials, and woodworking.
  • With a platform deck, your camping spot becomes more permanent and weatherproof, increasing the practicality of outdoor living.

Step 1 – Design the Platform

Choose the Right Location

You want a spot with privacy, natural protection, and a great view.

Also, a spot with good drainage is preferable, although not always possible.

Avoid spots that are in danger zones, such as areas that could have rock falls, landslides, or flash floods. 

Determine the Tent Platform Size and Shape

  1. Measure your tent’s dimensions.
  2. Add the perimeter of space you’d like around the tent—for walking, an extra deck, or gear storage. A good rule of thumb is to add at least a couple of feet extra on each side.
  3. Sketch out potential shapes: square, rectangle, or hexagon.
  4. Mark your platform on the ground using a nylon string line to outline your desired shape.
  5. Consider how high off the ground you want to raise the platform to mitigate moisture issues.

Codes and safety check: Before you build, check local building codes and permit requirements — a tent platform may legally count as a structure. In cold climates, account for frost heave by setting posts below the frost line or using a floating (non-frost-protected) design. And build for the full load: the platform and tent plus occupants, gear, and any expected snow load.

Step 2 – Gather Tools and Materials

Materials

  • Pressure-treated lumber (cedar lumber as an alternative) for posts and joists
  • Decking material of either wood or composite decking
  • 3” Galvanized screws or 10D nails
  • Joist hangers for securing the joists to the posts
  • Post anchors to secure the platform legs to the ground.
  • Concrete for setting the post anchors firmly in the ground
  • Concrete deck blocks (optional/alternative)

Tools

  • Circular saw for cutting lumber to the desired length
  • Drill, preferably cordless, for fastening screws
  • Hammer for driving in nails and other fasteners
  • Post-hole digger to prepare the holes for your posts
  • Tape measure for precise measurements
  • Level 
  • Carpenter pencil
  • Nylon string

Step 3 – Clear the Area

Once you’ve pinpointed your ideal location. Grab a pair of gloves and clear away any rocks, sticks, and forest debris.

Look out for larger rocks or roots that might need a shovel, saw, or large equipment.  

Consider also placing gravel under the platform area to improve water drainage. 

Step 4 – Dig Foundation Post Holes

Mark the location of the footings/post holes with stakes and nylon string to square the corners and establish a rough layout.

Mark the location of the holes with spray paint.

If you are in an urban area, remember to call before you dig to avoid hitting any underground utilities. 

If you’re using cinderblock piers or concrete deck blocks for your platform post legs, you can skip to step 6. 

5 Steps to Dig Post Holes

  1. Choose Your Tool: Grab a post-hole digger, a sturdy shovel, or a powered auger.
  2. Measure Up: Generally, you want each hole to be roughly three times the width of your post.
  3. Consider Alternatives: If digging isn’t up your alley or the terrain disagrees, a concrete deck block or cinder block pier can save the day. They’re a solid base for your posts without all the digging.
  4. Start Digging: With your post-hole digger, cleanly remove the earth. Remember to check your measurements as you go, ensuring consistent depth and diameter.
  5. Setting the Scene for Support: If you’re using concrete to set your posts, a concrete form tube can guide you to a smooth, strong pillar. Level the form tubes so they’re about 1” above the ground. Pack the soil around the form tubes with a tamp. 

Step 5 – Pour Concrete and Place Post Anchors

Mixing and Pouring Concrete

  1. Start with ready-mix concrete from your local hardware store.
  2. Follow the package directions. Typically, you’ll combine the concrete mix with water until it has a thick, oatmeal-like consistency.
  3. Shovel or pour the concrete into your pre-dug holes, filling up to just below ground level.

Setting Your Post Anchors

  1. Immediately after pouring, set your post anchors in the center of the wet concrete.
  2. Use a level and be meticulous to ensure they’re perfectly straight.
  3. Align them with a string line

Cure Time

  • Let the concrete cure for at least 24 hours.

Step 6 – Attach Posts or Beams to the Concrete Base

  1. Place your beam or post into the anchors.
  2. Utilizing a drill or hammer, fasten the posts to the anchors with post-base screws or nails.
  3. Always do a second sweep with your level. A well-leveled beam or post makes all the difference.
  4. Use a nylon line that is leveled and set to the correct height to mark and cut posts evenly and consistently. 

Step 7 – Attach Rim Joists or Beams

When setting up a sturdy tent platform, rim joists or beams are the backbone of your structure. They provide the perimeter frame on which every other part depends, so attaching them correctly is critical. 

  1. Attach rim joists on the outer edges of the posts. Start with one fastener per post in case you need to adjust. 
  2. Add fasteners to the rim joists after confirming everything is level and square. 
  3. Cut the posts even with the joists if not already trimmed.
  4. If you’re using beams, finish the open ends with a rim joist on both sides, making an enclosed, secure perimeter. 

Step 8 – Attach Inner Joists to Rim Joists or Beams

  1. Position your joist hangers along the inside face of the perimeter rim joists or beams spaced 16-24 inchesapart. Be consistent and follow any building codes in your area.  
  2. Attach joist hangers with fasteners. 
  3. Slide each joist into its hanger. They should fit snugly. Then, with a drill and screws, secure the joists to the hangers.
  4. Check each joist to make sure your platform is level. If a joist is a bit off, a wood shim can help level it. 

Step 9 – Install Decking Boards to the Top of the Joists

  1. Begin at an end: Start by aligning a decking board against the first joist. Check that it’s flush with the edge for a clean look. Hold it steady and then drill two screws into the board—one at each end—securing it to the joist. Move down the line, driving screws through the board into each intersecting joist.
  2. Mind the gaps: A crucial but often overlooked step is leaving a small space between each decking board. Use a spacer or a small nail to keep your gaps consistent. These gaps are vital for:
    • Expansion and contraction: Wood responds to weather, and those spaces allow it to breathe.
    • Drainage: Gaps prevent water from pooling, ensuring a dry deck.
  3. Sawing it down to size: If your boards extend beyond your joist frame, don’t fret. Mark the excess length with a pencil and line up your circular saw. Finding a comfortable stance, cut along the marked line for a tailor-fit finish of your deck.

Step 10 – Stain and Seal Wood

  • Pick Your Stain: Stains always have pigment or color in them. Select a stain with high weather resistance and a color that matches your style. I prefer a semi-transparent stain since it enhances the wood grain and stands up well to the elements, including UV rays.
  • Sealing Matters: After staining, don’t forget to apply a waterproof sealer. This extra layer is crucial for keeping moisture out and preserving your platform. Sealers have no color, and they dry clear. 

Applying Stain and Sealant

  1. Ensure Wood is Clean and Dry: Clean any debris or dust off your wood and make sure it’s completely dry.
  2. Apply Stain: Using a brush, roller, or sprayer, evenly coat the wood following the grain. Remember, it’s not just aesthetics—this is your platform’s armor!
  3. Allow to Dry: Patience, my friend. Let the stain dry as the manufacturer recommends, usually 24-48 hours.
  4. Seal It: With a clean brush or sprayer, apply the sealant thoroughly

FAQs

How much does it cost to build a tent platform?

The cost of building a tent platform depends on several factors, such as the size, design, material, and location of your platform.

You can expect to spend between $1,000 to $5,000 on materials, and between $1,500 and $3,500 on labor, for a standard platform that can fit a 12’x14′ tent.

However, these are only rough estimates, and your actual cost may vary depending on your specific needs and preferences and the current cost of lumber.

How long does it take to build a tent platform?

The time it takes to build a tent platform also depends on several factors, such as the complexity, skill, and tools involved in the project.

You can expect to spend between one and two days building a basic platform that can fit a 12’x14′ tent. However, this is only a rough estimate, and your actual time may vary depending on your specific needs and preferences.

What are the advantages and disadvantages of a tent platform?

A tent platform can have both advantages and disadvantages, depending on your situation and preference. Here are some of the pros and cons of using a tent platform:

Advantages

– Can protect your tent from water and other damage, turning your canvas tent into a practical and enduring shelter.
– Can provide you with a flat, comfortable, and dry surface for sleeping and relaxing, regardless of the terrain and weather conditions.
– Can discourage insects and animals from living under your tent, and reduce the debris that you track into your tent.
– Can offer more headroom, storage space, and configuration options than a ground tent, especially for larger and taller tents.
– Can enhance the appearance and style of your tent, making it look more elegant and inviting.

Disadvantages

– Can be expensive and time-consuming to build, requiring materials, labor, and tools that may not be readily available or affordable.
– Can be difficult and tricky to pitch a tent on, requiring special techniques and equipment to anchor the tent securely and properly.
– Can be less flexible and movable than a ground tent, requiring more planning and preparation to find a suitable and legal location to set it up.
– Can reduce the natural and authentic feel of camping, as it separates you from the ground and the elements.

How to pitch a tent on a platform?

You want to pitch your tent in the same way and shape that you would on the ground. You fasten the tent to the platform with screw through the metal grommets on your tent not the elastic bands. Your guylines really need to have the same angle they would on the ground to avoid stress on the tent poles. This might mean using short guyline poles or stakes that are attached to your platform. Remember to keep 1-2 feet of line you can tension between the guyline pole and the tent.

How can I figure out how much lumber I’ll need for my tent platform?

To figure out the amount of lumber you need, first decide on the dimensions of your tent platform. Let’s say your desired platform is 10 feet by 12 feet. Standard lumber sizes typically come in even-length increments, so you’d need to calculate how many pieces of lumber will cover the platform’s length and width when cut to fit. For custom sizes, you can get beams cut to specific lengths at your local lumberyard or home improvement store—just bring your measurements.

Why use concrete for the posts?

Pouring concrete for your post holes ensures a stable and durable deck foundation to withstand the rigors of mother nature. A concrete base prevents your structure from shifting, keeping your tent platform level and secure.

Why use a stain or sealant?

When building a tent platform, selecting and applying the right stain and sealant is crucial for durability and aesthetics. You’ll want to choose a stain that not only complements the natural beauty of the wood but also provides a reliable waterproofing barrier, especially under heavy rain. You don’t always need both, especially if you want the natural wood color.