How to Use a Compass: Steps for Compass and Map Navigation

Compass on a topo map

A compass and map greatly reduce the chance of staying lost outdoors, but they are not a guarantee — always carry a map, tell someone your plan, and practice before you need them. Most outdoors experts recommend carrying a compass as part of your essential hiking gear. However, using a compass is a lost science, as most hikers and backpackers use a phone or GPS for navigation. This guide helps you learn how to use a compass for navigation, so your compass isn’t just dead weight in your pack.

I’ve put together a step-by-step guide to learning the science of using a compass based on my experience hiking with a compass and map. I’ve also researched the best outdoor navigation resources to help you learn to use your compass effectively.

Why Use a Compass?

You will probably navigate most of your hikes with your phone using something like Gaia, Google Maps, or even a separate GPS device. This is not only easy but also often more accurate. But there a 2 reasons to bring and use a compass on your hike:

  1. A compass can quickly orient your map.If you have a paper map (which you should on a longer hike), using a compass to orient the map in the correct position is quick and easy with a compass.
  2. A compass provides backup. If your phone or GPS fails, you need a backup, especially on a longer or remote area hike. Also, dense canopy and deep canyons can degrade GPS accuracy and slow satellite fixes, though they rarely eliminate reception entirely. Having and knowing how to use a compass is a worthwhile skill to reduce getting lost in the woods.

Compass Basics

Types of Compasses

Baseplate or orienteering compass

Open baseplate compass
Photo: ©Daniel Borkert/OutdoorFootprints.com

A baseplate, also called an orienteering compass, is the most common type of hiking and backpacking compass. It usually is made of a flat piece of transparent plastic with an adjustable dial or bezel. Some baseplate compasses come with a mirror that allows sighting capabilities. Baseplate compasses work well either by themselves or with a map.

Lensatic compass
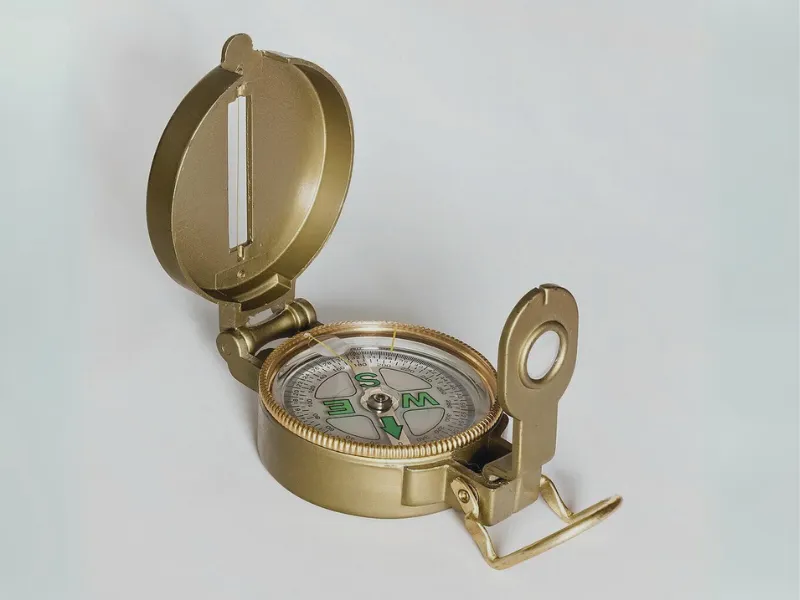
Open lensatic compass
Photo: ©Jacek Halicki/CC BY-SA 4.0 via Wikimedia Commons

Lensatic compasses are commonly seen in military and action movies. They are usually round with a sighting wire and lid. They can work in a pinch both in the field and using a map. However, for hiking and backpacking, you will generally want to get and use a baseplate compass rather than a lensatic compass.

Parts of a Baseplate Compass
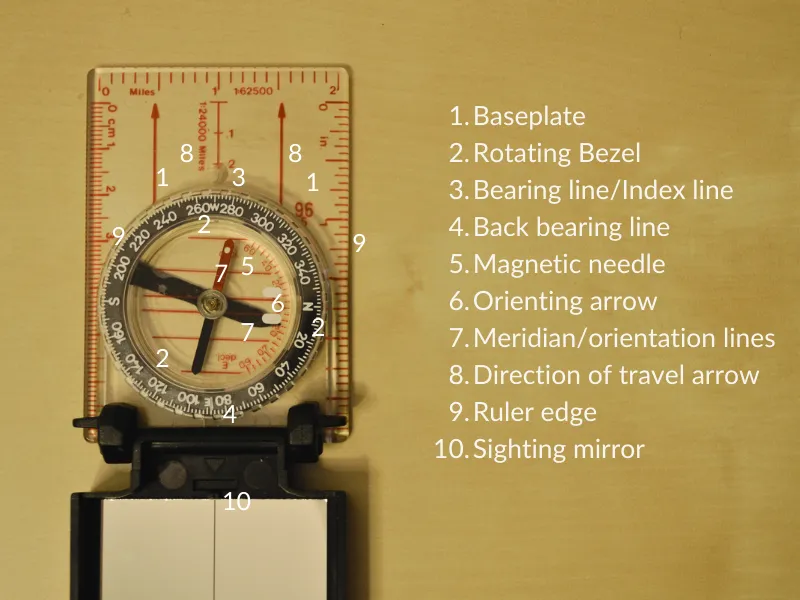
Numbered parts of a compass
Photo: ©Daniel Borkert/OutdoorFootprints.com
  1. Baseplate: The large flat rectangular plastic piece that has the ruler edges, bezel, index line, and direction of travel arrow
  2. Rotating Bezel: The dial with numbers 0-359 representing degrees (the angles as measured from North, which is 0°)
  3. Bearing Line/Index Line: The marker of the current direction the bezel is set at in degrees
  4. Back Bearing Line: The marker that is always 180° from the index line or bearing
  5. Magnetic Needle: The marker in the middle always points towards the magnetic north (usually, the north part of the needle is red/colored while the south part of the needle is usually black)
  6. Orienting Arrow: This is how you will line up the bezel with the magnetic needle so your compass reads accurately
  7. Meridian/Orientation Lines: Run North/South and help you line up the compass correctly on a map
  8. Direction of Travel Arrow:Points away from you in the direction you want to travel or take a bearing
  9. Ruler Edge: The long edge of the baseplate, usually marked in inches and centimeters, helps you measure distances on a map.
  10. Sighting Mirror (optional): A mirror can help you more accurately shoot a bearing (mirror usage not covered in this guide)
  11. Declination Adjustment (optional): Some compasses have a key or tool you can use to adjust for declination, as discussed further below in this guide.

How to do Basic Compass Navigation

  1. Hold the compass flat at waist height with both hands and elbows tucked in for support, with the direction arrow facing away from you towards your intended destination.
Photo: ©Daniel Borkert/OutdoorFootprints.com
  1. Rotate the bezel dial until the orienting arrow is aligned with the red magnetic arrow. Remember the phrase, “Put Red in the Shed.”
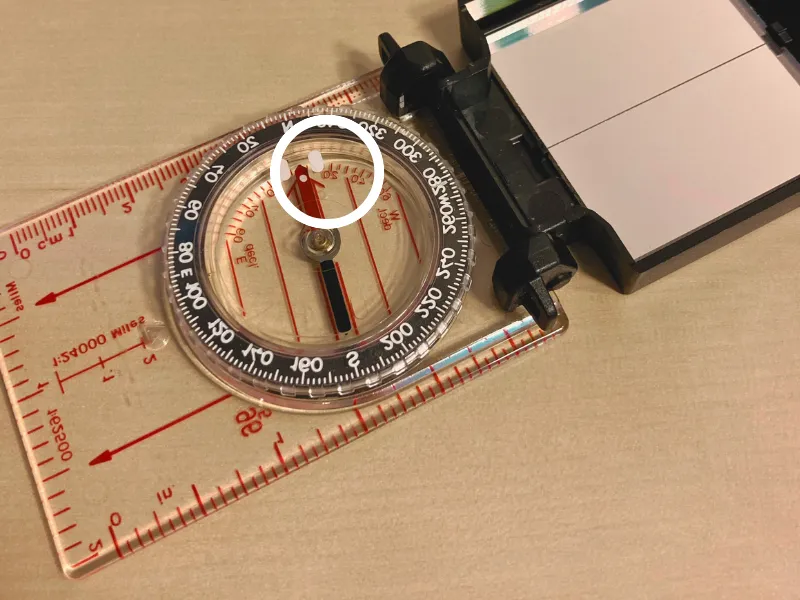
Photo: ©Daniel Borkert/OutdoorFootprints.com
  1. Read the number on the index line/bearing line. This is the direction you’re currently facing expressed in degrees (an angle clockwise from North is considered 0 degrees). The back-bearing is 180 degrees behind you and should be on your back-bearing line.
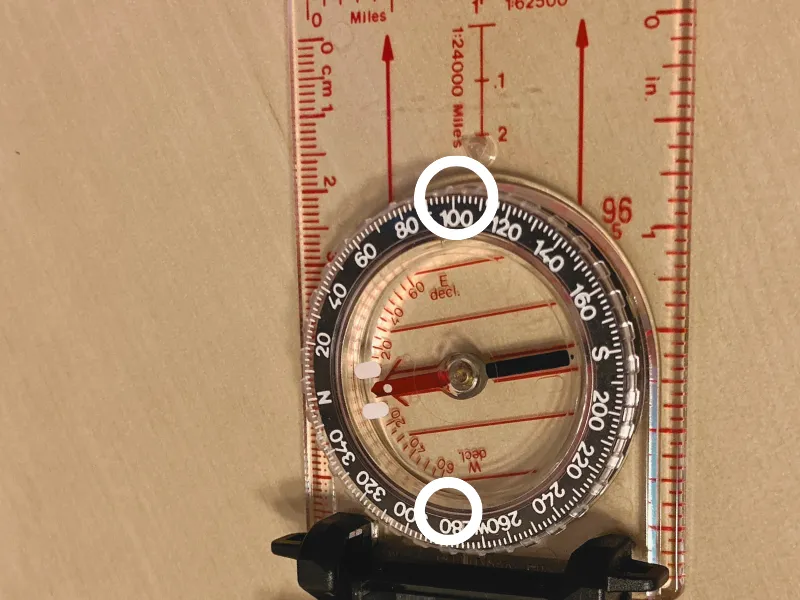
Photo: ©Daniel Borkert/OutdoorFootprints.com
  1. If possible, note a landscape feature directly aheadwithin the next hundreds of feet on your bearing and a point behindyou on your back bearing.
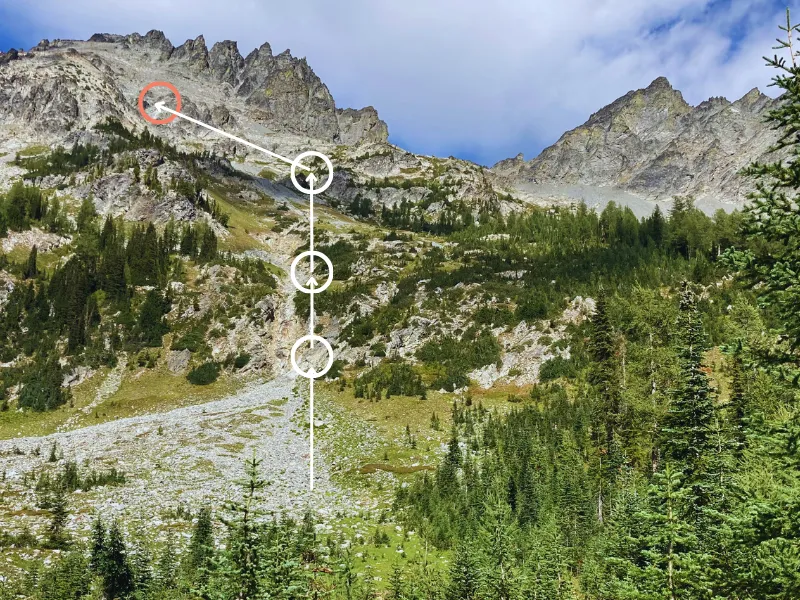
Shooting a bearing course with intermediate points going up Five Finger Jack | Photo: ©Daniel Borkert/OutdoorFootprints.com
  1. Draw an imaginary line in your mind. Your compass bearing should match this imaginary line.
  2. Don’t change anything on the compass until you want to go in a different direction.
  3. Put the compass away and walk/hike toward the landscape feature you identified ahead of you. If you lose sight of the feature ahead, look behind for the back-bearing feature you identified.
  4. Once you’re at the landscape feature you identified, take your compass out and, without adjusting anything on the compass, rotate your body until the magnetic needle lines up with the orienting needle. “Put red in the shed”.
  5. Repeat steps 5-8 until you reach your intended destination.

How to Use a Compass with a Map

Photo: ©Daniel Borkert/OutdoorFootprints.com

Using a compass with a map is a powerful, reliable navigation tool for lost-proofing yourself. Most hikers and backpackers should have some basic skill with reading and using a map with a compass. You can download and print USGS topo maps for free, so there’s no excuse for not always having a good topo map when hiking or backpacking. Here are a few common scenarios when using a map and compass together with the basic steps.

Always Adjust for Declination

Chart: USGS Educational ResourcesPublic Domain

Your compass’s magnetic needle always points to the “magnetic north.” However, the magnetic north is actually slightly different from “true north” or the north pole. This difference is called declination and varies depending on where you are in the world. 

We care about declination because most maps are oriented for “True North.” If you’re not using a map, you can skip adjusting your compass for declination. 

Chart: ©Cavit, CC BY 4.0 via Wikimedia Commons

Declination adjustment for your compass can be confusing, but I have found two easy methods for adjusting your compass for declination that help you avoid doing too much math and calculations. If at all possible, plan ahead for declination before your trip and avoid trying to do any declination addition/subtraction in the field.  

Find the declination offset for your current area

You first have to know the declination offset for your particular area. Generally, you can search by zip code using the Magnetic Field Calculator. This will give you a declination of either East or West by degrees. The USGS topo maps also have a declination offset on the bottom. The declination changes slightly yearly, so an older map might not have an accurate declination offset number. 
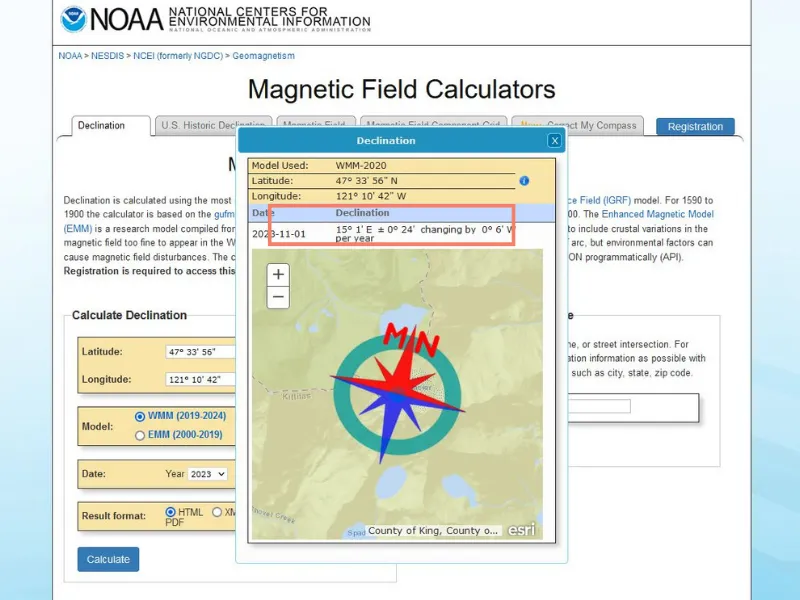
Example using the Magnetic Field Calculator in my area in Washington State | Screenshot: Daniel Borkert accessing NOAA Declination Calculator website

Adjust your compass for the declination

After you know your declination offset in East or West degrees, you must adjust your compass to account for the declination. There are multiple ways to do this, but here are the 2 easiest ways to adjust for declination on your compass. 

Method #1– With an adjustable orienting arrow built into the compass.

Some compasses come with a way to adjust the orienting arrow to account for your decline. I recommend looking up the user guide for how to do this, but usually, it’s just a simple screw you turn to adjust the orienting arrow to the specified declination degree, either East or West. With this method, you will still “Put red in the shed.”
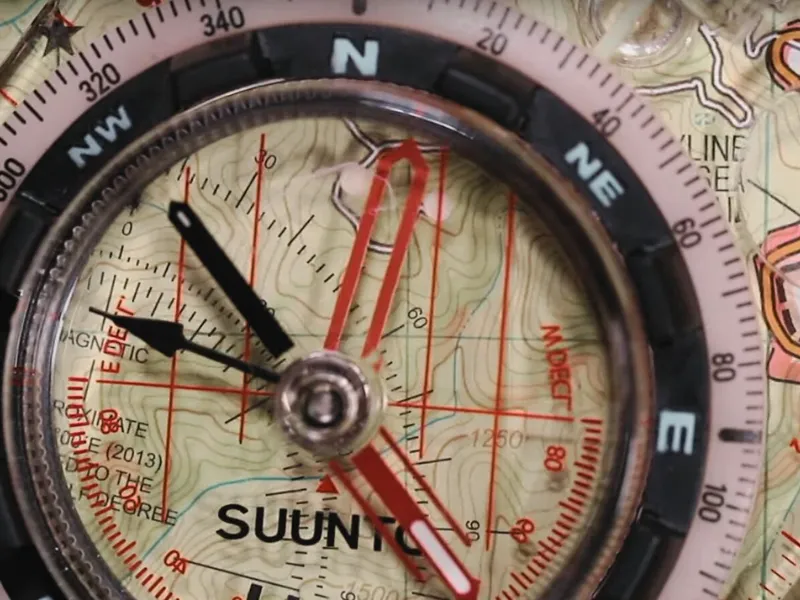
Suunto Compass with Declination Adjusted | Screenshot: Summit Sparrow via Youtube
Method #2– With tape as the new orienting arrow on non-adjustable compasses.

Some baseplate compasses do not have an adjustable orienting arrow for declination. You can either add/subtract on the fly, which can get confusing, or you can use a strip of tape to mark the declination and use the tape as the new orienting arrow. With this method, you will now “Put red on the tape.”
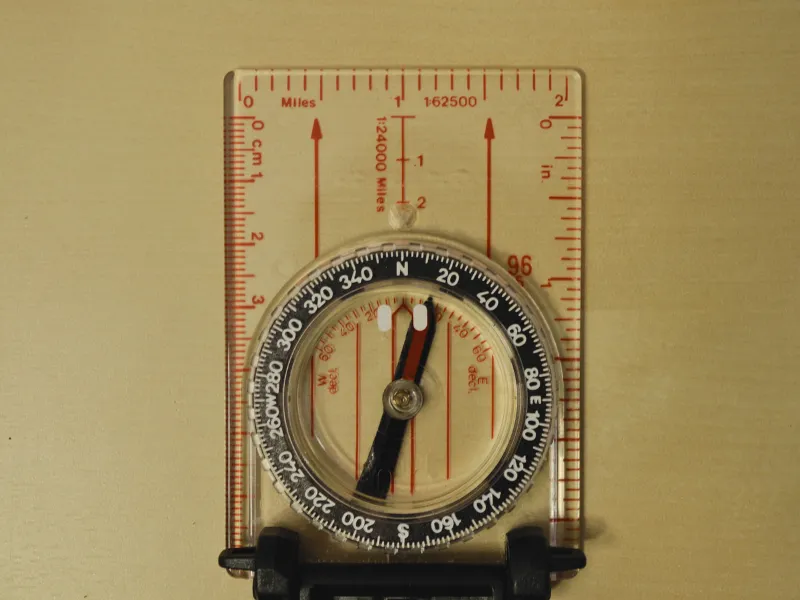
Compass now adjusted for declination with black tape as a new orientation arrow. | Photo: ©Daniel Borkert/OutdoorFootprints.com

When you know your location on the map

  1. Adjust the compass for declination as above.
  2. Orient the map using landscape features (optional step). You are basically using your compass as a protractor to find an angle from north on the map, so you can ignore the magnetic needle while it’s on the map.
  3. Place the compass on the map with the back ruler edge on your current location.
  4. Place the front ruler edge on your intended destination. Direction arrows should be facing toward the intended destination. 
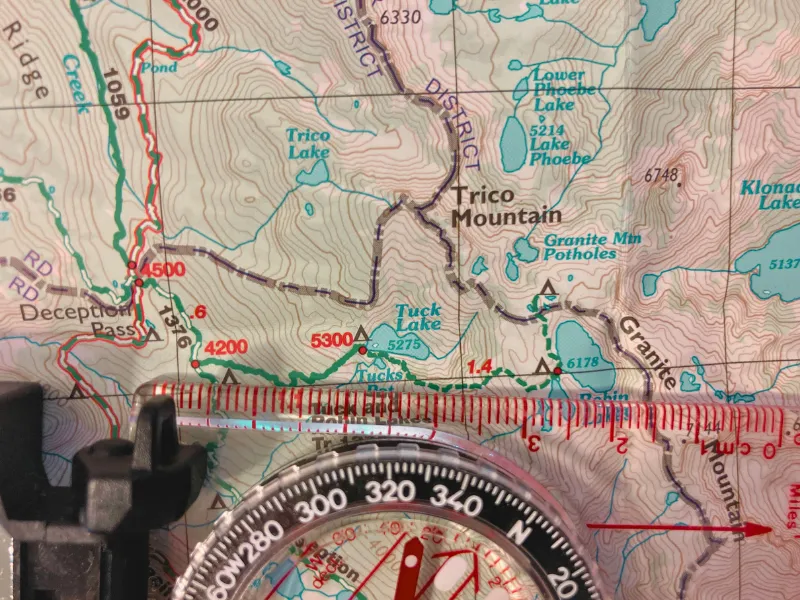
Turn off (current location) towards Robin Lakes (intended destination) using the ruler edge on my compass. | Photo: ©Daniel Borkert/OutdoorFootprints.com
  1. Rotate the bezel so the meridian/orienting lines are pointed north on the map and parallel with the North/South lines on the map. Remember to ignore the magnetic lines/needle at this point. Also, ignore the adjusted declination orienting arrow or taped declination. 
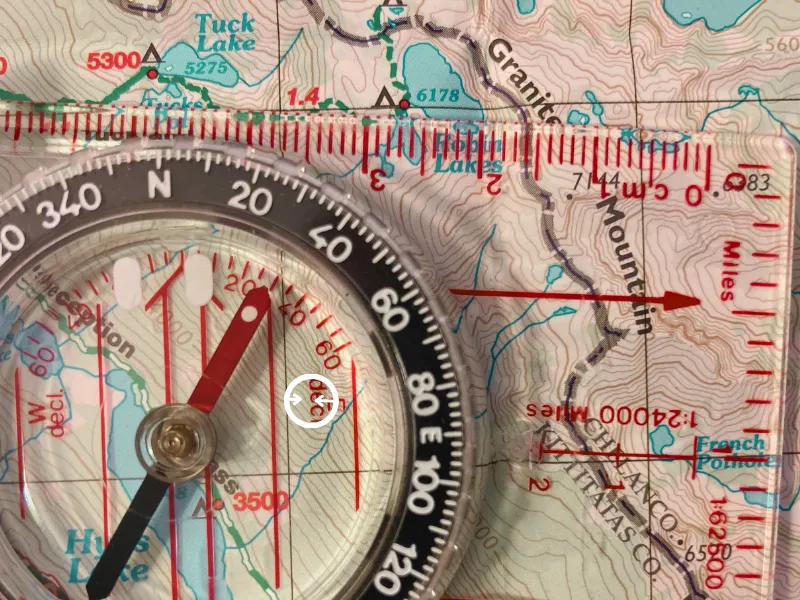
Ignore the magnetic needle. The compass meridian lines must align with the map’s north/south lines. | Photo: ©Daniel Borkert/OutdoorFootprints.com
  1. Read the bearing number at the index line once the meridian/orienting lines parallel the map’s North/South lines. This is the bearing you need to reach your intended destination.
The compass edge is set on the turnoff, aligning with my destination (Robin Lakes), ANDthe compass meridian lines are set parallel. Bearing 93° at the index line is the bearing I need to take to get from the turnoff toward Robin Lakes. | Photo: ©Daniel Borkert/OutdoorFootprints.com
  1. Remove the compass from the map without rotating the bezel (keep it at 93°).
  2. Now rotate your body with the compass and align the magnetic needle with the adjusted declination orienting arrow or taped declination line (“Put red in the shed” or “Put red on the tape”).
  3. Once lined up, you should be facing the direction and bearing of your intended destination.
  4. Use the basic navigation steps above to work your way to your destination.
  5. In more extreme terrain, you may need to plot multiple bearing lines to avoid obstacles.

When you don’t know your location on the map

When you don’t know where you are on a map, but you’re on the trail.

  1. Orient map to true north using the compass.
Orient the map to true North by lining up compass meridian lines parallel to map lines with the direction arrows facing the top of the map. Then rotate the map to put “Red in the shed” or “Red on Tape,” depending on how you adjusted the compass for declination. | Photo: ©Daniel Borkert/OutdoorFootprints.com
  1. Attempt to identify a landscape feature that matches the map and take a bearing of that feature.
  2. Line up the front ruler edge with the landscape feature.
Photo: ©Daniel Borkert/OutdoorFootprints.com
  1. Rotate the entire compass baseplate until meridian/orienting North/South lines parallel the map’s North /South lines. Don’t rotate the bezel to do this.
Photo: ©Daniel Borkert/OutdoorFootprints.com
  1. The front rule edge should still be a landscape feature on the map, and the back edge should be towards your current location on the trail. You may need to use a straight edge to extend the line backward until it hits your trail.
An additional bearing of a landscape feature seen on the map should help confirm your location on the trail. This is a recommended but optional step. | Photo: ©Daniel Borkert/OutdoorFootprints.com
  1. Look for additional features near the trail to double-check your work.

When you don’t know where you are on a map, and you’re not on a trail. 

  1. Orient map to true north using the compass as demonstrated above.
  2. Attempt to identify a landscape feature that matches the map and take a bearing of that feature.
  3. Line up the front ruler edge with the landscape feature shown above.
  4. Rotate the entire compass baseplate until the meridian and orienting lines parallel the map’s North and South lines. Don’t rotate the bezel to do this.
  5. Mark this line on your map.
  6. Repeat steps 1-5, at least 1-2x more with different landscape features, preferably 90 degrees or more from each other.
  7. The intersection of lines should form a small area where you are approximately on the map.
If you’re not on a trail, use your compass to take 3+ bearings, which can help you “triangulate” your position on the map. The three bearings above form a triangle that approximates the area I’m currently standing on the map. | Photo: ©Daniel Borkert/OutdoorFootprints.com

Tips for Using Compass

  1. Rotate the bezel only when necessary. 
  2. Rotate your body with the compass, keeping the front arrow straight in front of you. Do not rotate the compass only with your hands.
  3. Keep the compass flat when using it.
  4. Avoid using a compass around metal objects such as phones, keys, cars, or power lines.
  5. If you use a map, always plan to account for declination on your compass before you get outside (doing math on the fly increases the chance of error).

Practice, Practice, Practice

Learning how to use a compass is primarily a hands-on experience. The best way to get good at using a compass is to go outside and practice. Here are some exercises for getting comfortable with your compass for basic navigation. 

Bearing/back-bearing exercise

  1. Mark your starting location. 
  2. Look for an object or landscape feature several yards away and take a bearing from your current location. 
  3. Make a note of the back bearing. 
  4. Put your compass away and walk towards the identified landscape feature. 
  5. When you reach your intended destination, adjust your compass to the back bearing.
  6. Make your way back to where you started. 
  7. Repeat the exercise but increase the distance.

You should arrive at your starting location if you identified a landscape feature in line with your back bearing. If you didn’t identify a landscape feature in line with your back bearing, you might end up slightly off to the right or left of your starting location. This is called “lateral drift” and can easily happen, especially over long distances, so always having an object or landscape feature identified on your bearing line helps keep your course. 

The Square exercise

  1. Mark your starting location. 
  2. Adjust the compass index line pointing to the North or 0 degrees.
  3. Rotate your body to align the orienting arrow with a red magnetic needle. “Put red in the shed.”
  4. Walk 10 steps, then stop and mark your spot.
  5. Adjust the compass index line pointing to the East or 90 degrees.
  6. Rotate your body to align the orienting arrow with a red magnetic needle. “Put red in the shed.”
  7. Walk 10 steps, then stop and mark your spot.
  8. Adjust the compass index line pointing to the South or 180 degrees.
  9. Rotate your body again to align the orienting arrow with a red magnetic needle. “Put red in the shed.”
  10. Walk 10 steps, then stop and mark your spot.
  11. Adjust the compass index line pointing to the West or 270 degrees.
  12. Rotate your body one last time to line up the orienting arrow with a red magnetic needle. “Put red in the shed.”
  13. Walk 10 steps, then stop. You should be at your starting location, having completed a square. 

Map and compass exercise

  1. Get or print a topo map of your area
  2. Adjust your compass for magnetic declination using one of the two methods for declination adjustment as above.
  3. Orient your map north with a compass. 
  4. Mark your current location on the map and find an intended destination. 
  5. Use your compass on the map to plot a course, taking note of the bearings. 
  6. Use your compass with the bearing to reach your intended destination, remembering to use intermediate landscape features to keep your line from drifting. 
  7. For a further challenge, use your compass and map to pinpoint your location on the map.

Knowing how to use a compass is a powerful tool for safely navigating hikes, especially for beginners. Having and using a compass and map together significantly decreases your risk of getting lost in the great outdoors. Check out our essential hiking gear guide for other ways to plan your upcoming hiking trips, including packing a good first aid kit.

FAQs

How do I read a compass for beginners?

Reading a compass starts with understanding its main components: the base plate, the direction of travel arrow, the rotating bezel (or compass ring), and the magnetic needle. The needle typically has a red end, which points toward magnetic north. To read a compass:

1. Place it flat on your palm or a level surface.

2. Rotate the bezel so the orienting lines match the compass needle’s direction.

3. The direction of travel arrow now points to your desired direction.

What is the correct way to hold a compass?

Hold the compass level in front of you. Ensure the direction of travel arrow points straight away from you. Keep the compass away from metal objects or electromagnetic fields to avoid interference. This position ensures accurate readings.

How do I set a bearing on a compass?

1. Identify your current location and destination on a map.

2. Place the compass edge between these two points.

3. Rotate the bezel until the orienting lines parallel the map’s meridians, ensuring the north

4. indicator points to map north.

5. The direction of travel arrow now points to your destination, with the bearing number at the index line.

Does a compass always point to true north?

No, a compass points to magnetic north, not true north, due to the Earth’s magnetic fields. The difference between these is known as magnetic declination, which varies depending on your location.

How can I adjust for declination on a compass?

Some compasses have a built-in declination adjustment. For these, refer to a local map for the declination angle, adjust the declination scale accordingly, and your compass will now align with true north. If your compass lacks this feature, you’ll need to calculate the adjustment when setting your bearing manually.

Can I use a compass without a map?

Yes, a compass can be used independently to maintain a straight path or find a general direction. However, combining it with a map provides precise navigation and location tracking.

How do I find north using a compass?

1. Hold the compass level.
2. Turn yourself and the compass until the red end of the needle aligns with the orienting arrow.
3. The direction of travel arrow now points to magnetic north.

What are some common mistakes when using a compass?

– Not holding the compass level, causing inaccurate readings.

– Allowing the compass to be near metal or electronic devices.

– Forgetting to adjust for magnetic declination, leading to off-course navigation.

– Misreading the bearing or confusing the north on the compass with the map’s north.

How do I use a compass for orienteering?

Orienteering involves using a compass and map to navigate from point to point in diverse and usually unfamiliar terrain:

1. Understand the map’s scale, symbols, and contours.

2. Set bearings between checkpoints.

3. Use the compass to orient the map and yourself to the north.

4. Navigate using both the compass for direction and the map for terrain recognition.

Remember, practice makes perfect. Start with simple exercises in familiar areas to build your skills before venturing into unfamiliar territory.

Leave No Trace and Beyond

Heaps of trash on WA trail hike

A record 181.1 million Americans (58.6%) participated in outdoor recreation, according to the Outdoor Foundation’s 2025 Outdoor Participation Report [1]. Leave No Trace guides responsibly enjoy and protect the outdoors, whether hiking, car camping, backpacking, or even at home.

I am an outdoor enthusiast who took the Leave No Trace course [2], read multiple research articles, blogs, and books, and spent well over 15+ hours researching not only Leave No Trace but also general environmental philosophy, wilderness management theory, and various outdoor ethic recommendations that extend beyond the Leave No Trace seven principles. 

Leave No Trace Seven Principles

#1 Plan Ahead And Prepare

  • Keep your group small to reduce impact.
  • Know the rules and get a permit if needed.
  • Check the weather forecast.
  • Bring appropriate gear and clothing.
  • Test gear at home.
  • Schedule arrival 2 hours before sunset to set up camp.

#2 Travel And Camp On Durable Surfaces

  • Hike on designated trails.
  • Hiking in the middle of the trail, including walking through mud puddles to reduce trail widening.
  • Walk spread out on barren dirt, gravel, sand, rock, snow, or leaf litter in low or no-trail areas.
  • Avoid stepping on living soil or cryptobiotic crusts found especially in desert areas.
  • Avoid trail shortcuts.
  • Find a great campsite,preferably at an established site.

#3 Dispose Of Waste Properly

  • Biodegradable soap doesn’t mean it’s good for fish or plants.
  • Wash dishes in a large container rather than directly in streams or lakes.
  • Strain out food bits from dishwater or gray water and dispose of them in the trash rather than on the ground or in the water.
  • If disposal facilities aren’t available, scatter gray water widely >200 ft from the camp and water sources. This includes using your camp shower.
  • Pee on durable surfaces such as rocks or pine duff >200ft from trails, campsites, high-traffic areas, and water sources [3].
  • Poop in an outhouse if available; otherwise, dig a hole and bury at least 200ft from the trail, camp, or water sources.
  • Always pack out or bury dog poop.
  • Pack out all trash, including peels, diapers, and eggshells. 

#4 Leave What You Find

  • Take a picture instead of taking it or carving it.
  • Leave all rocks, flowers, and other natural objects.
  • Leave archaeological objects, including arrowheads, as these are federally protected [4].
  • Follow all foraging guidelines [5].
  • Leave areas as you find them, including avoiding digging trenches or building forts.
  • Clean outdoor gear before and after your trip to reduce invasive species.

#5 Minimize Campfire Impacts

  • Use stoves for cooking.
  • Check regulations before starting a campfire.
  • Never leave a fire unattended.
  • Supervise young children around the fire.
  • Only use sticks that are dead, down, and can be broken by hand without tools.
  • Put out fires safely by letting it burn down, drowning it with water, stirring it up, and checking it for heat.

#6 Respect Wildlife

  • Observe wildlife from a distance.
  • Never feed wildlife.
  • Store food and trash securely using a bear canister.
  • Take binoculars or zoom lenses for maximum wildlife enjoyment.
  • Avoid wildlife during sensitive times: mating, nesting, raising young, or winter.

#7 Be Considerate Of Others

  • Share the trail with uphill hikers with the right of way and use caution when passing.
  • Reduce noise, both your voice and music, while camping and hiking.
  • Limit entertainment and communication tech while outdoors.
  • Show respect and care for all – No shaming/bullying. 
  • Be a responsible pet owner who knows the rules, picks up poop, and keeps your pet on a leash.
  • Make outdoors welcoming, especially for minority communities.
    • Often with a fear of outdoor spaces due to historical reasons
    • Often with a lack of knowledge of how to get to and enjoy the outdoors
    • Often experience a lack of an invitation to get outdoors (but they don’t need permission either)
    • For more info, check out Black Folks CampToo.

Beyond Leave No Trace 

Photo: ©Kamchatka via Canva.com

Leaving no trace is truly impossible. The Leave No Trace Center, the US Forest Service, and various other groups have advocated for going beyond Leave No Trace by moving towards a sustainable lifestyle every day [6,7,8,9]. Here are several tips recommended by various experts to go beyond Leave No Trace towards a better, more sustainable outdoor lifestyle: 

#8 Beyond Leave Not Trace Starts at Home

  • Reuse equipment and clothing if possible.
  • Buy only the necessary equipment and clothing you need.
  • Minimize single-use items.
  • Take care of your equipment and clothing, including properly caring for your sleeping bag, boots, tent, backpack, and other outdoor gear.
  • Use responsible geo-tagging on social media.
  • Make responsible food and lifestyle consumption choices.
  • Decrease overall energy consumption, including the use of alternative transportation. 
  • Get involved in outdoor communities advocating for sustainability.
  • Start today in your green space areas.

#9 Beyond Leave No Trace Continues with a Broader Awareness

  • Learn about the ecological processes and conditions in the areas you both live and enjoy outdoors,such as the prior indigenous cultures, local weather patterns, geology, native plants, trees, and animals.
  • Learn basic primitive woodcraft skills such as reading animal tracks, foraging, building a survival shelter, and other basic survival skills.
  • Learn about the manufacturing process of your outdoor gear and clothing.
  • Seek and find hidden, local outdoor opportunities, reducing travel while increasing your opportunities for outdoor enjoyment.

Enjoy your connection to the outdoors in a responsible, sustainable way. Take your first step and look at our guide on finding a great campsite.

FAQs

Are there any additional educational resources or programs for ‘Leave No Trace’?

There are tons of educational resources and programs available for those interested in learning more about ‘Leave No Trace,’ including:

– The Sourcesbelow are a great start.
– Workshops and training courses offered by the Leave No Trace Center for Outdoor Ethics.
– Educational materials provided by the National Parks Service and other outdoor organizations.

What does ‘Beyond Leave No Trace’ mean?

‘Beyond Leave No Trace’ refers to practices that minimize your impact and contribute positively to the environment. This includes:

– Picking up litter left by others.
– Participating in conservation efforts.
– Educating yourself and others about sustainable practices

Can ‘Leave No Trace’ principles be applied in everyday life?

Yes, ‘Leave No Trace’ principles can be applied daily by:

– Reducing waste and recycling.
– Conserving water and energy.
– Supporting conservation efforts and organizations

Sources

  1. 2022 Outdoor Participation Trends Report by the Outdoor Foundation
  2. Leave No Trace 101 Course
  3. How to Pee Outside Leave No Trace Center via Youtube
  4. Archeological Resources Protection by U.S. Forest Service
  5. How to Leave No Trace When Foraging by Leave No Trace Center
  6. Beyond Leave No Trace by Gregory Simon and Peter Alagona
  7. Managing for Wilderness Experiences in the 21st Century by Joseph Roggenbuck
  8. Leaving ‘Leave No Trace’ Behind by Green Teacher
  9. ASAP 2.0: As Sustainable as Possible by multiple authors at Northland College

How to Choose a Campsite: a Guide to Finding the Perfect Camping Spot

how to choose a campsite feature image

Choosing a great campsite can make or break your camping trip. Throughout my almost four decades of camping, I’ve tent-camped, hammocked, backpacked, and car-camped in horrible, incredible, and many in-between campsites. Good situational awareness is key when choosing a campsite. Here are five guidelines with tips and questions to help you choose a good campsite. 

1) Plan ahead.

Photo: ©Yaroslav Shuraev via Canva.com

What do you want out of your camping experience?

Do you primarily want a good night’s sleep? Do you primarily want to have a great time with friends? Maybe you value a convenient campsite near the bathrooms, showers, or other amenities. Or maybe you want to go fishing, off-roading, or to the beach. Cost is usually at least a secondary consideration. What you want is personal and likely a combination of factors. 

Gather good intel.

Identify a few potential campsite options.

Identify a few possible campsite options within a certain distance in case you want to stop sooner or go on further if you’re stuck in traffic, get a late start, or find that you have the energy to go further than originally expected. 

Test gear at home before your trip. 

Testing your gear helps you visualize the size of your tent, RV, or hammock in a camp spot. It also helps you estimate how long setup and breakdown takes. Gear testing at home helps you determine what pieces and parts you have or are missing. 

Schedule your arrival at least 2 hours before sunset. 

You can set up camp in the dark, but I guarantee you’ll enjoy the camping experience much more if you get there in the daylight to avoid campsite surprises such as scenery, pests, and gear difficulties. 

2) Look for a comfortable campsite.

Photo: ©Vitalalp via Canva.com

Look for a level area. 

Are you comfortable lying down? This is critical for a good night’s sleep. Consider a slightly inclined spot for water drainage in case of rain. Avoid low campsites to avoid dampness and coldness.

Look for plush, dry ground.

Is the ground soft and porous? Look preferably for a campsite covered in natural materials like leaves, moss, or sand to help with sleep padding, warmth, and water drainage.  

Look for enough space and seating

Is the campsite roomy enough for sleeping, cooking, sitting, and cleanup areas? I value finding comfortable sitting places, such as logs or rocks nearby. Sometimes this isn’t always possible, but you at least need enough space to set up your tent. 

Look for water. 

Is there water nearby for hydration and cooking? Camp near a water source but not too close. Camp at least 200 feet away from streams and lakes to reduce the impact on the native plants and animals. Camping near a water source is sometimes not an option.  

Look for privacy. 

Is the campsite generally peaceful, and is there anything that might attract animals or people to your campsite? Avoid camping on either human or animal trails. Also, look for some separation between campsites. Privacy is not always available.  

Look for naturally protected and sheltered areas.

Is the campsite exposed to sun, wind, and potential rain? Forested campsites are often best for natural shelter. Also, consider the sun exposure. Morning sun and afternoon shade usually work best. Practically, this means southeastern-facing campsites are preferable. 

3) Look for a safe campsite.

Photo: ©Oleksandr Filon via Canva.com

Anticipate potential rain and wind.

Would this campsite be a good location in a storm? 

  • Avoid low campsite spots and potential puddle areas. 
  • Anticipate how rain might drain out of your campsite. 
  • Know the potential weak spots of your camping gear.
  • Consider the wind direction and forecast. 
  • Look at the bent of trees, which may indicate the direction of common wind. 
  • Utilize forested or boulder areas for weather protection. 
  • Try to place the foot of the tent facing the wind so that the wind blows over your tent instead of catching it. 

Avoid potential deadfall.

Are any dead trees, limbs, or loose rocks above or nearby? Look up and around.Situational awareness is critical to avoiding widow-makers. 

Avoid low spots.

Does it look like a puddle was here? Low spots are cold and potentially wet. Try to find a campsite with higher ground that is not exposed. 

Avoid pests and poisonous plants.

Is there evidence of animal droppings, food bits, ants, or other bugs?There’s nothing worse than setting up camp in a beautiful spot only to find you’re sitting on an ant nest. Pests looking for food, including mice, rats, raccoons, chipmunks, and bears, are attracted to larger, popular campsites. Look for animal holes or nests nearby. Be aware of poisonous plants in your areas, especially with kids. 

Avoid danger zones.

Is this a spot at risk for a major natural disaster?Consider tides on the beach, avalanches in snowy areas, and flash floods in desert/dry areas. Use common sense to avoid exposed campsites such as high points, wide-open areas, and lone trees. 

4) Look for an environmentally friendly campsite.

Photo: ©Westhoff via Canva.com

Use established campsites when possible.

Where have others previously camped? The best campsites are found, but they are not made. Consider a campsite with durability and leave no trace principles:

  • Previous hikers, campers, or rangers have created designated spots for a reason, such as a tent platform, gravel pad, or other marked areas.
  • Keep campsites small, even with a large group. 
  • Avoid large flat areas to avoid the creation of crowded, noisy mega-sites.
  • Avoid lightly used sites, as even a single night can reverse natural recovery and potentially create an unwanted established campsite.
  • If no established campsite is available, follow Leave No Trace durable-surface guidance: prefer rock, gravel, or bare dirt; in pristine areas, disperse use and minimize trampling of vegetation; always follow local regulations. Shaded areas with non-vegetated leaf litter or flat, bare rock are also good choices. Avoid camping on broad-leaf plants or lightly used sites.

Follow the 200 ft rule.

Is the campsite at least 200 feet from the nearest water source? Both people and animals highly use these areas. Many smaller, fragile wildlife live within this 200-foot zone. Avoid camping in this zone, especially if established sites are outside this fragile impact zone. 

Consider responsible hammock camping in wilderness areas to reduce impact.

Can you use a hammock here? My favorite way to wilderness camp for over a decade is with a hammock. You can also be part of the solution to reduce impact while enjoying the outdoors. Hammocks reduce your environmental footprint if used correctly [1]. They have the added bonus of making campsite selection much easier. Uneven, rocky, root-covered, muddy ground with tall weeds and sticks everywhere is no longer a concern. 

5) Look for a beautiful campsite.

Photo: ©alsem via Canva.com

A good campsite is often not the most beautiful. If a beautiful spot is a priority, you might have to consider reasonable compromises. Nothing is wrong with wanting that awe-inspiring view or a campsite that feels just right!

Start dreaming of your next ideal campsite. What does it look like? Then, put together your ultimate camping gear list or start planning delicious camping meals.

FAQ

What is the best age to go camping with kids?

Camping can be a fun and rewarding experience for people of all ages as long as you are prepared and comfortable. However, some factors that may influence your decision are the type of camping, the location, the season, the amenities, and the activities available.

What should I consider when camping with infants and toddlers?

Babies are somewhat easier to camp with if you keep them warm or cool, depending on the weather. You may want to choose a campground with amenities like water, electricity, and camp showers or camp close to home in case of emergencies. Also, babies and toddlers can be fussy, especially when tired, so camping in a trailer or RV might work better than a tent.

Camping with toddlers can be challenging, as they may be curious and adventurous but also prone to eating stuff they shouldn’t or wandering off. You may want to find a campsite with grassy or sandy areas or bring a playpen or a play tent for them. Avoid campsites near water, cliffs, or other hazards, and keep an eye on them at all times.

What about camping with preschoolers and elementary-age kids?

This is a great age to start camping, as they can enjoy nature and learn new skills. You may want to involve them in the planning and packing process and let them help with simple tasks like setting up the tent or collecting firewood. You may also want some fun outdoor activities ready for them, like hiking, fishing, or playing games.

How about camping with older kids and teens?

Camping can be more adventurous and exciting with older kids and teens, as they can explore new places and try new things. You may want to choose a campsite that offers more challenging outdoor activities, like backpacking, canoeing, or rock climbing. You may also want to give them some independence and responsibility, like letting them choose their tent or cook their meal.